


2025/04/08Views(24178)Reviews(0)
I. Target Audience
Operations, Customer Service
II. Feature Introduction
The largest part of Amazon after-sales service is handling emails, such as buyer messages, Amazon emails, Q&A, Feedback, etc. Due to IP restrictions, these emails can only be processed in Seller Central. Moreover, there are many types of emails, but they can only be processed in one function, which is very inconvenient.
To address this issue, SellerSpace has launched the [Email Messages] feature to help sellers manage email messages from multiple stores in a unified manner. It automatically categorizes different types of emails, such as buyer messages, Amazon emails, Q&A questions, refund emails, A-to-z Guarantee claim emails, and sent emails. It also supports setting up [Email Templates], adding [Email Forbidden Words]. Additionally, you can set up new email notifications to help sellers process corresponding emails more efficiently and improve response times.
When using SellerSpace's [Email Messages] to process emails, please note: the emails you reply to are sent to the recipient through Amazon, not directly through SellerSpace. Therefore, the content of your replies must comply with Amazon's regulations.
III. Use Cases
- Replying to and processing different types of email messages
IV. Operation Guide
1. Binding a Dedicated Email Address for Your Account
To process email messages directly through SellerSpace, you need to first bind a dedicated email address for each marketplace. Dedicated email addresses are automatically generated by the system. Each store and each marketplace needs to bind its own dedicated email address separately.
The binding process is as follows:
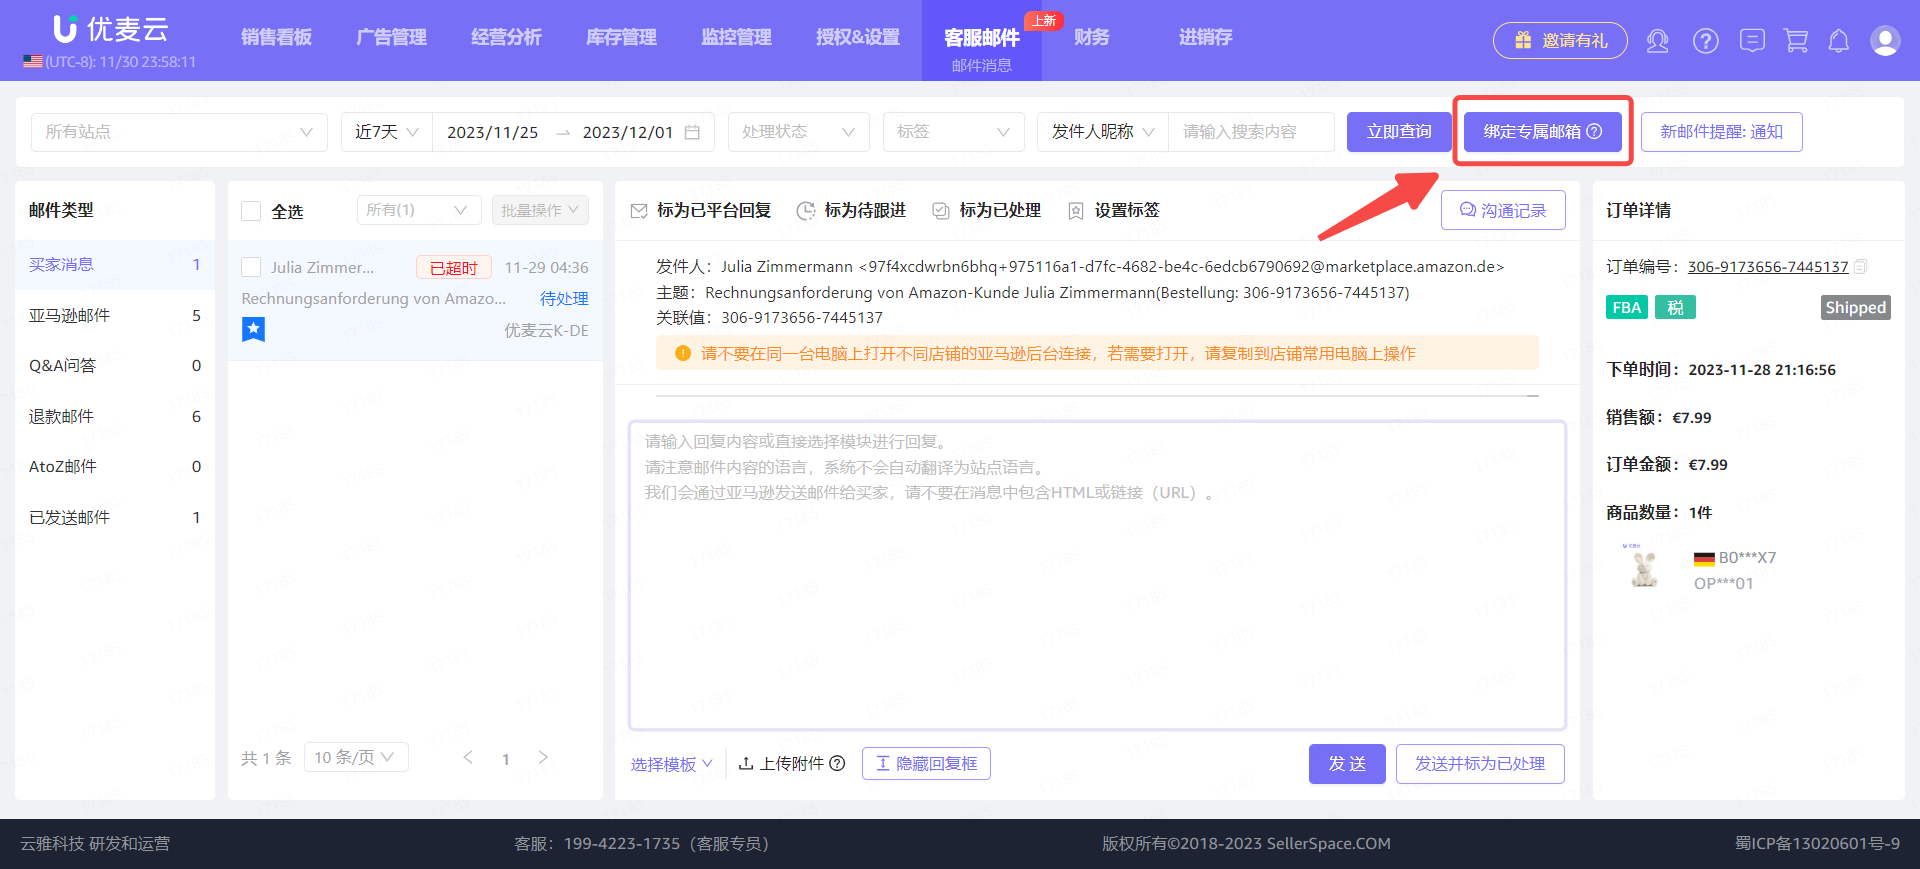
Go to the [Customer Service Email -> Email Messages] feature and click [Bind Dedicated Email Address] to enter the marketplace selection page.
 +
+
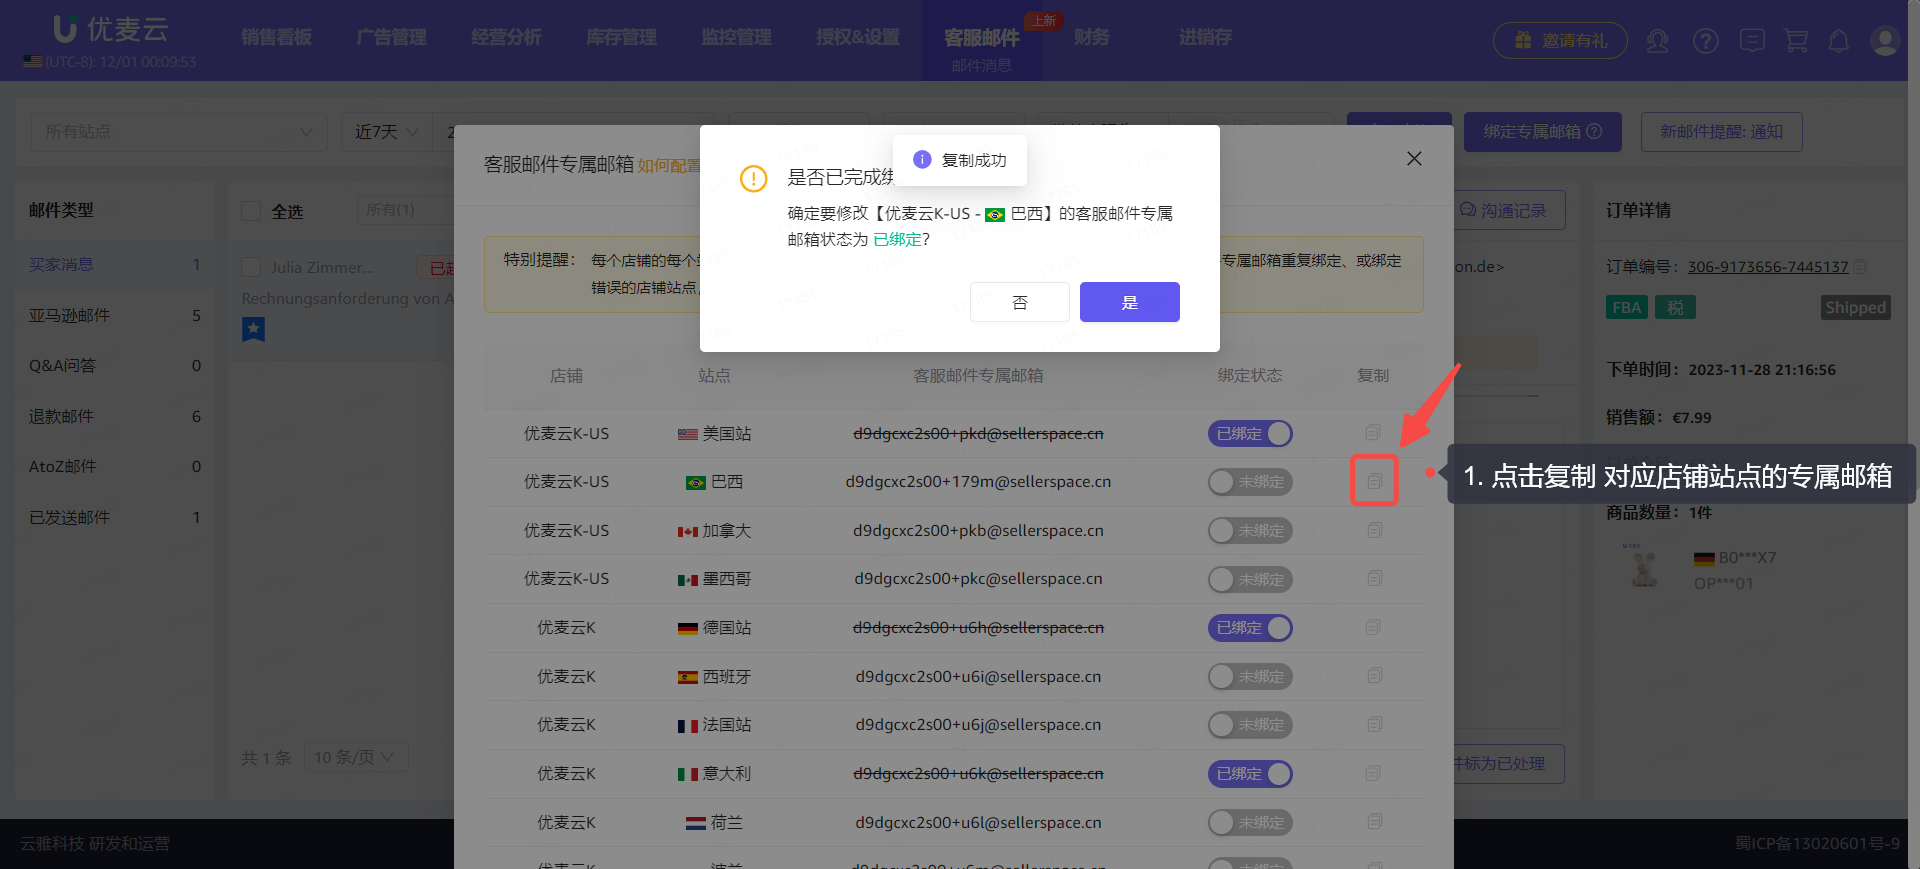
Enter the "Customer Service Dedicated Email Address" page,
Find the marketplace for which you want to bind a dedicated email address and click the [Click to Copy] button on the right to copy the dedicated email address for that marketplace. Then, go to Seller Central to complete the binding.
Important Notes!!
① Each marketplace for each store has its own dedicated email address. When binding dedicated email addresses in Seller Central, ensure they correspond one-to-one. Do not repeatedly bind dedicated email addresses or bind them to the wrong store or marketplace to avoid account association issues!!!
② After clicking copy, a confirmation binding pop-up will appear. Please do not close it. Go directly to Seller Central to bind, and after binding is complete, come back and click confirm directly to avoid confusing the marketplace to which the dedicated email address is bound.
 +
+
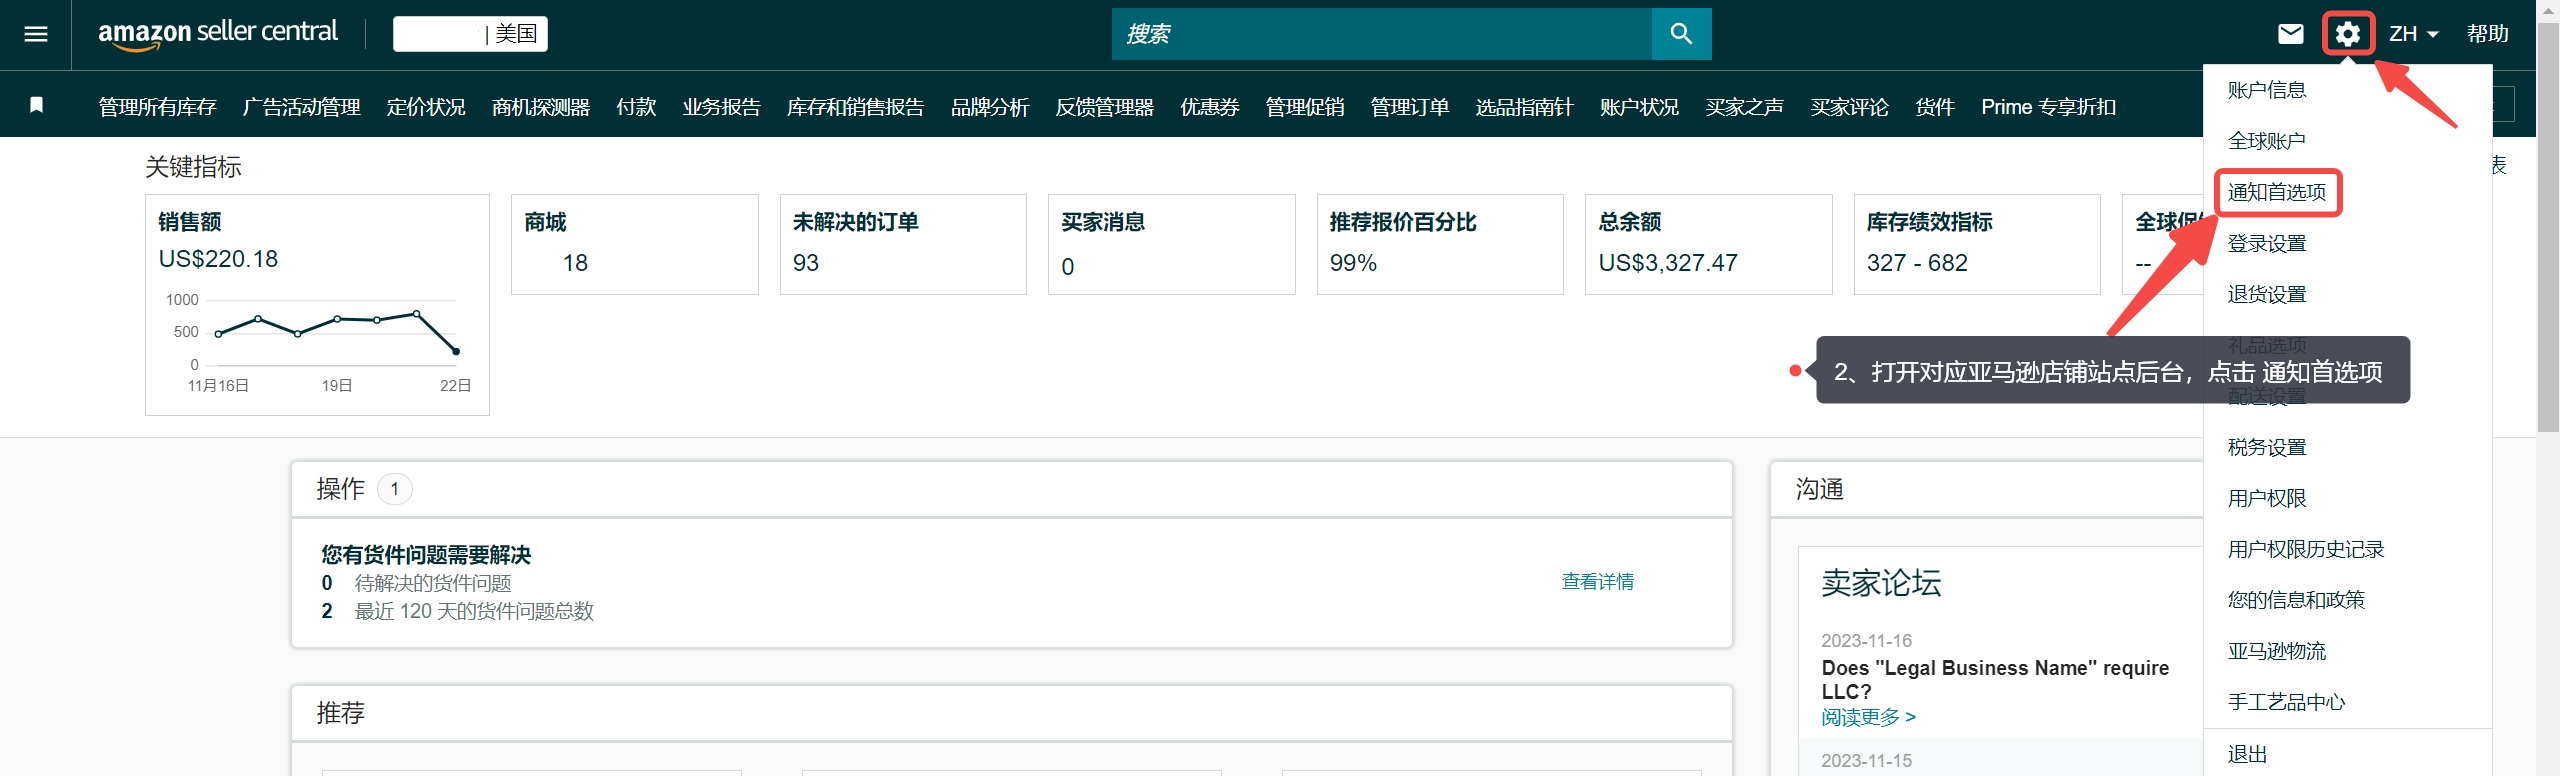
After copying the dedicated email address, go to Seller Central,
Click the settings button in the upper right corner and select [Notification Preferences] to enter the notification options settings page.
 +
+
Enter the "Notification Options" page,
Sellers need to bind the dedicated email address to the corresponding message type notifications such as Buyer Messages, Q&A Questions, Refund Emails, and A-to-z Guarantee Claim Emails.
Special Notes:
- One marketplace store can only correspond to one dedicated email address. Do not repeatedly bind email addresses or bind them to the wrong store to avoid account association issues!
- SellerSpace Buyer Messages only sync emails initiated by buyers. Buyer messages replied to by sellers in Seller Central will not be synced to SellerSpace.
- You can freely bind multiple types of message notifications in Seller Central to receive corresponding email messages.
- We will only categorize emails according to preset email types. Non-specific types of emails will be collectively summarized into the [Amazon Emails] category.
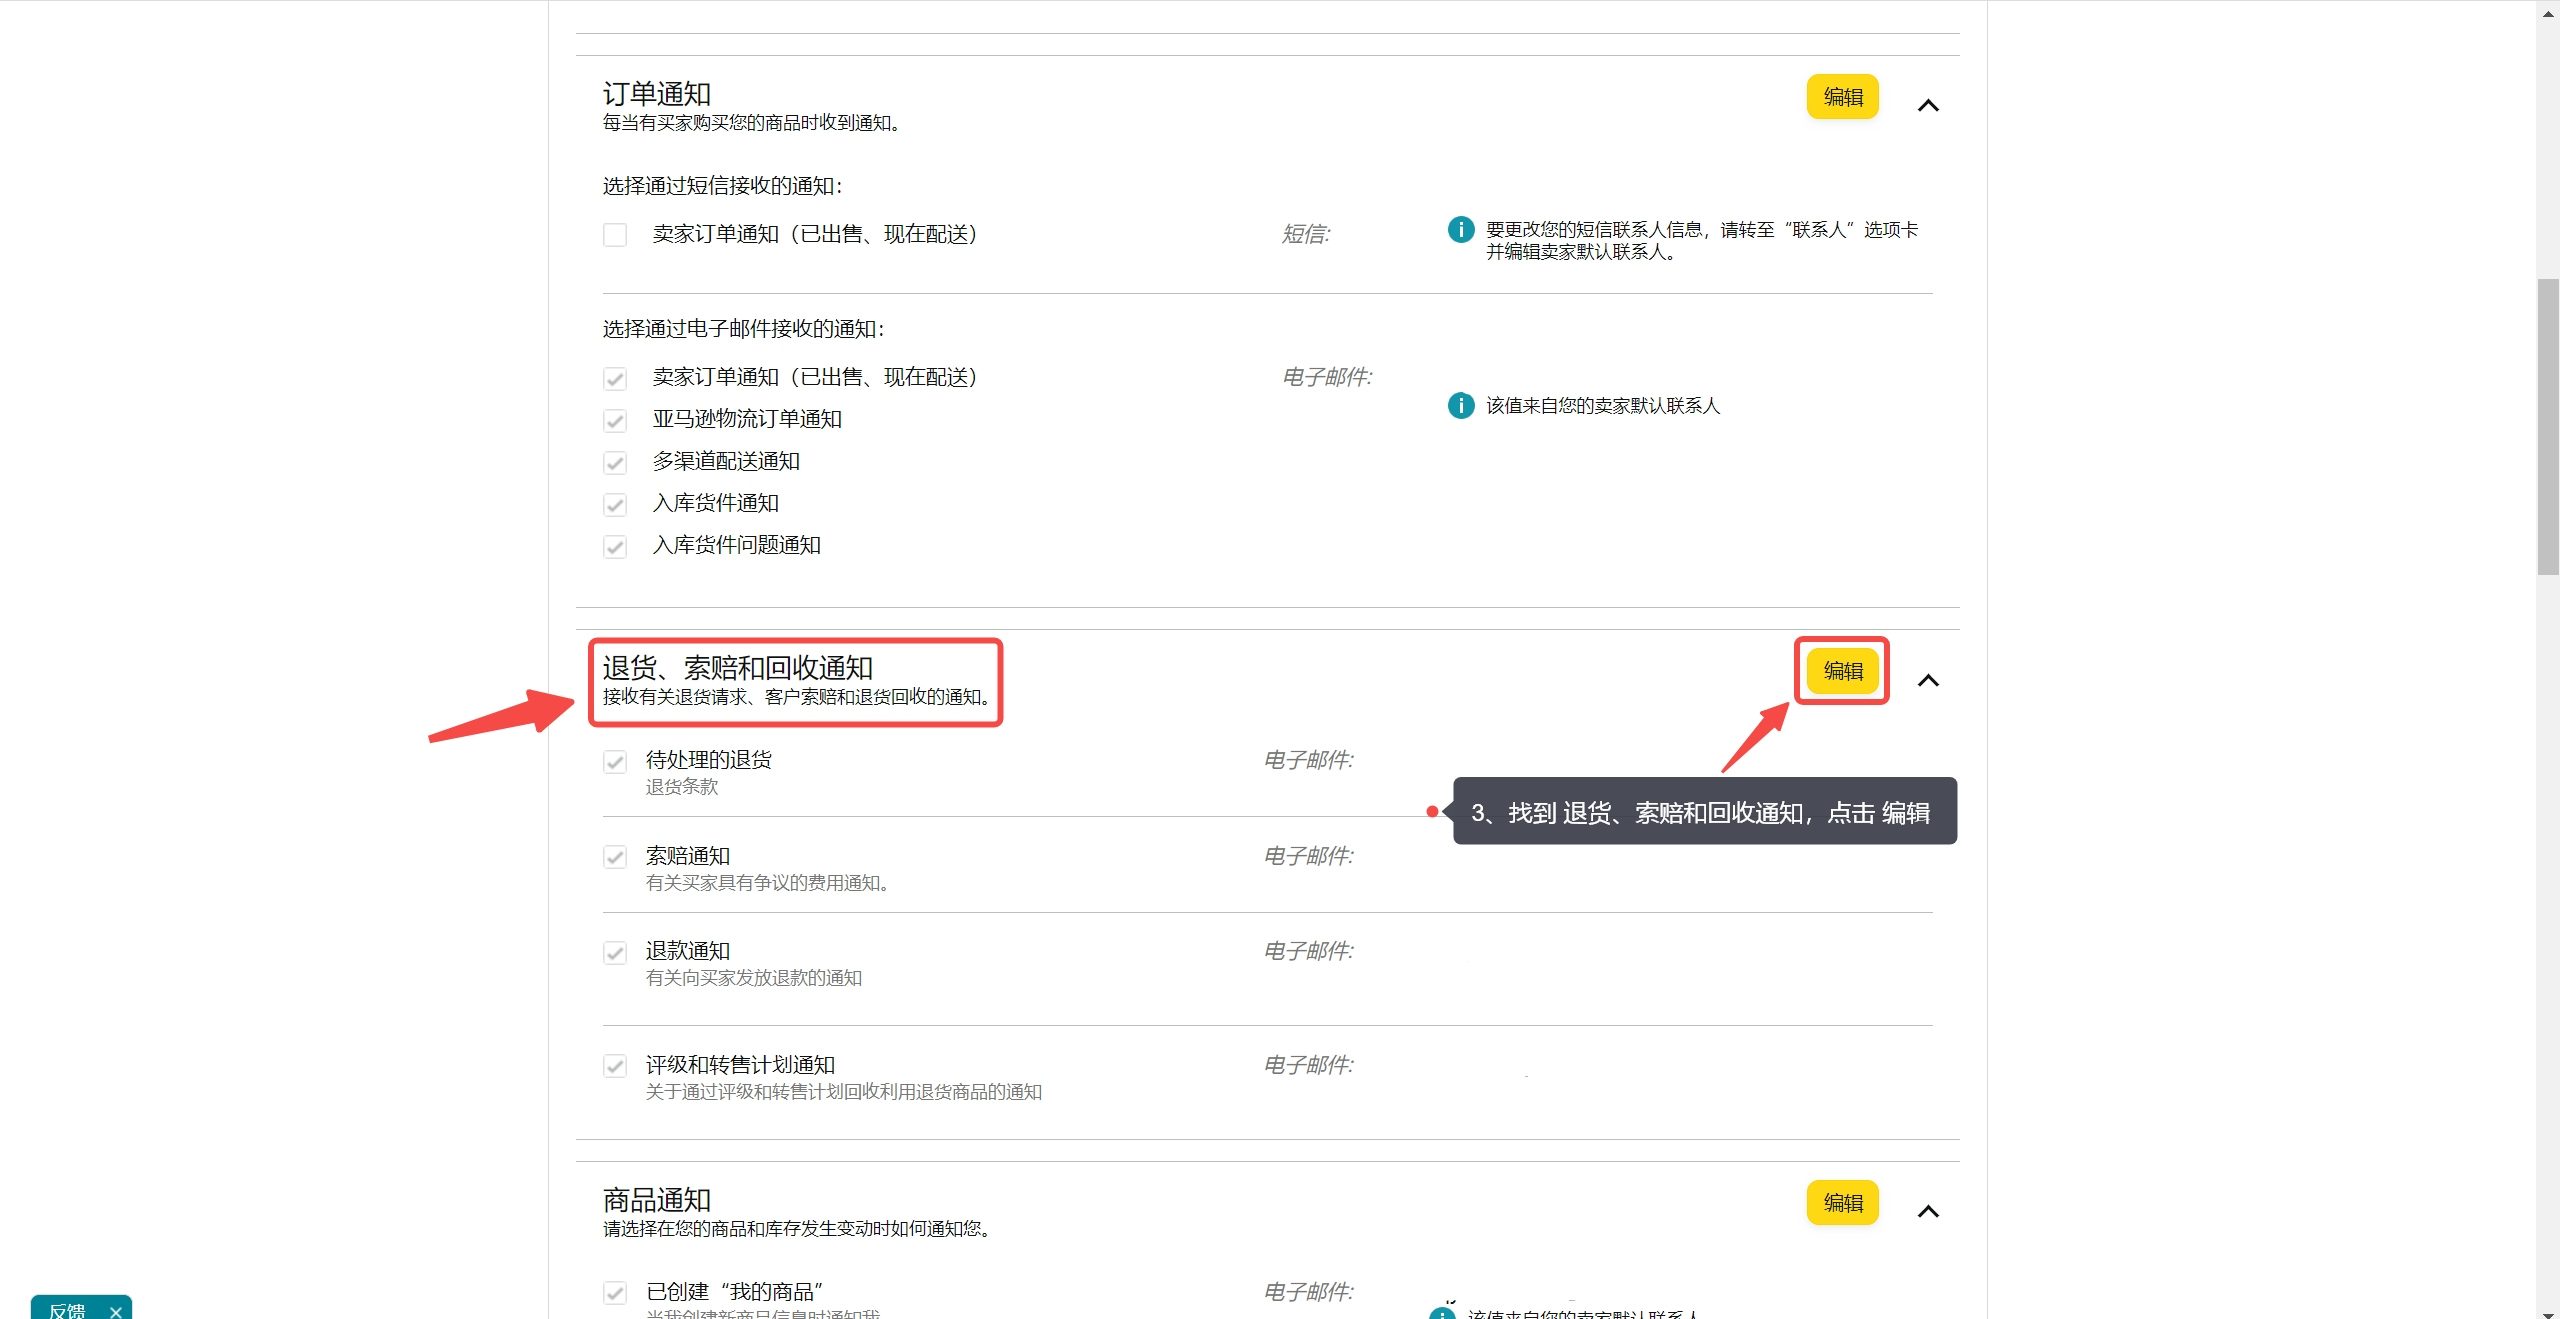
① Returns, Claims, and Chargebacks Notifications
Find [Returns, Claims, and Chargebacks Notifications], click Edit to bind the dedicated email address.
 +
+
Enter the "Edit" page,
Paste the copied dedicated email address into the [Refund Notifications] and [Claim Notifications] fields to help the system categorize refund emails;
You can bind other types according to your needs.
 +
+
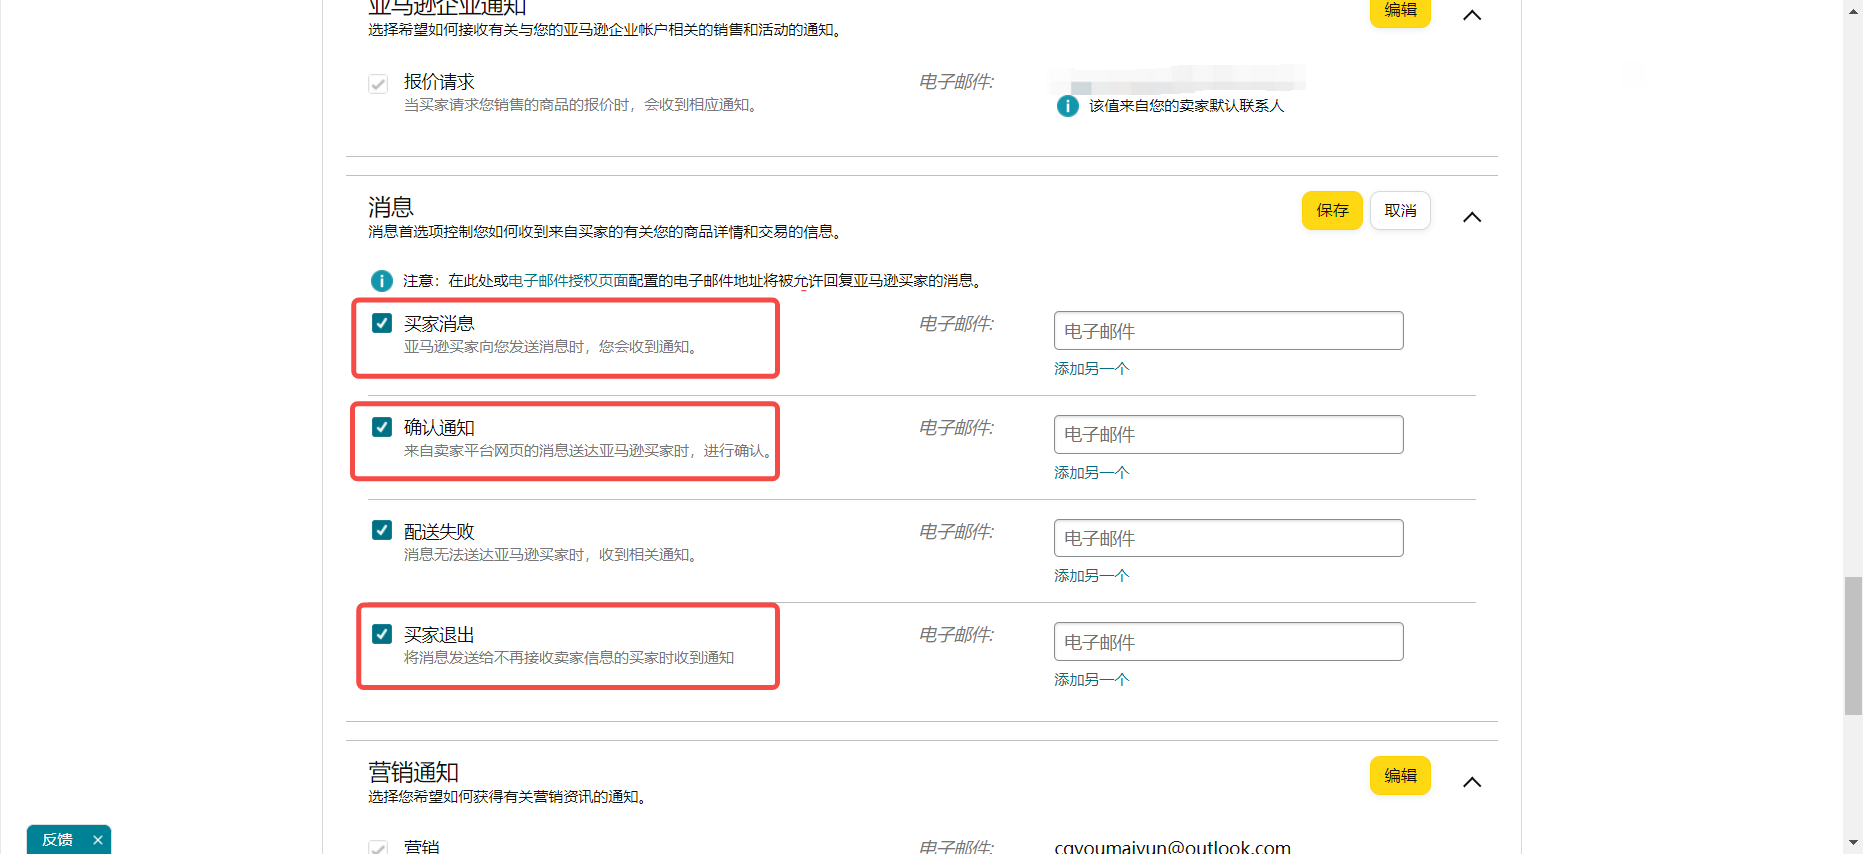
② Messages
Find [Messages], click Edit, and follow the same method to select [Buyer Messages], [Confirmation Notification], [Buyer Opt-out] to bind the dedicated email address.
 +
+
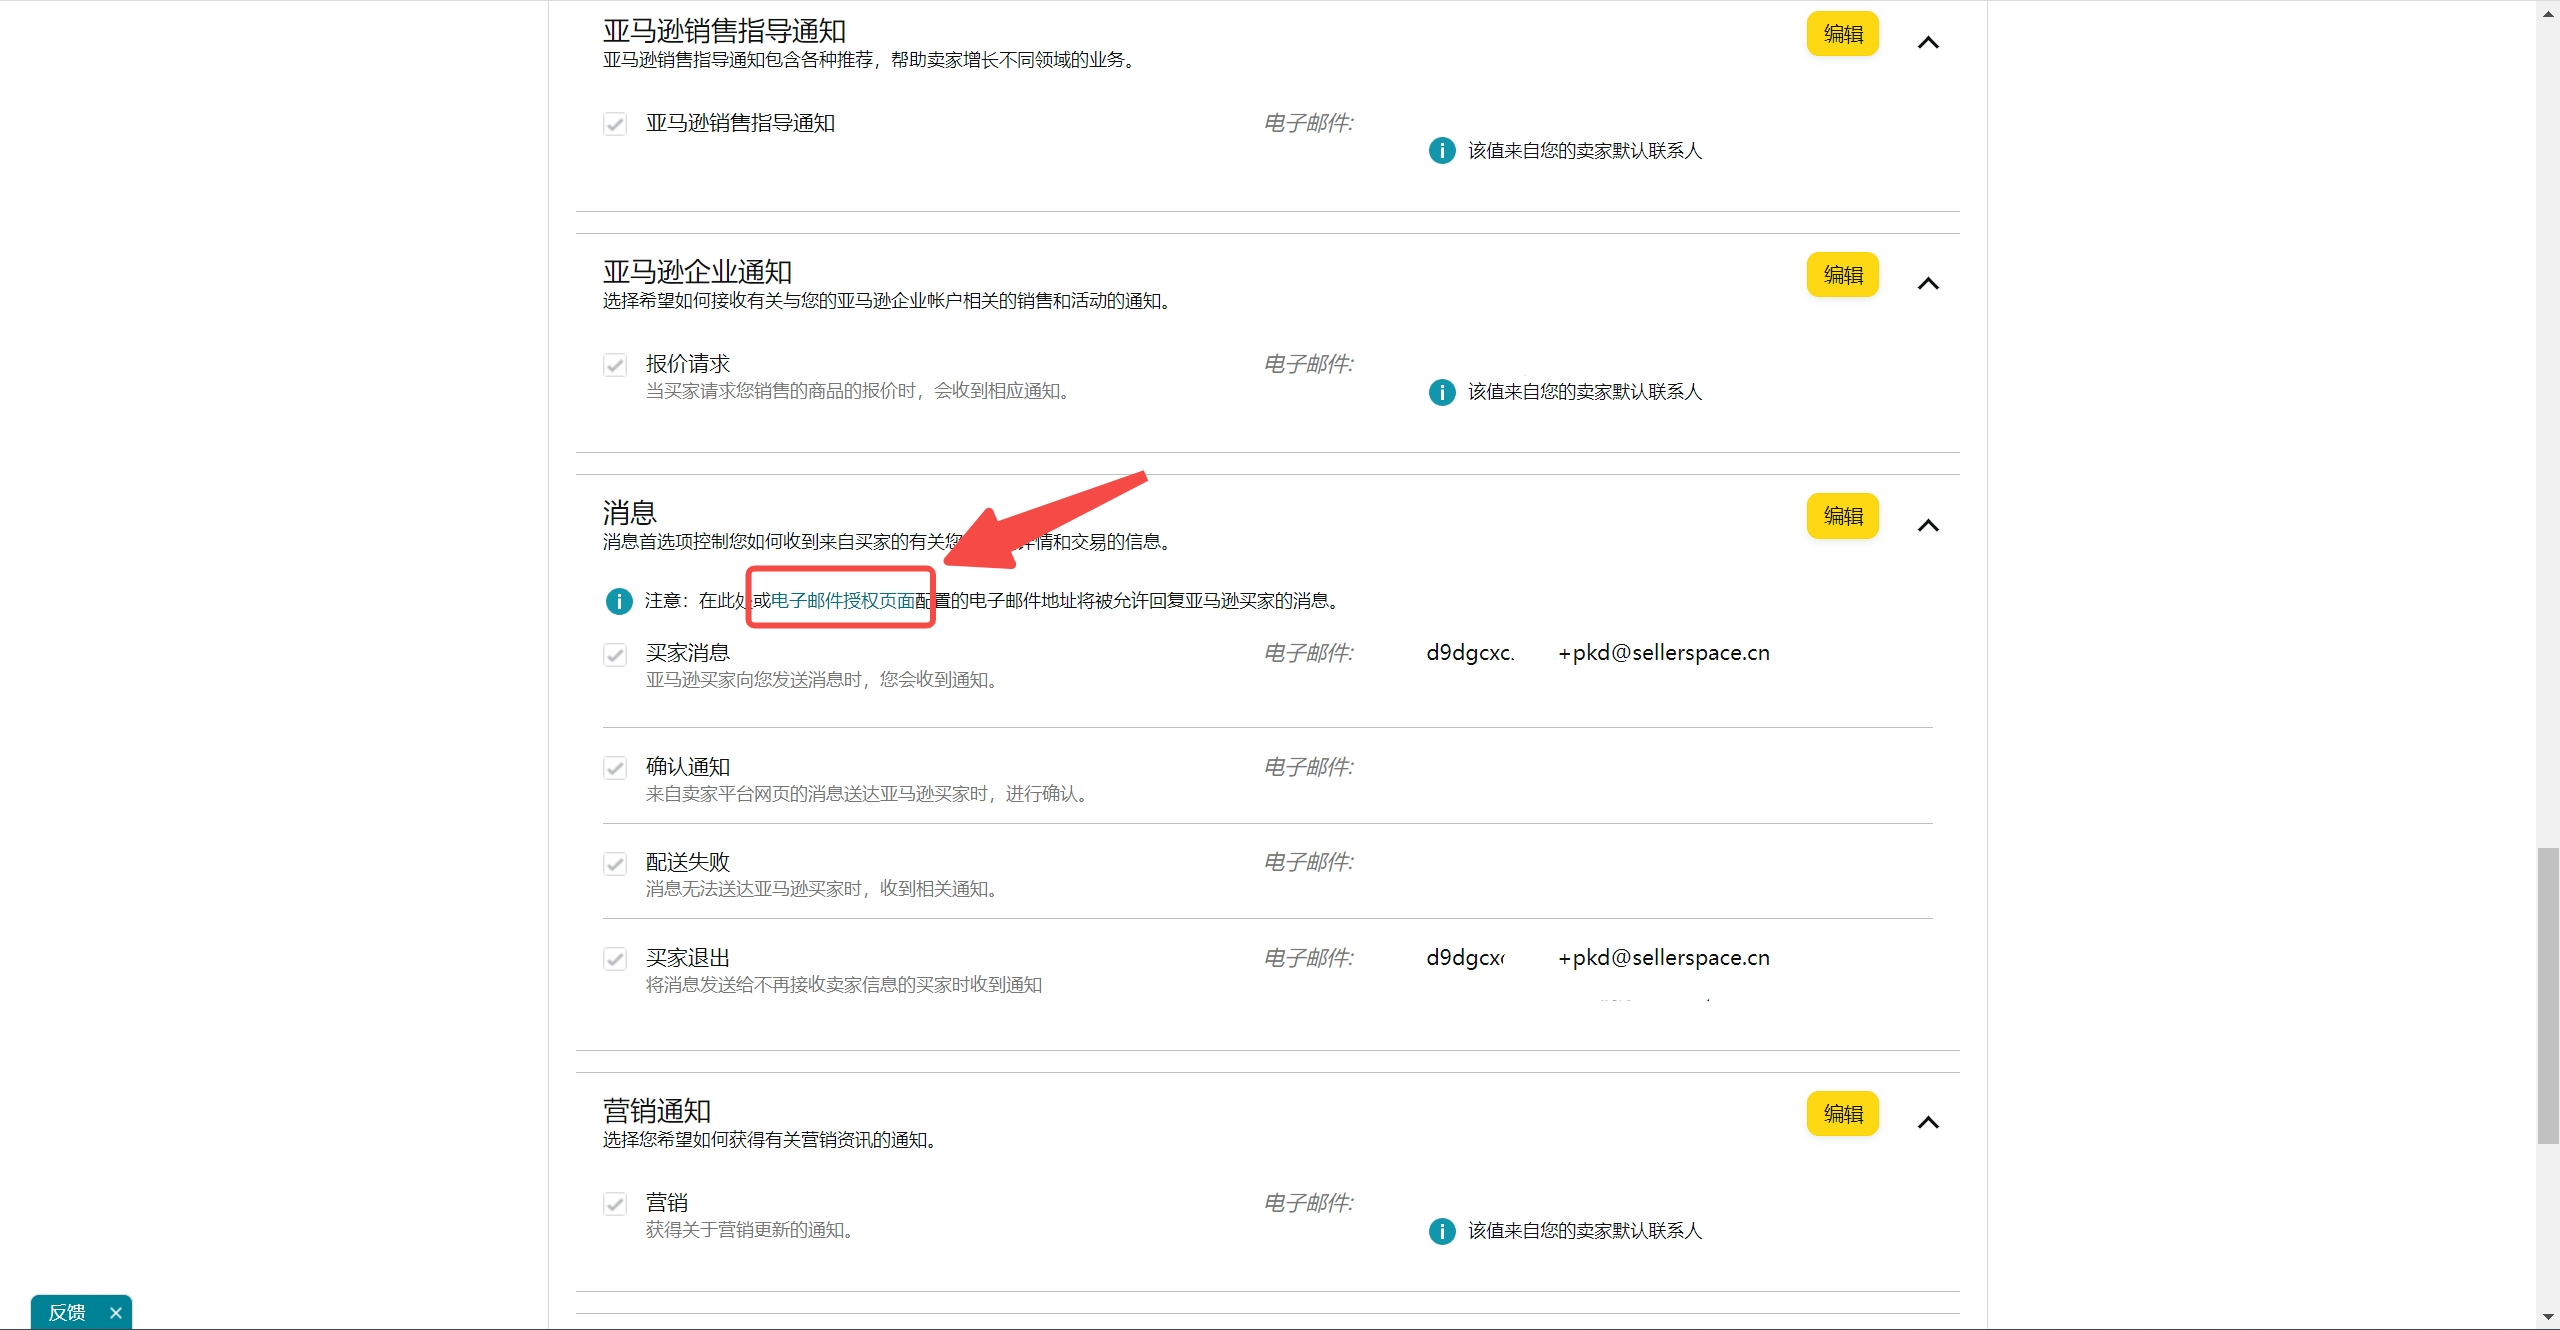
After the dedicated email address is successfully bound, in the [Messages] option field, click [Email Authorization Page] to go and confirm whether the dedicated email address is successfully bound.
 +
+
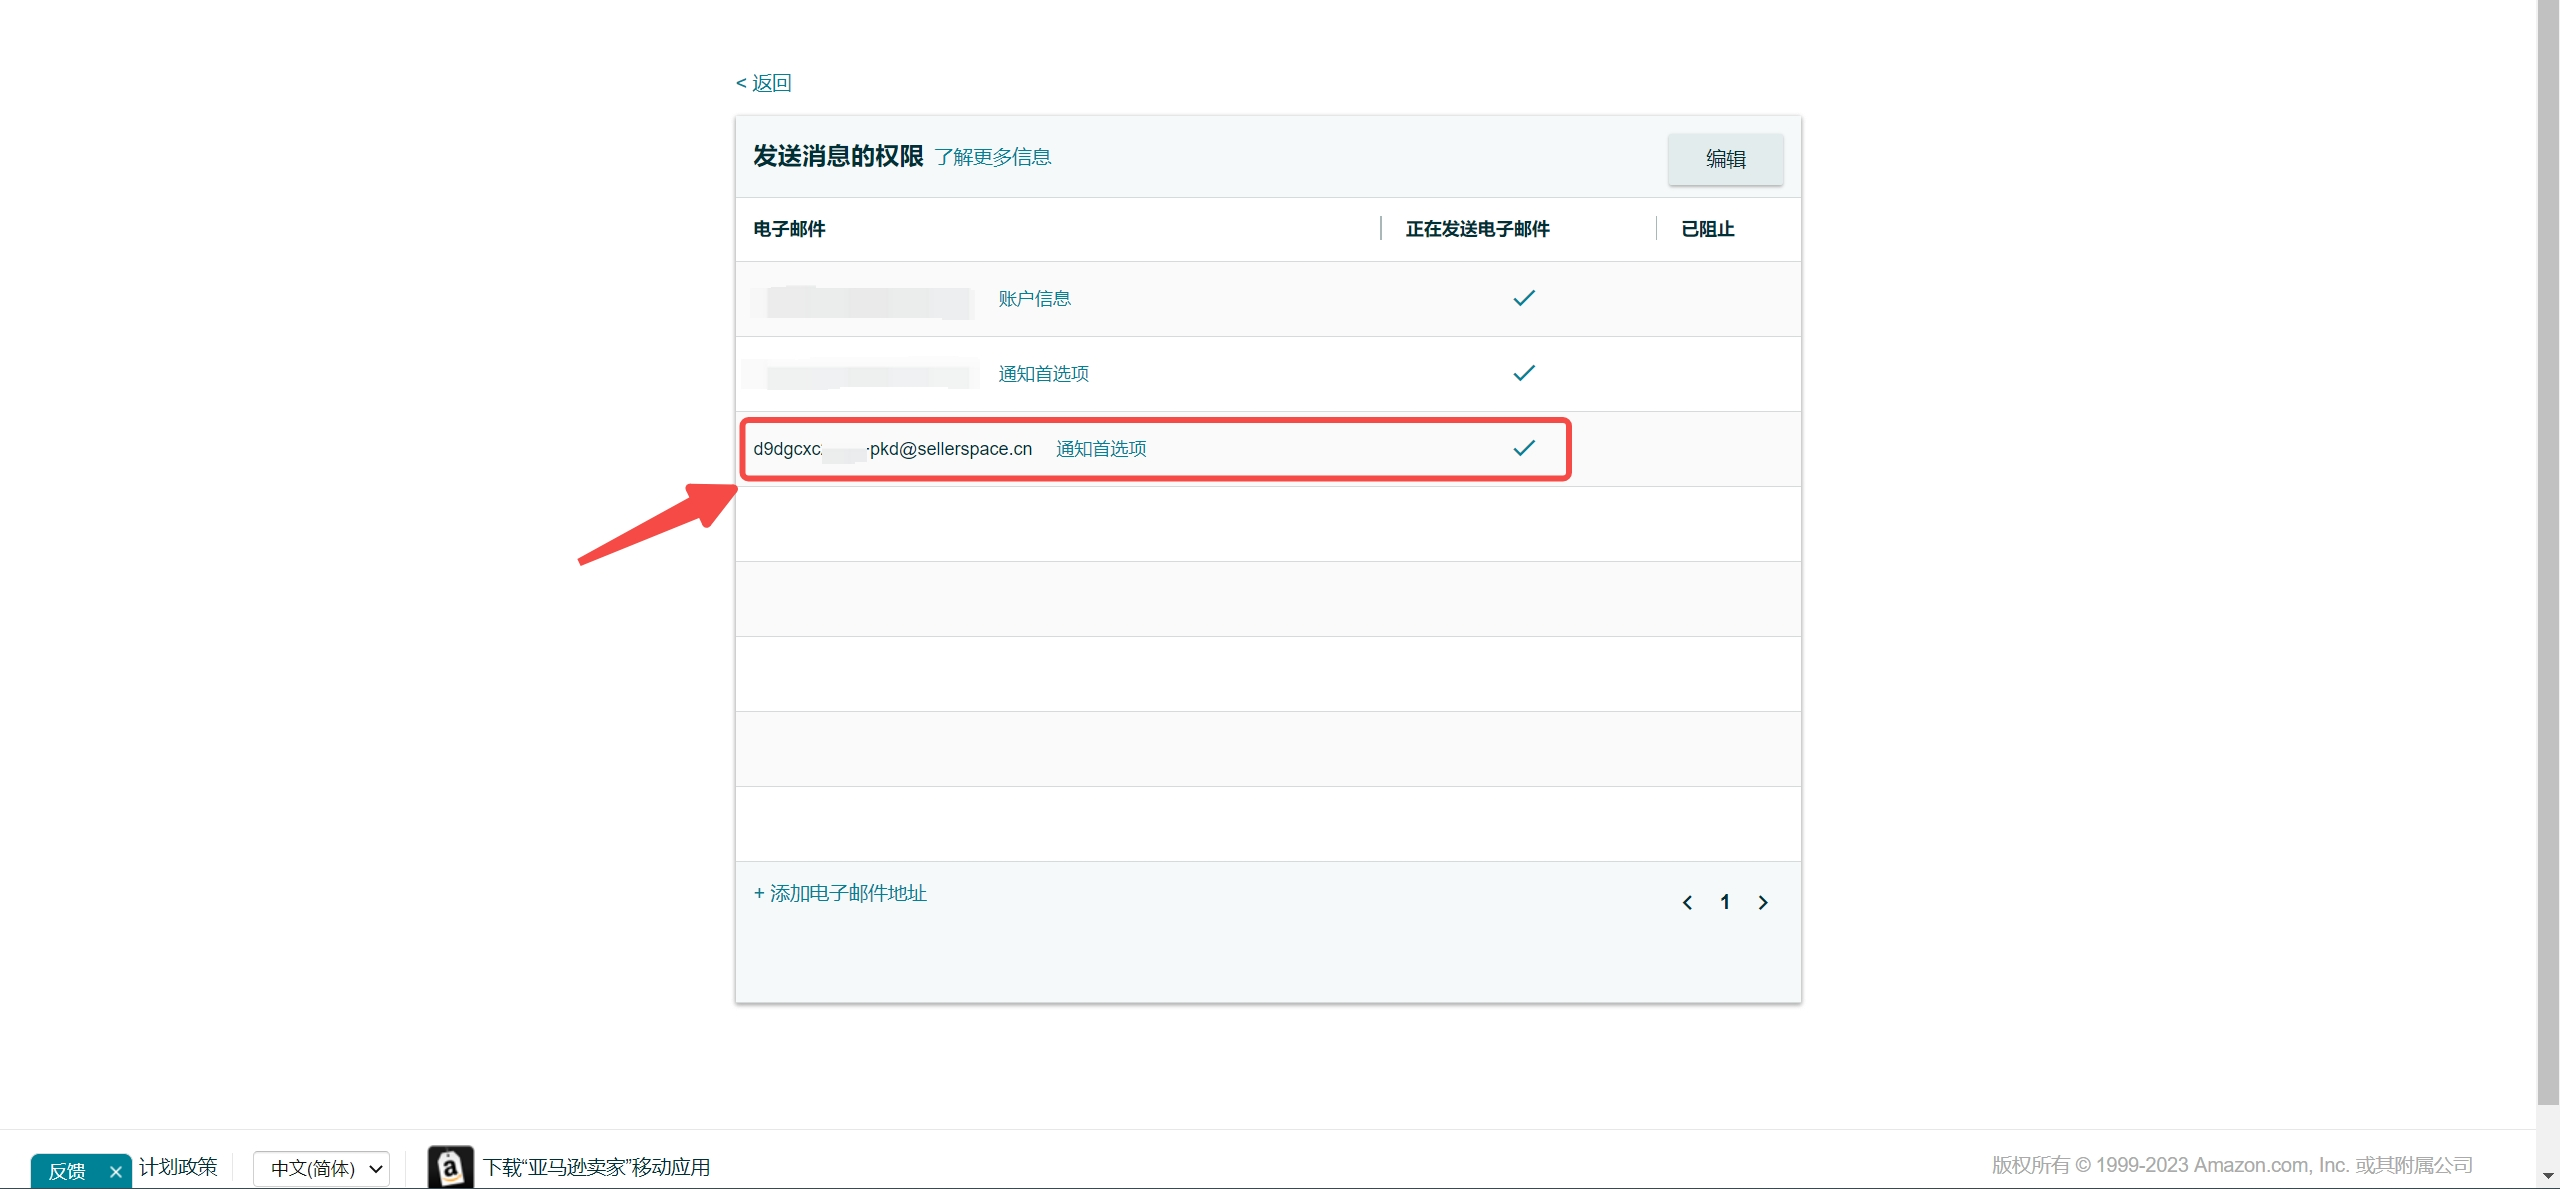
Seeing the dedicated email address we added indicates successful binding.
Note: Please do not delete the bound dedicated email address to avoid not receiving emails normally.
 +
+
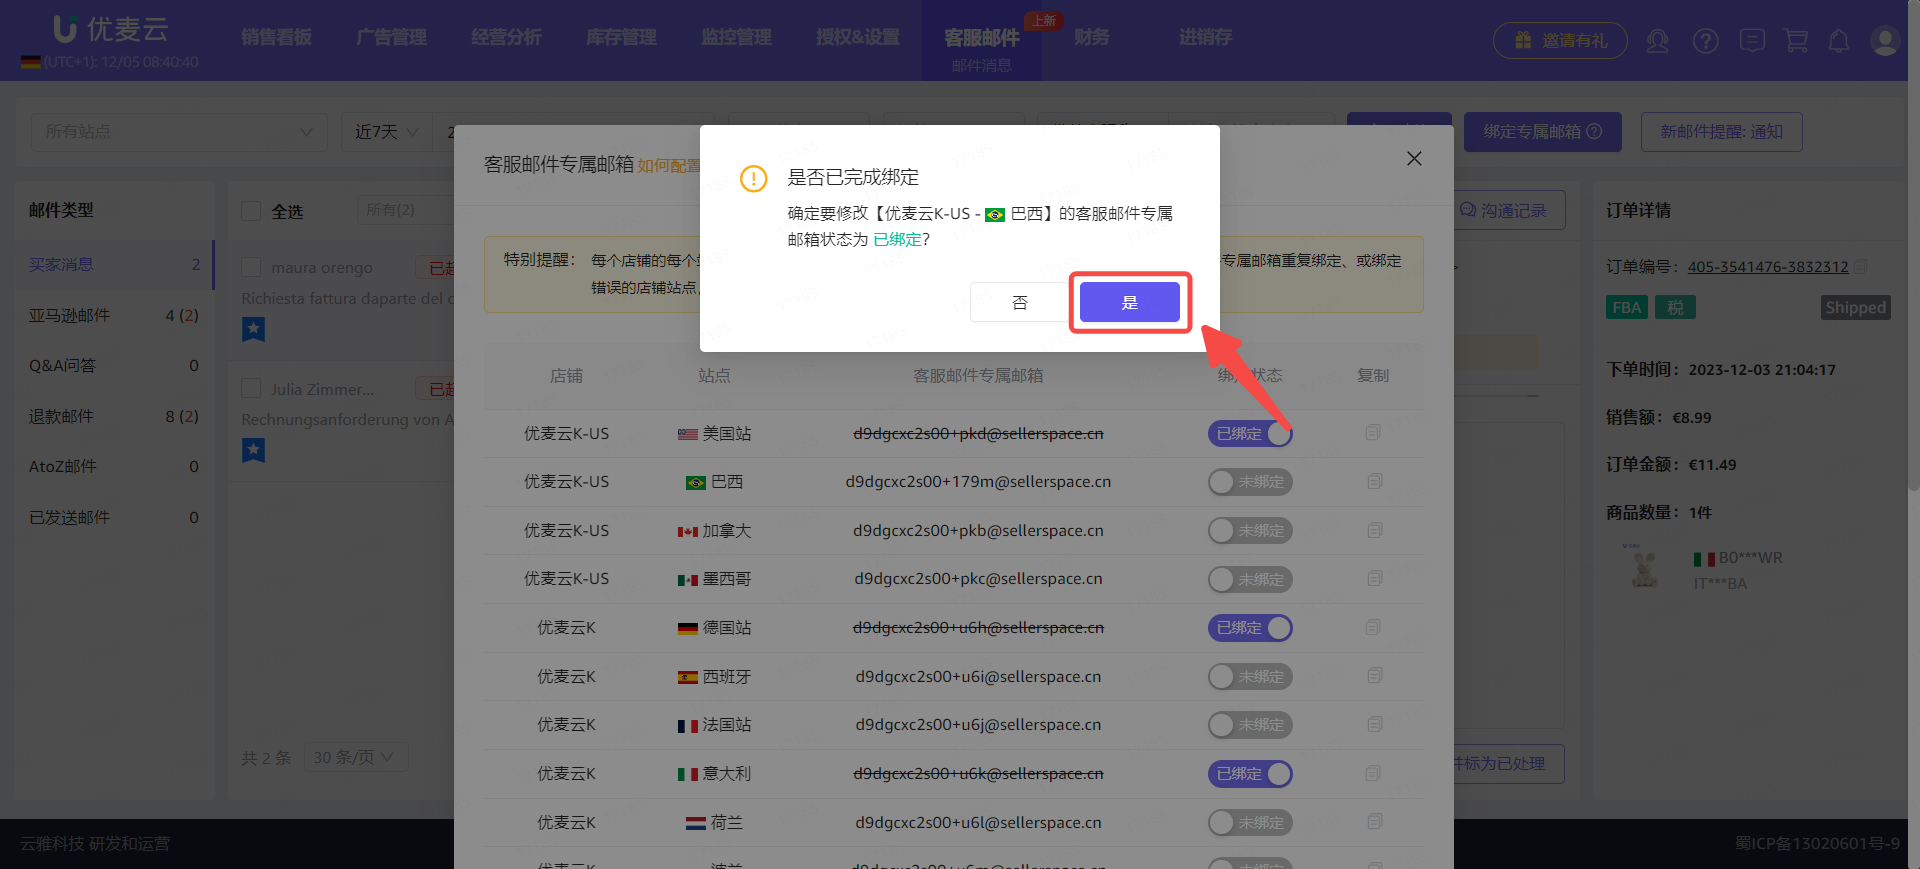
Finally, return to SellerSpace and go back to the "Customer Service Dedicated Email Address" page,
Click [Yes] to mark the email address as [Bound].
 +
+
After the dedicated email address is successfully bound, we can choose to continue with three pre-settings to use SellerSpace to process emails more efficiently.
2. Pre-setting - Create Email Templates (Optional)
Feature path: Customer Service Email -> Email Templates
Operation Guide: Click to View
3. Pre-setting - Add Email Forbidden Words (Optional)
Feature path: Customer Service Email -> Email Forbidden Words
Operation Guide: Click to View
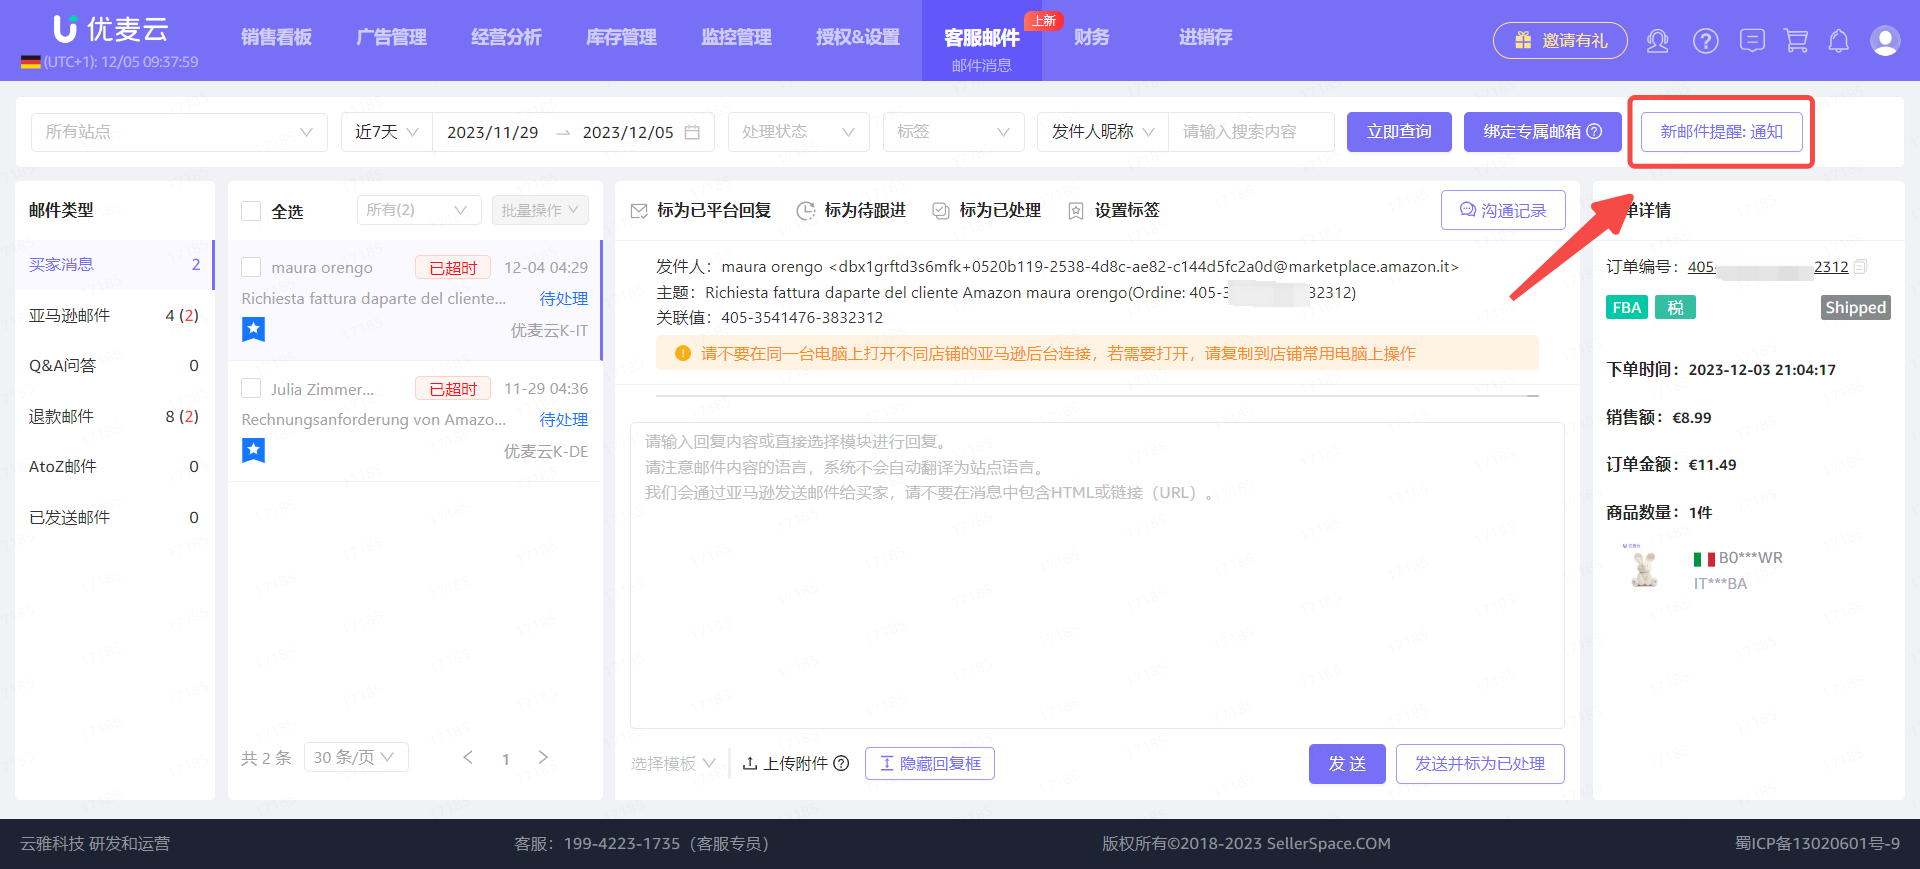
4. Pre-setting - Set Up New Email Notifications (Optional)
Before setting up, we need to ensure that WeChat is bound. Click to view how to bind WeChat
Enter the "Email Messages" feature,
Click [New Email Notification: Reminder] in the upper right corner to enter the settings page.
 +
+
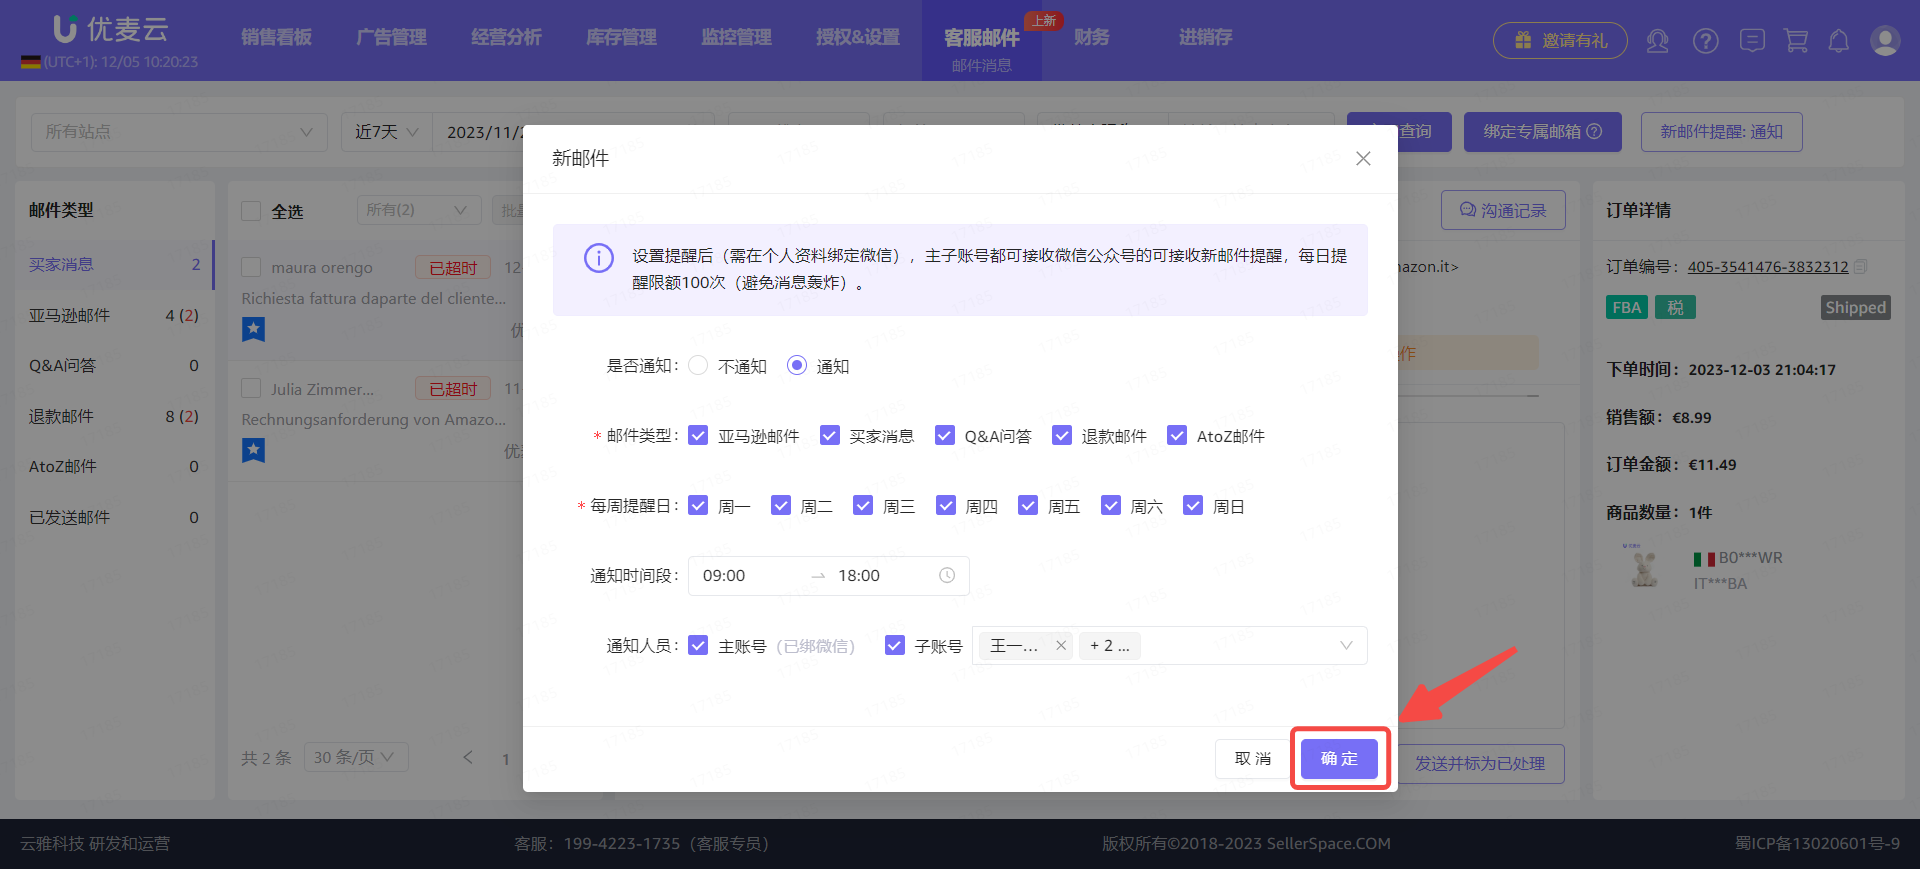
Enter the "New Email" page,
Select [Notification] and set the corresponding notification options:
- Type of email notification: Amazon Emails (all emails that are not in the other four categories), Buyer Messages, Q&A Questions, Refund Emails, A-to-z Guarantee Claim Emails.
- Days of the week to remind: Monday to Sunday.
- Notification time period: 0:00 to 24:00. Cross-day settings are supported here, such as "9:00 AM today" to "10:00 AM on the 2nd day".
- Notification personnel: Main account, corresponding sub-accounts.
 +
+
After setting up, confirm that the information is correct and click [Confirm] to save.
 +
+
5. Processing Emails - Viewing
When new emails arrive, we can directly view the email content in the [Web Version] and [Mini Program]. WeChat Mini Program: Email - Graphic Tutorial
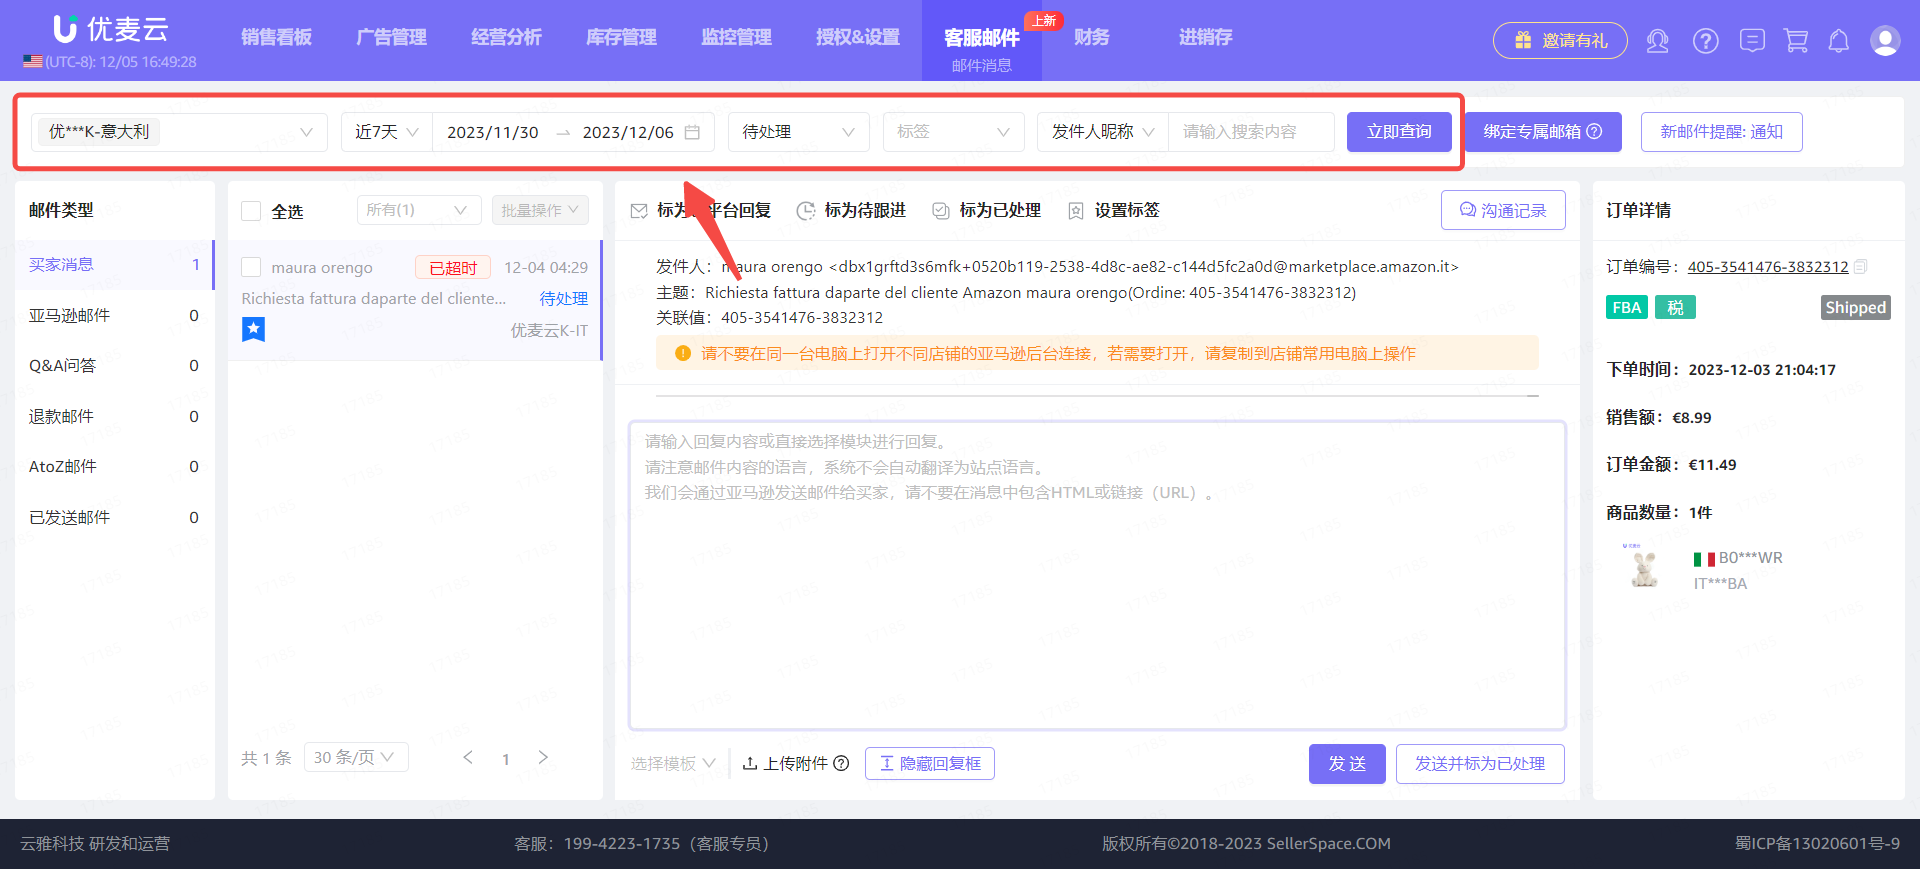
Taking viewing "SellerSpace - Italy Marketplace, Last 7 Days, Unprocessed Buyer Messages" as an example,
Through the filter bar above, select the marketplace "SellerSpace - Italy Marketplace", Time: Last 7 Days, Processing Status: Pending, and you can directly view the corresponding emails.
 +
+
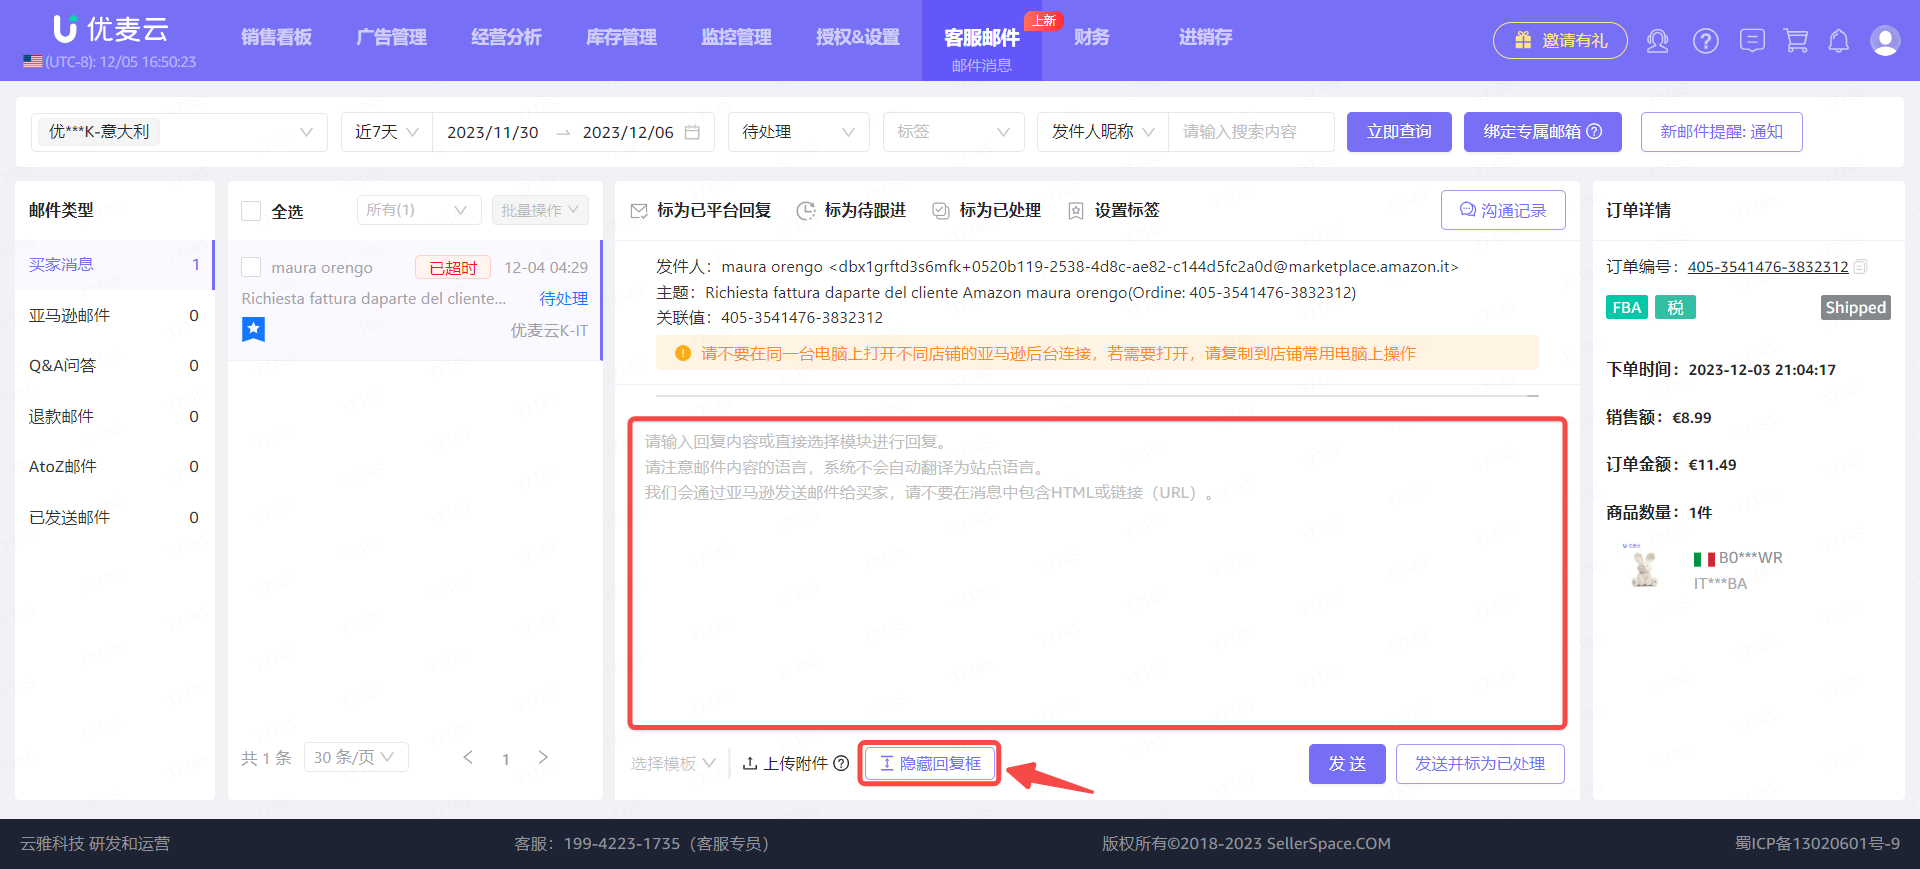
① Hide Reply Box
After finding the email, click into the email content,
The system expands the reply box by default, which may cause the reply box to obscure the email content. At this time, you can click [Hide Reply Box] below to hide it.
 +
+
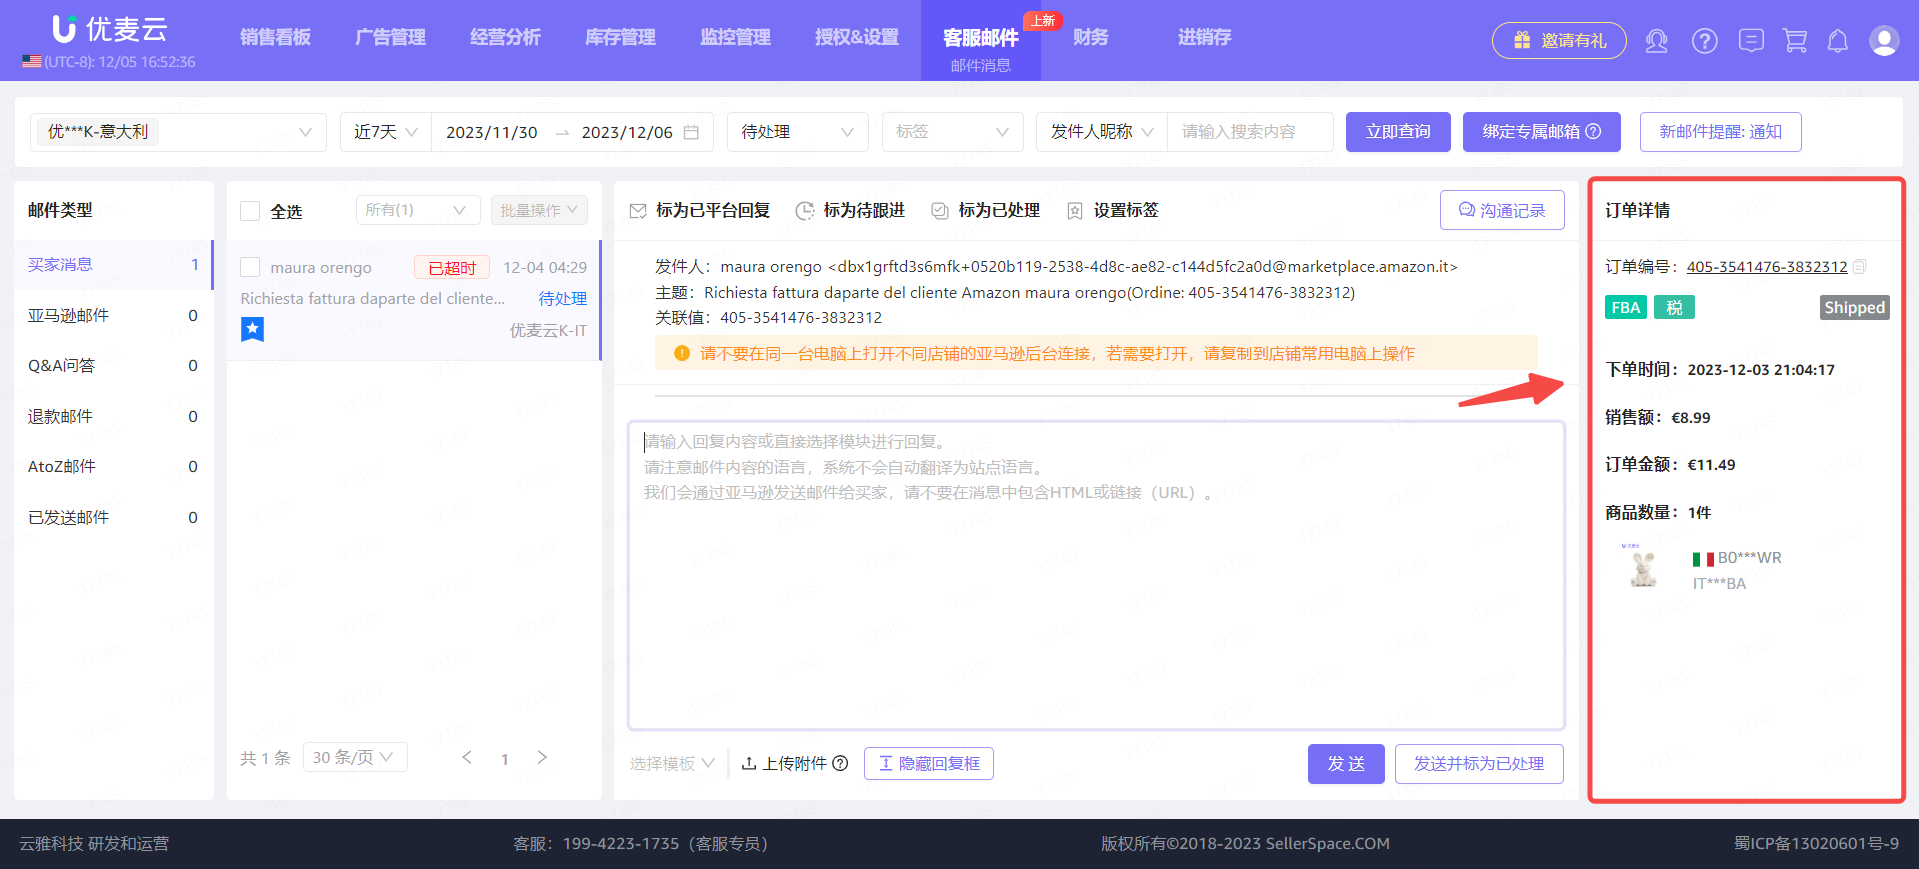
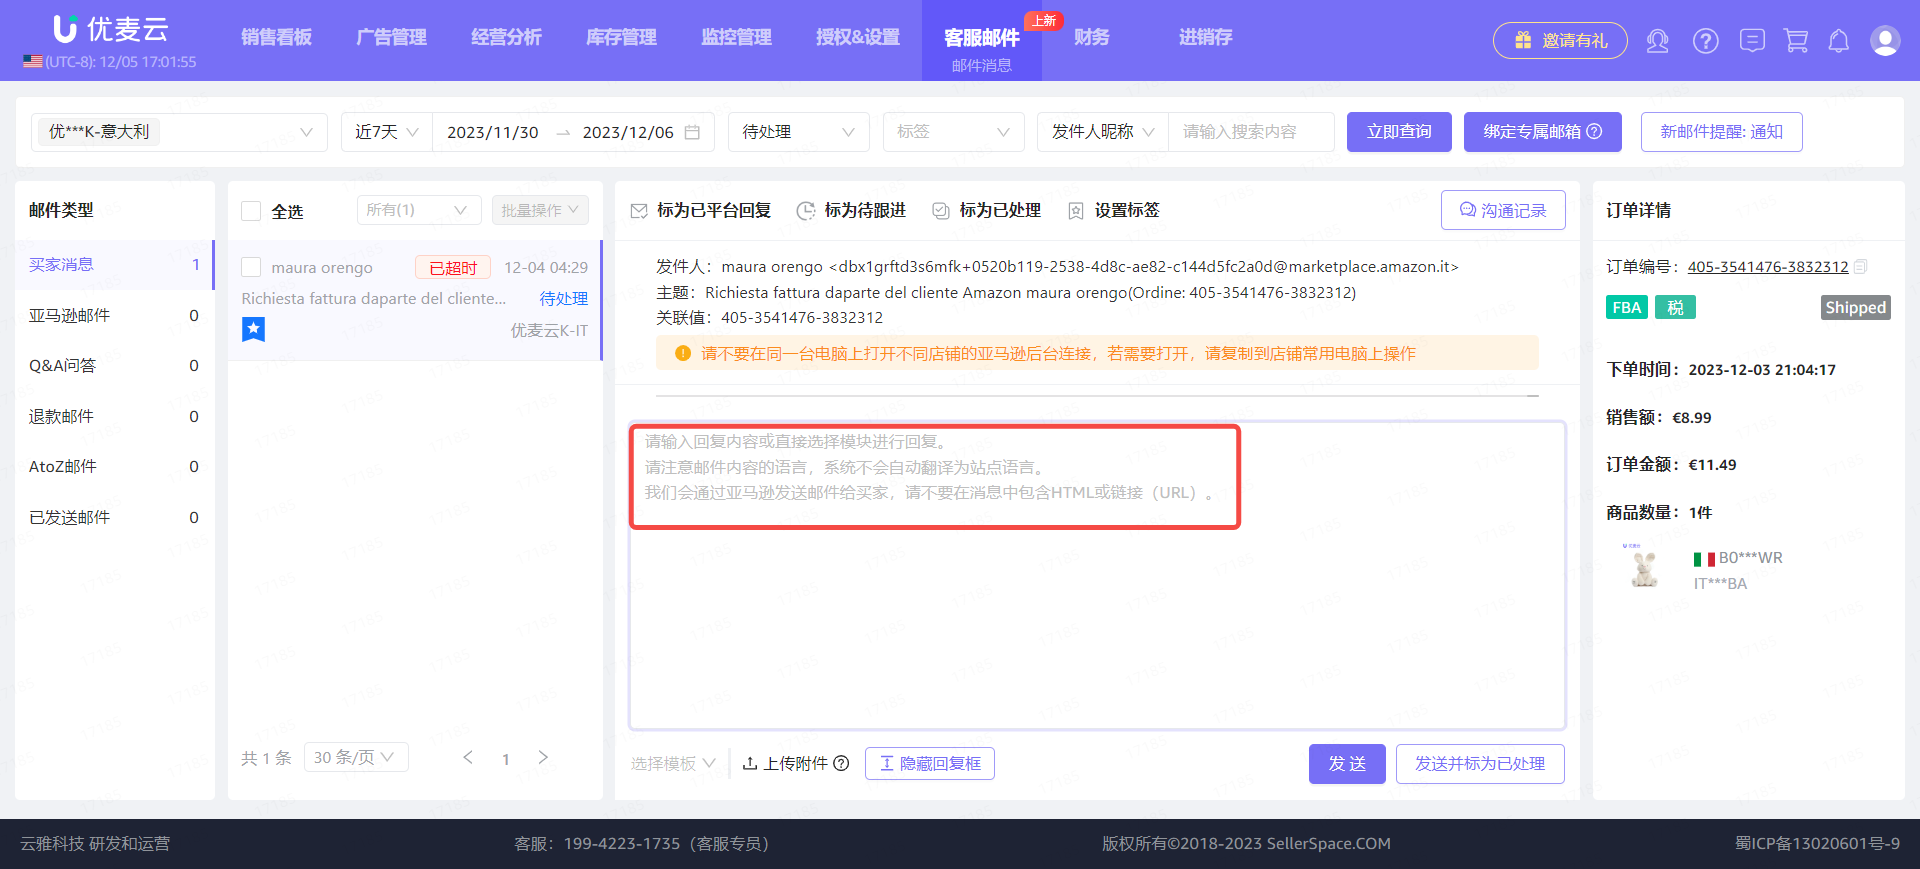
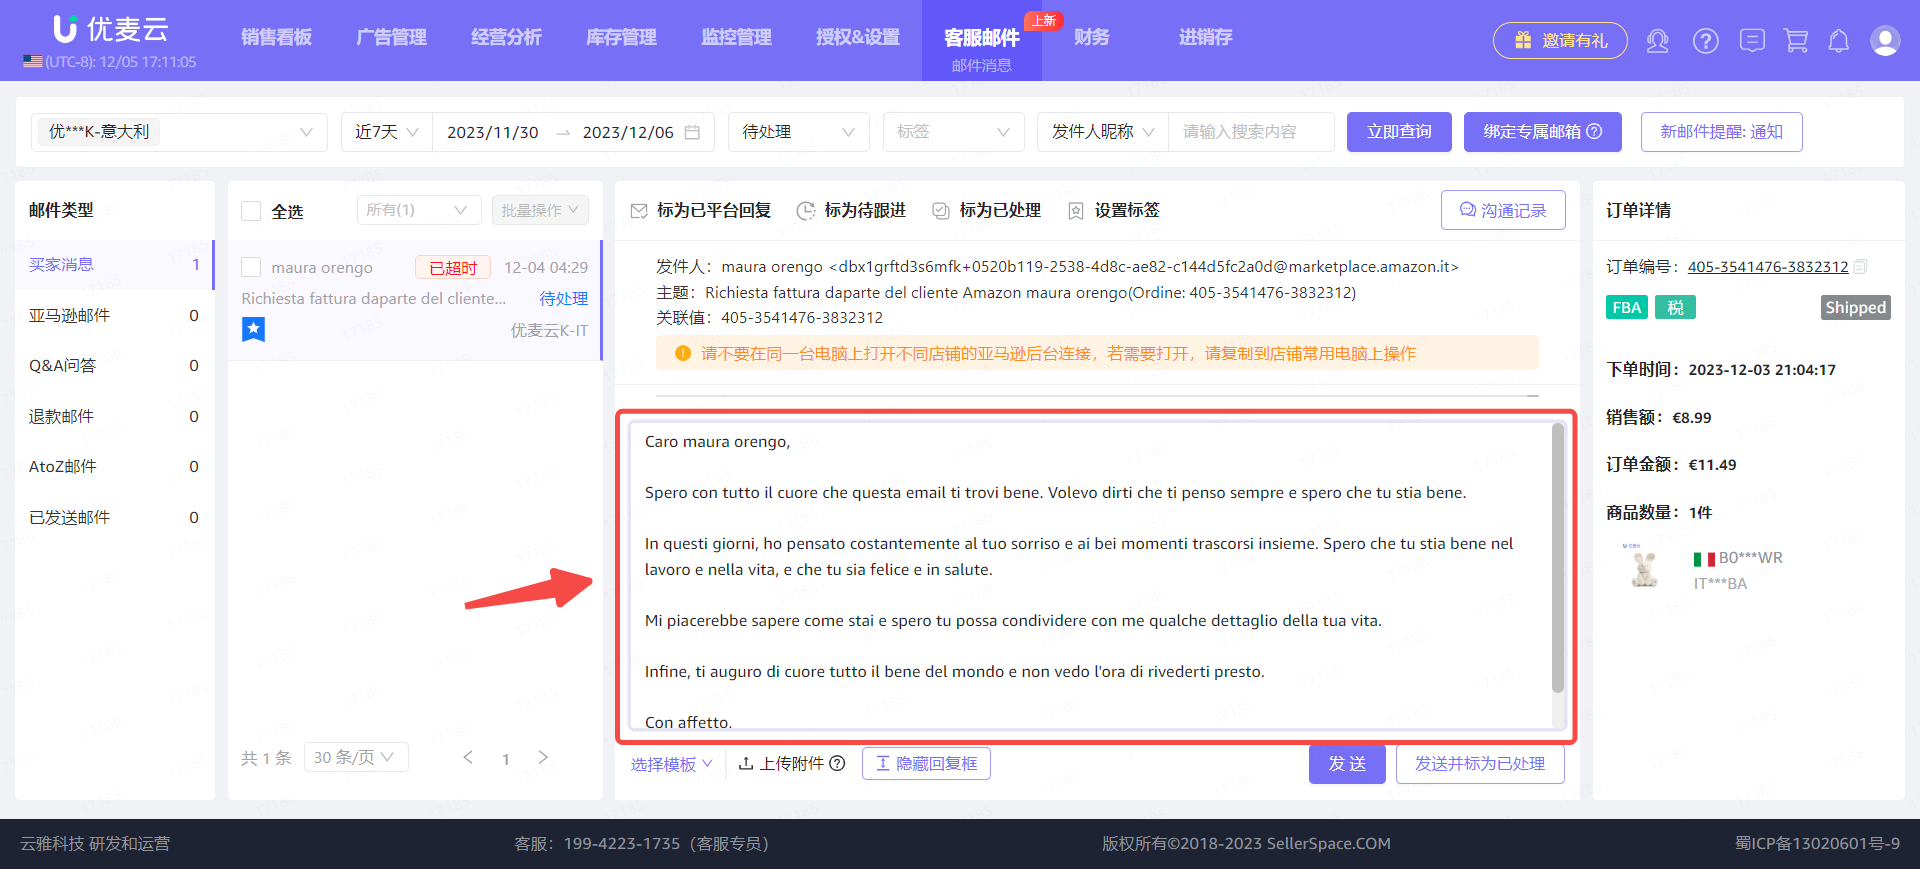
② Order Details
If it is an order-related email, the order details will be displayed on the right side of the email content to help sellers grasp the information more accurately and reply to the email.
 +
+
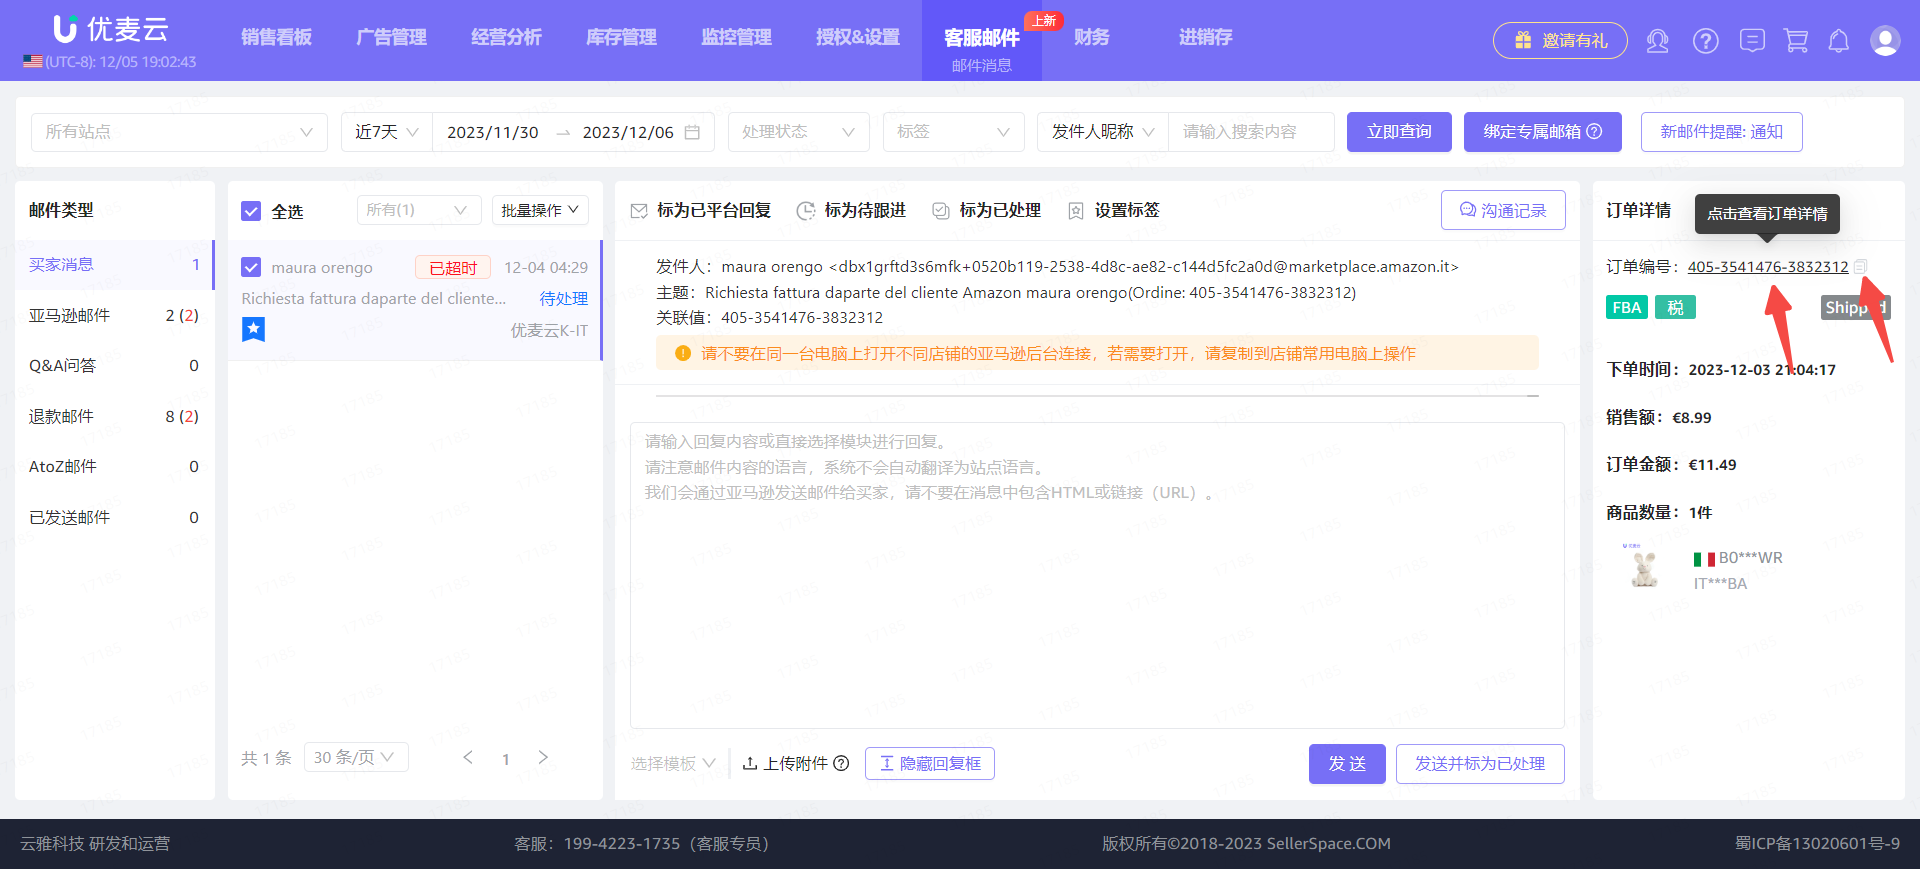
Click the order ID to jump to view the fee details of the order;
Click the button to the right of the order number to directly copy the order number.
 +
+
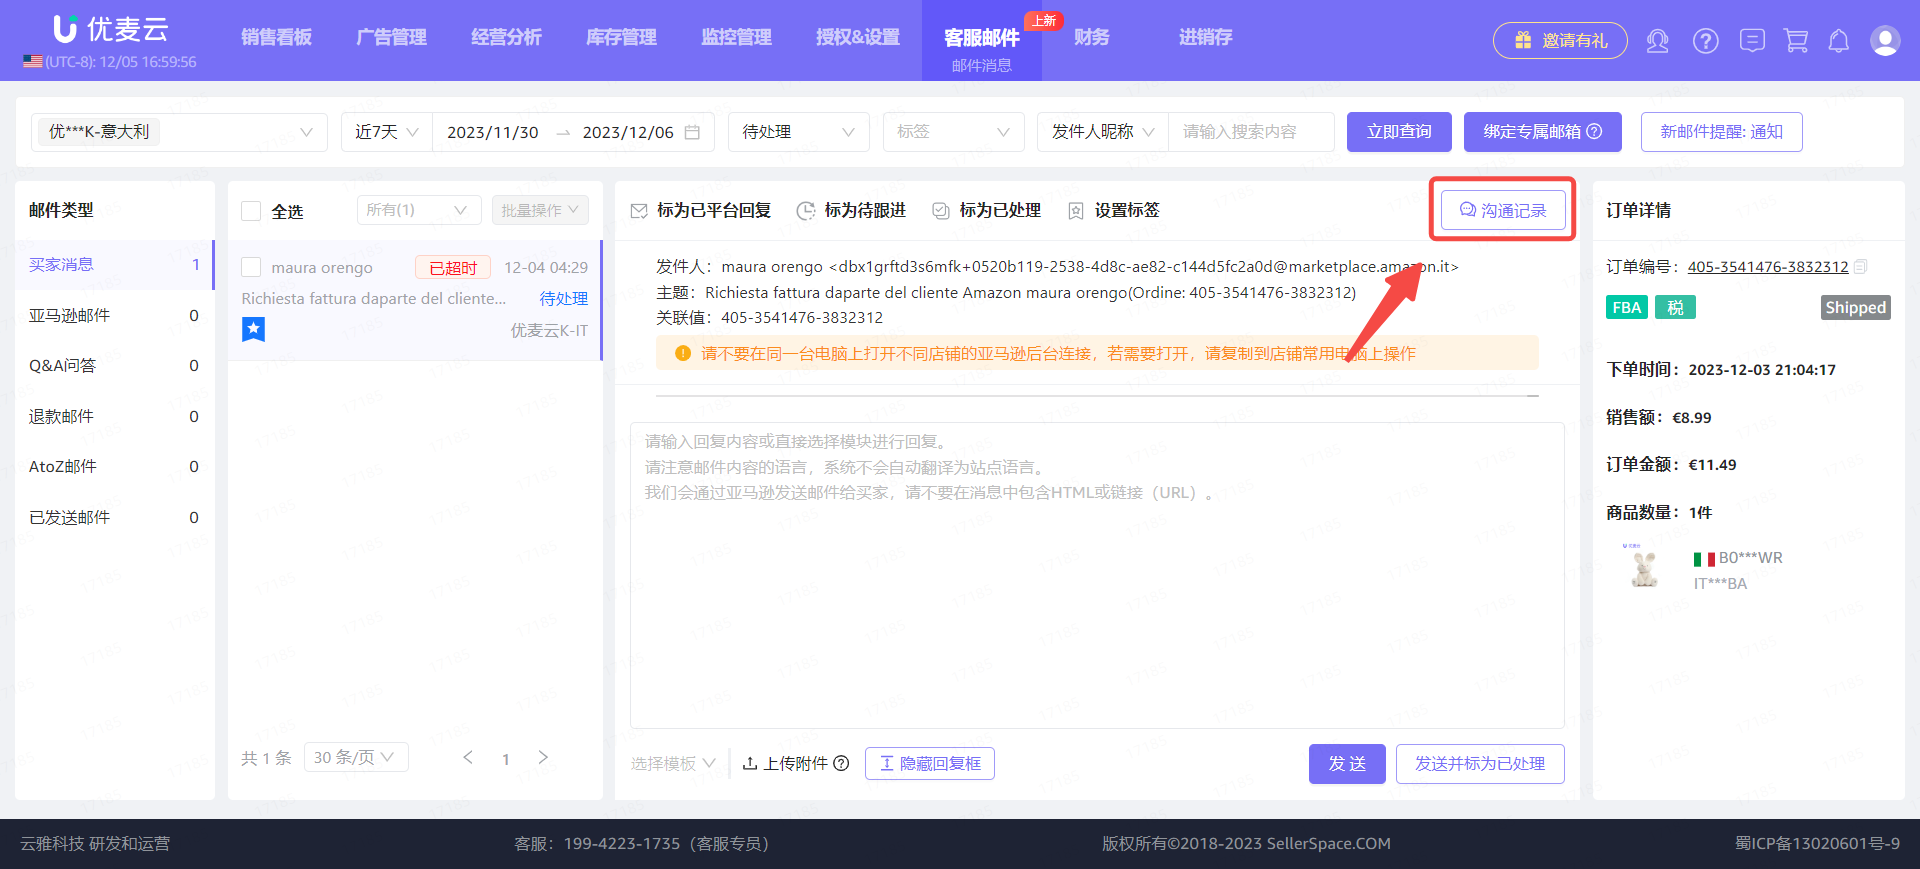
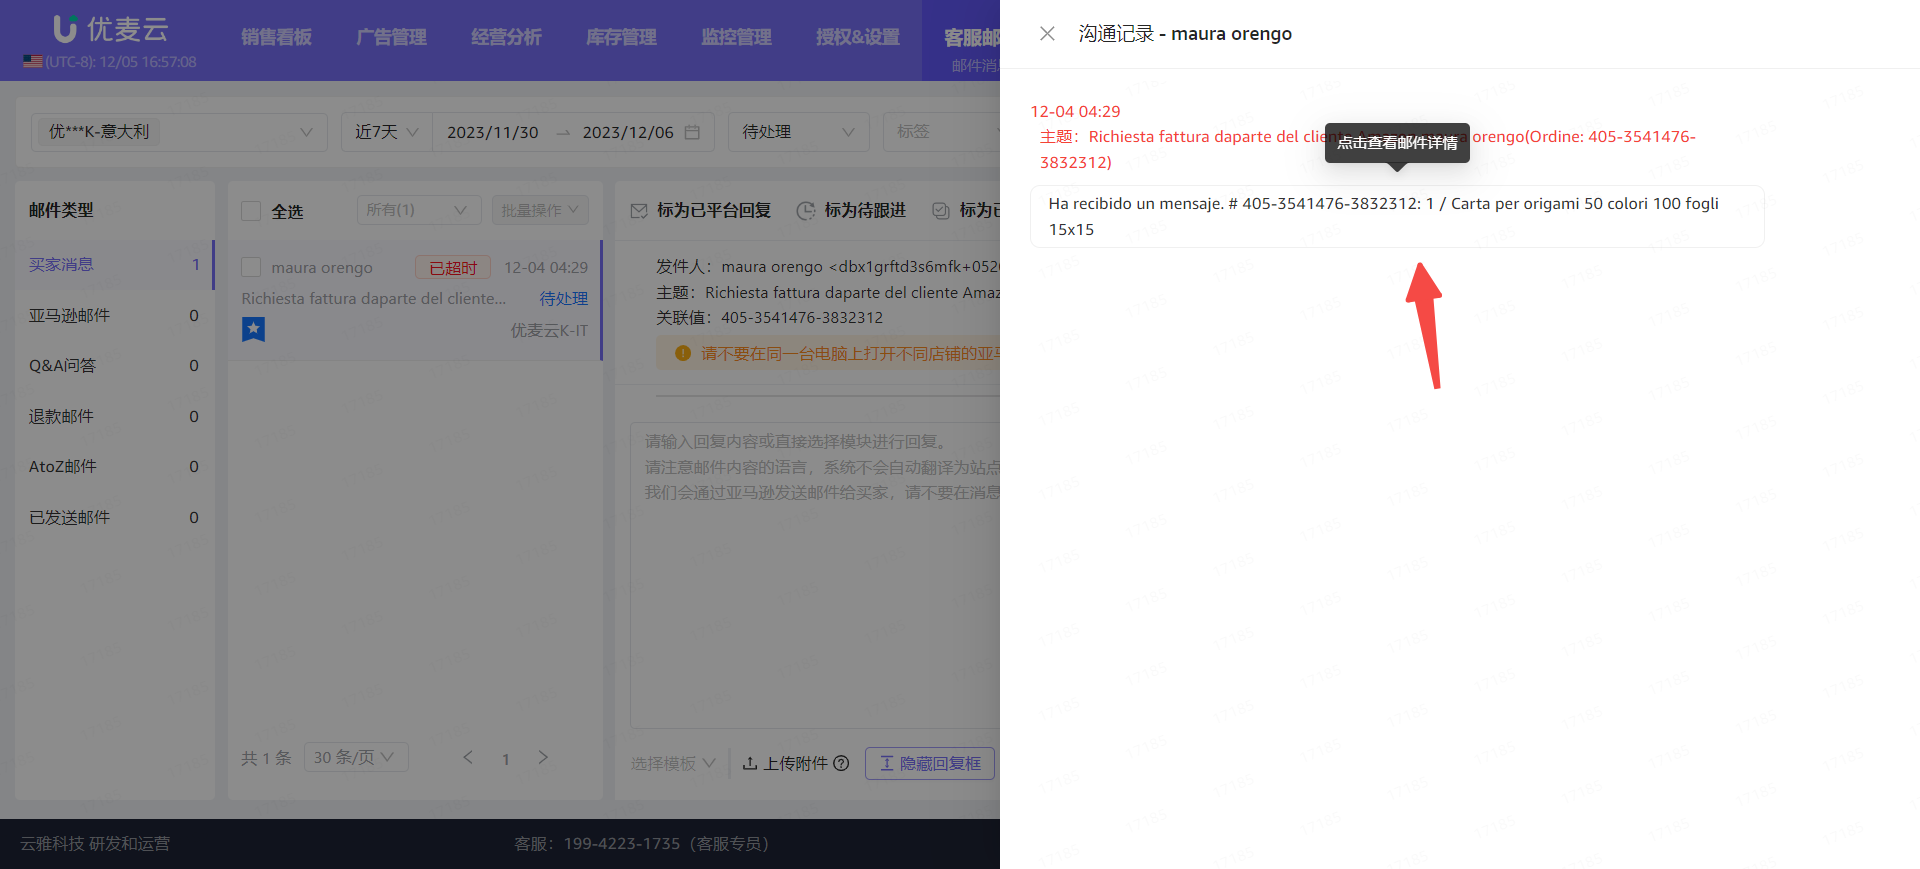
③ Communication History
If an email involves multiple replies, it supports viewing the details of historical email exchanges to help us reply to emails more accurately.
Click [Communication History] in the upper right corner to enter the historical email exchange details page,
 +
+
Enter the "Email Details" page,
Find the corresponding email information and click to view the details of the email.
 +
+
Email Details:
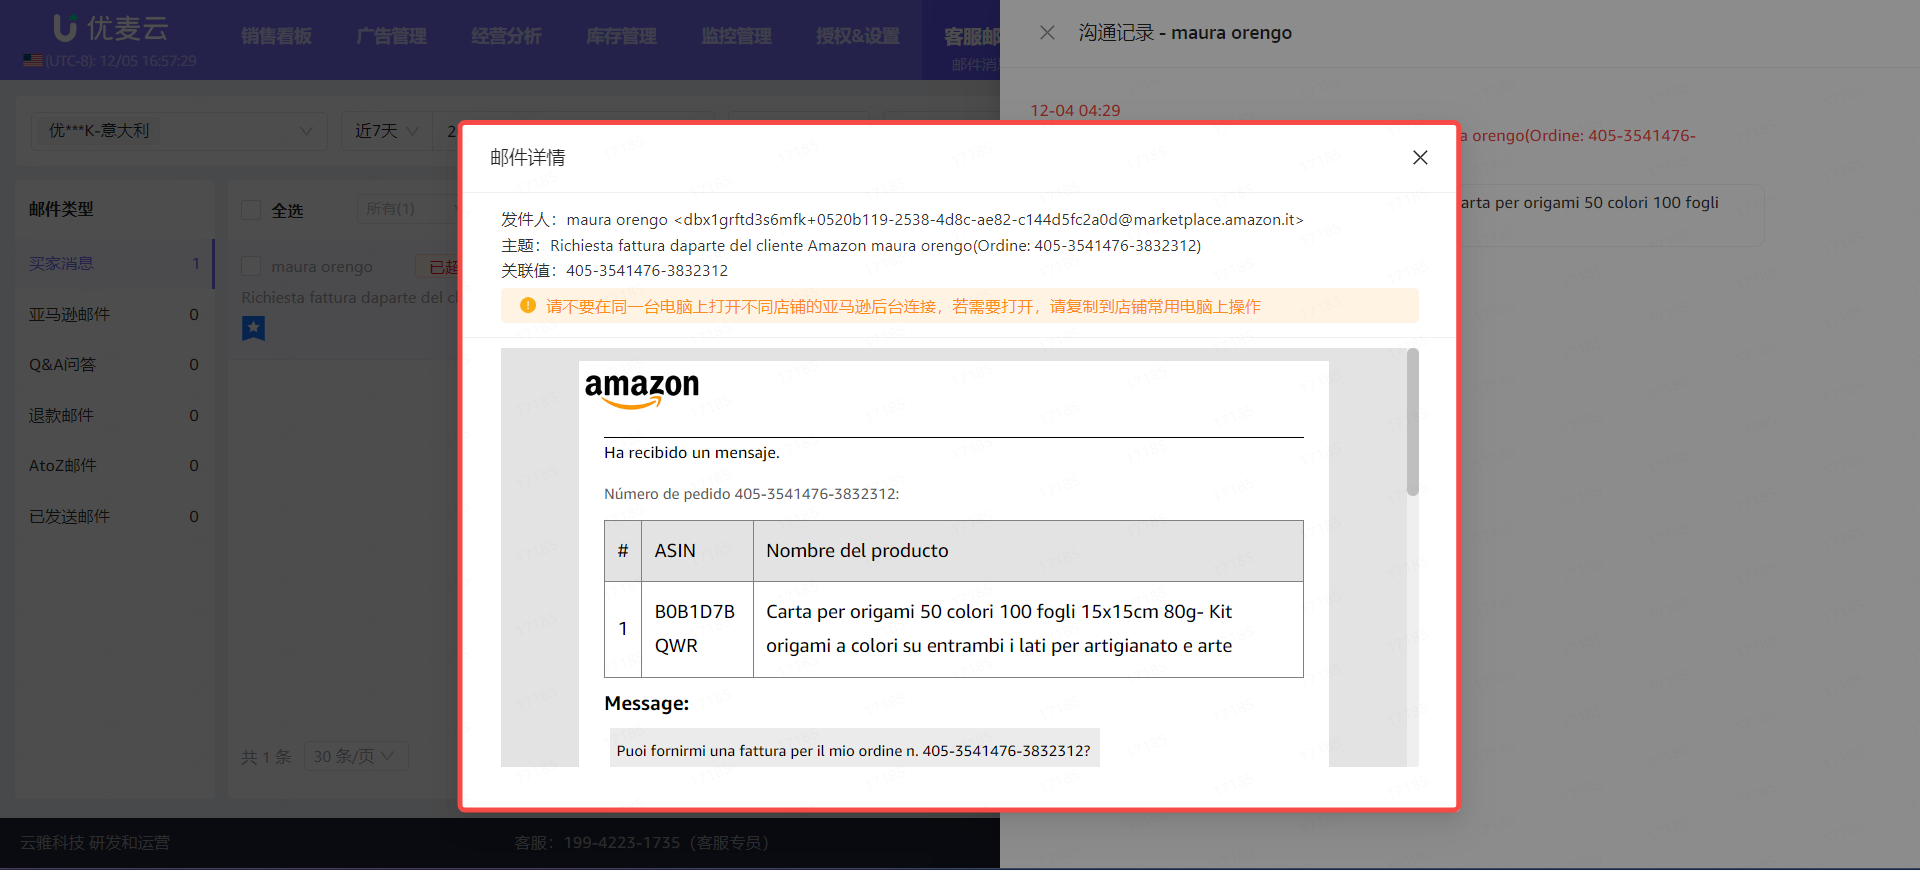 +
+
6. Processing Emails - Replying
If it is an email that needs to be replied to, we can directly edit the reply content in the reply box.
When editing the reply content, please note:
- The system will not automatically translate to the marketplace language. Please reply using the corresponding marketplace language.
- We send emails to buyers through Amazon. Please do not include HTML links (URLs) in your replies.
- It is recommended not to include sensitive words, such as: review, feedback, contact US, etc.
 +
+
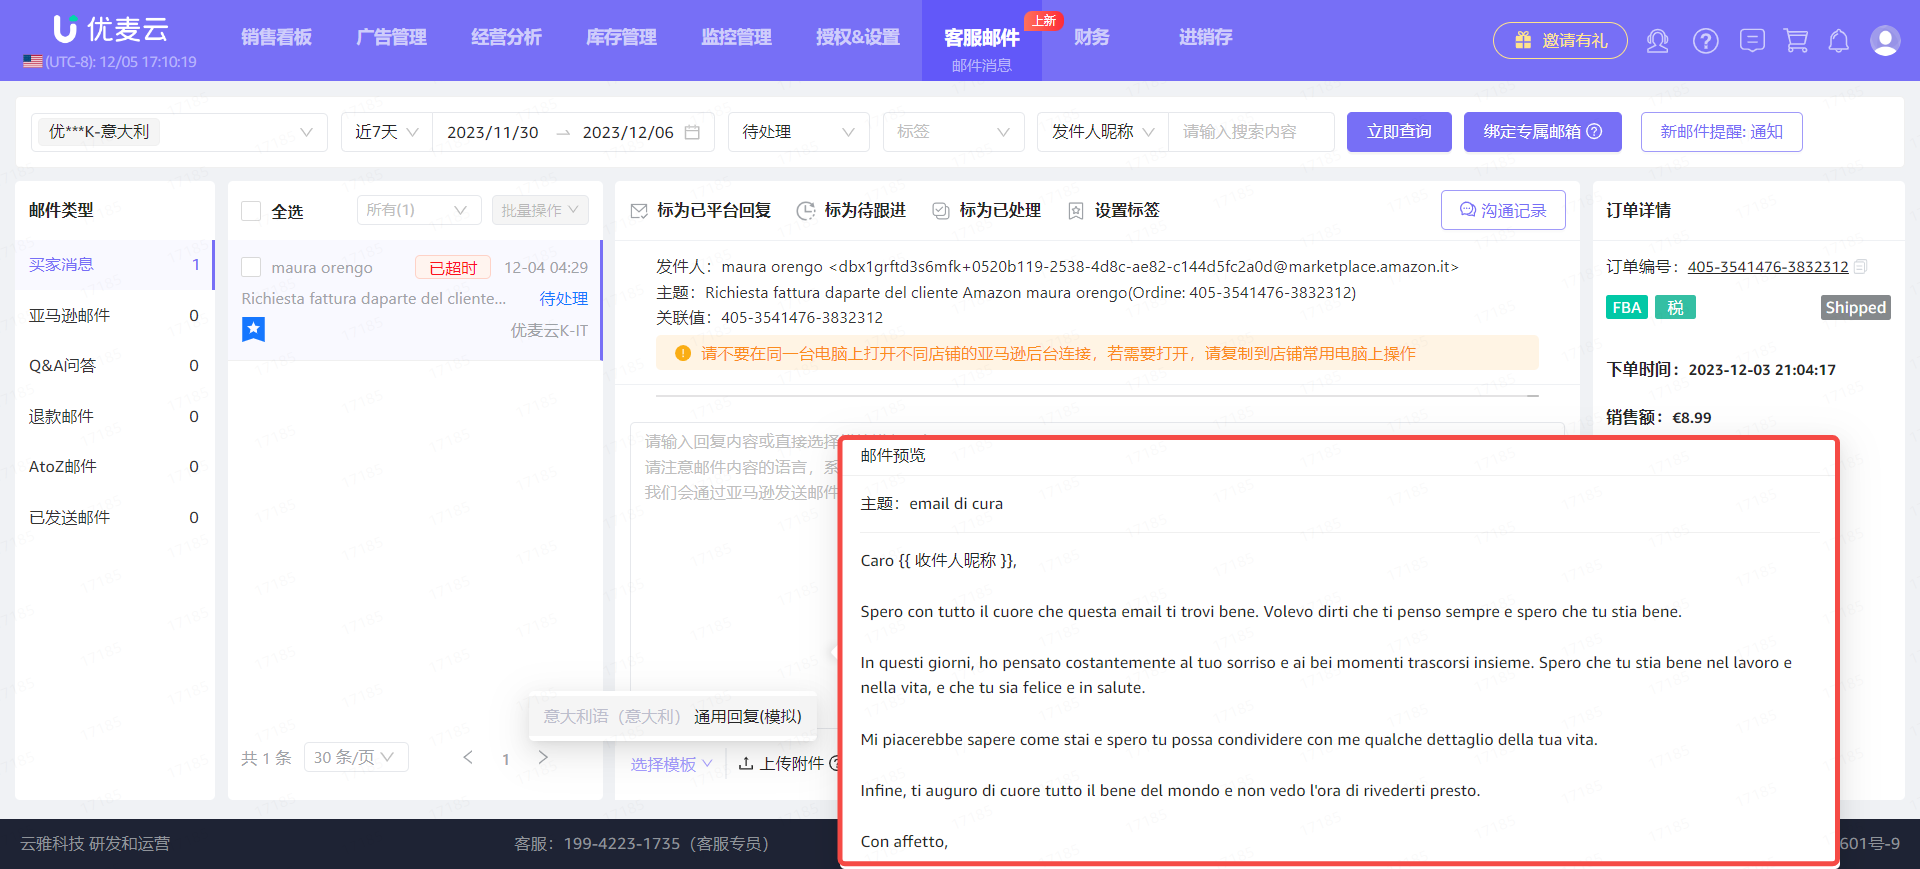
Alternatively, you can directly select a pre-set email template,
Click [Select Template] in the lower left corner and select the corresponding template.
 +
+
Click the template name to fill the template content into the reply box for editing and confirmation.
 +
+
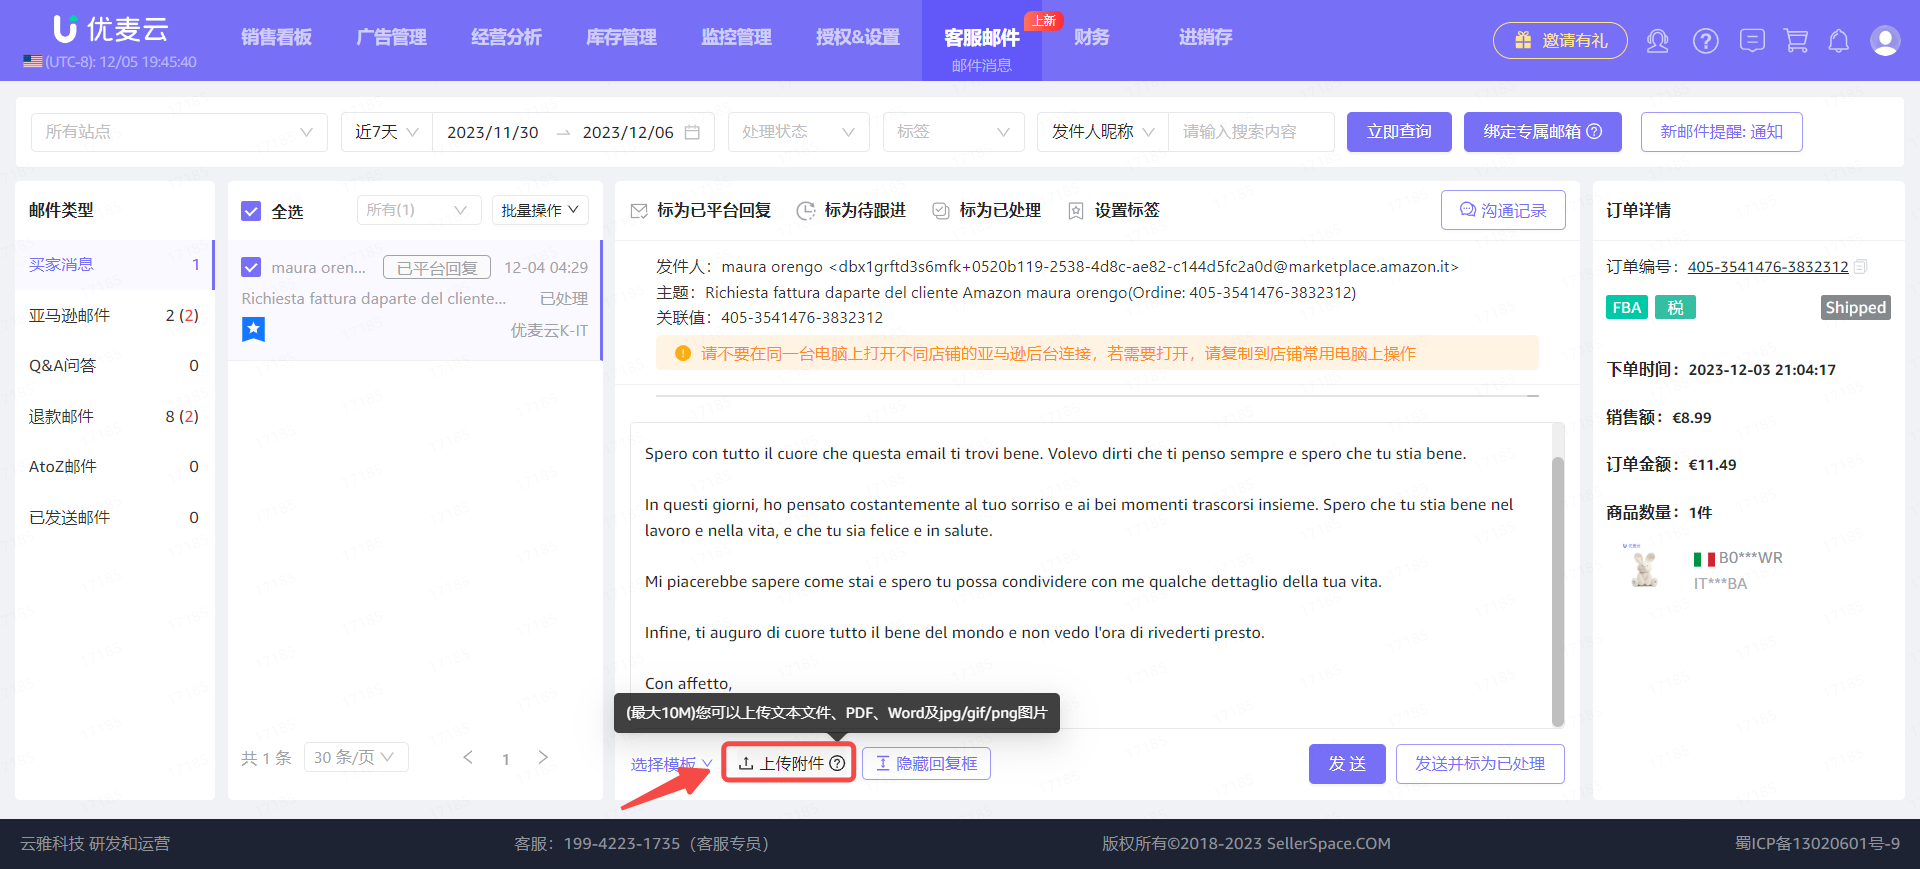
If there are attachments, click [Upload Attachment] below to upload them directly.
Note:
- The maximum file size is 10M;
- Supported upload formats: text files, PDF, Word, jpg/gif/png images.
 +
+
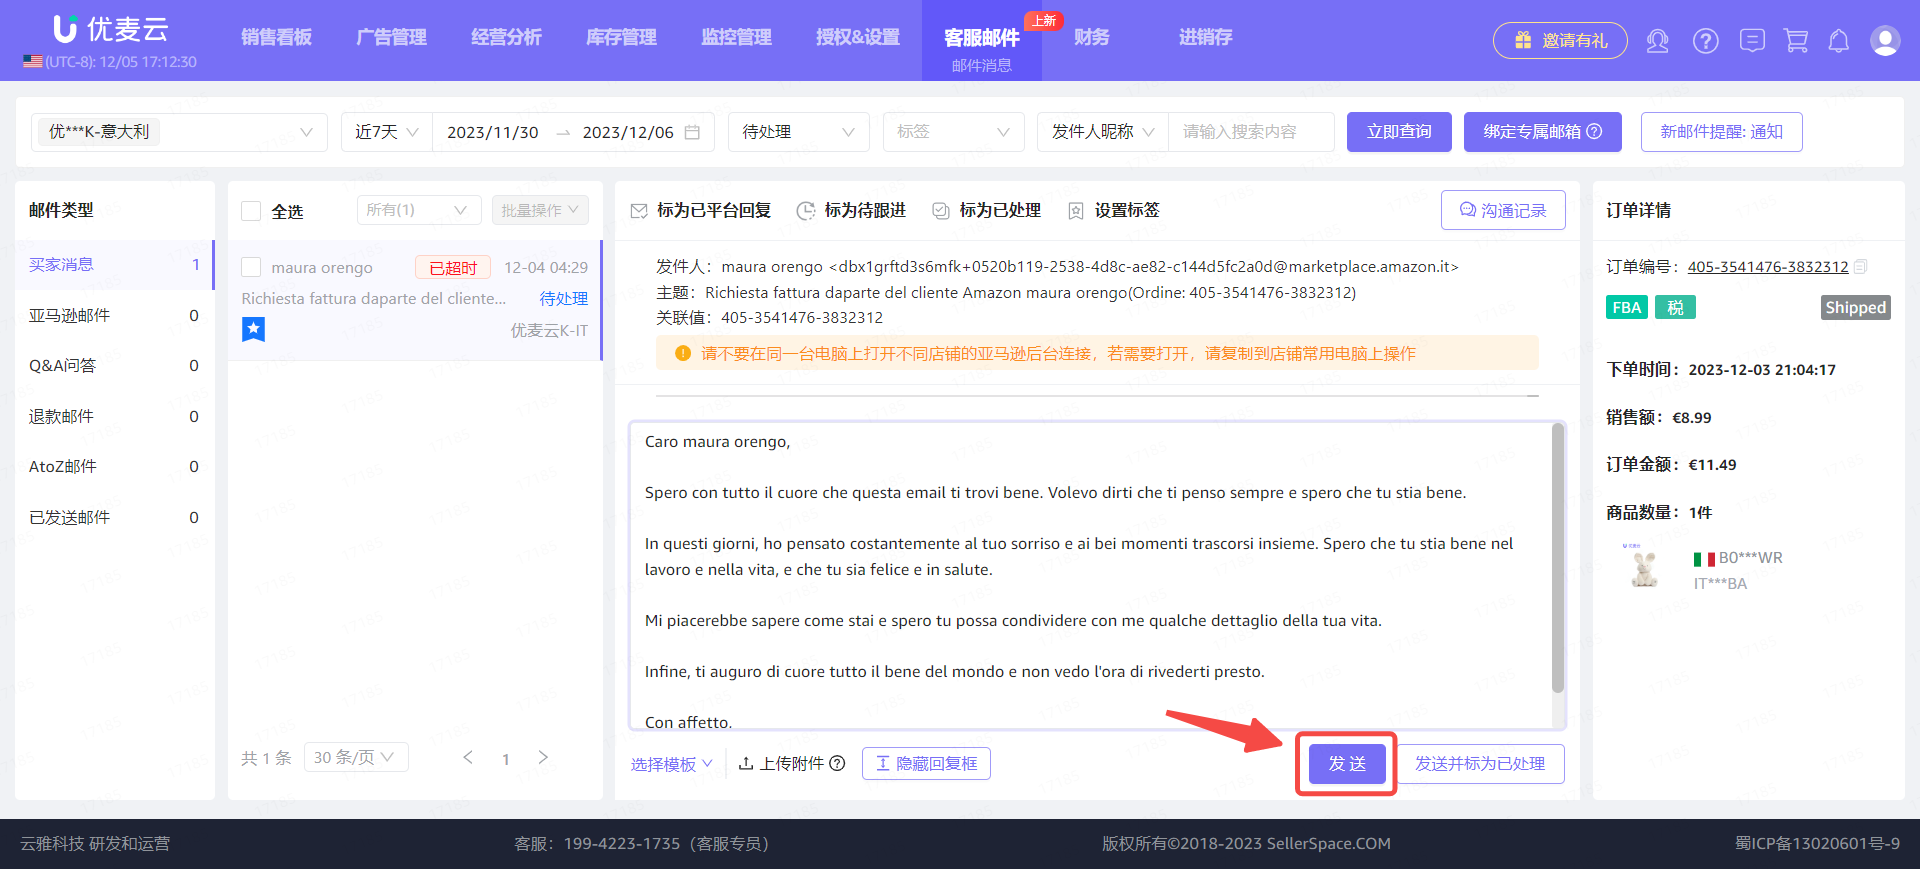
After confirming that the reply email content is correct, click [Send].
 +
+
7. Processing Emails - Marking
In addition to viewing and replying to emails, we can also mark emails to categorize and manage them.
There are 4 types of markings: Replied on Platform, To Follow Up, Processed, and Tags.
And their operations are largely similar.
① Mark as Replied on Platform
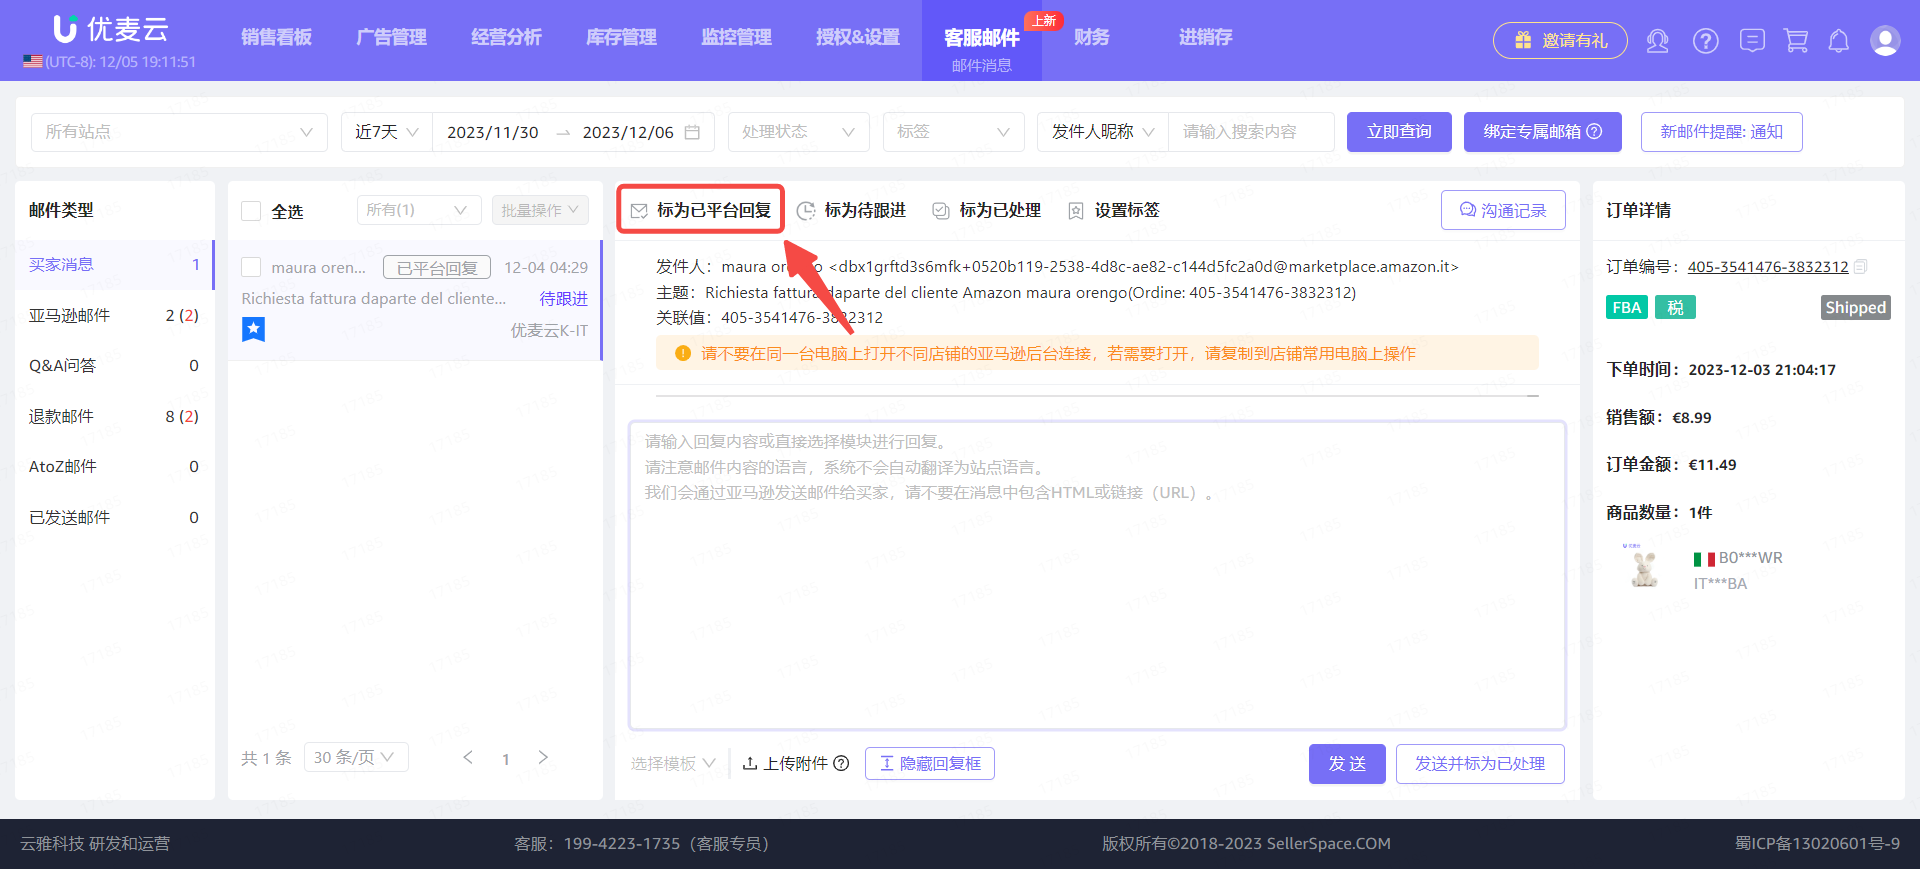
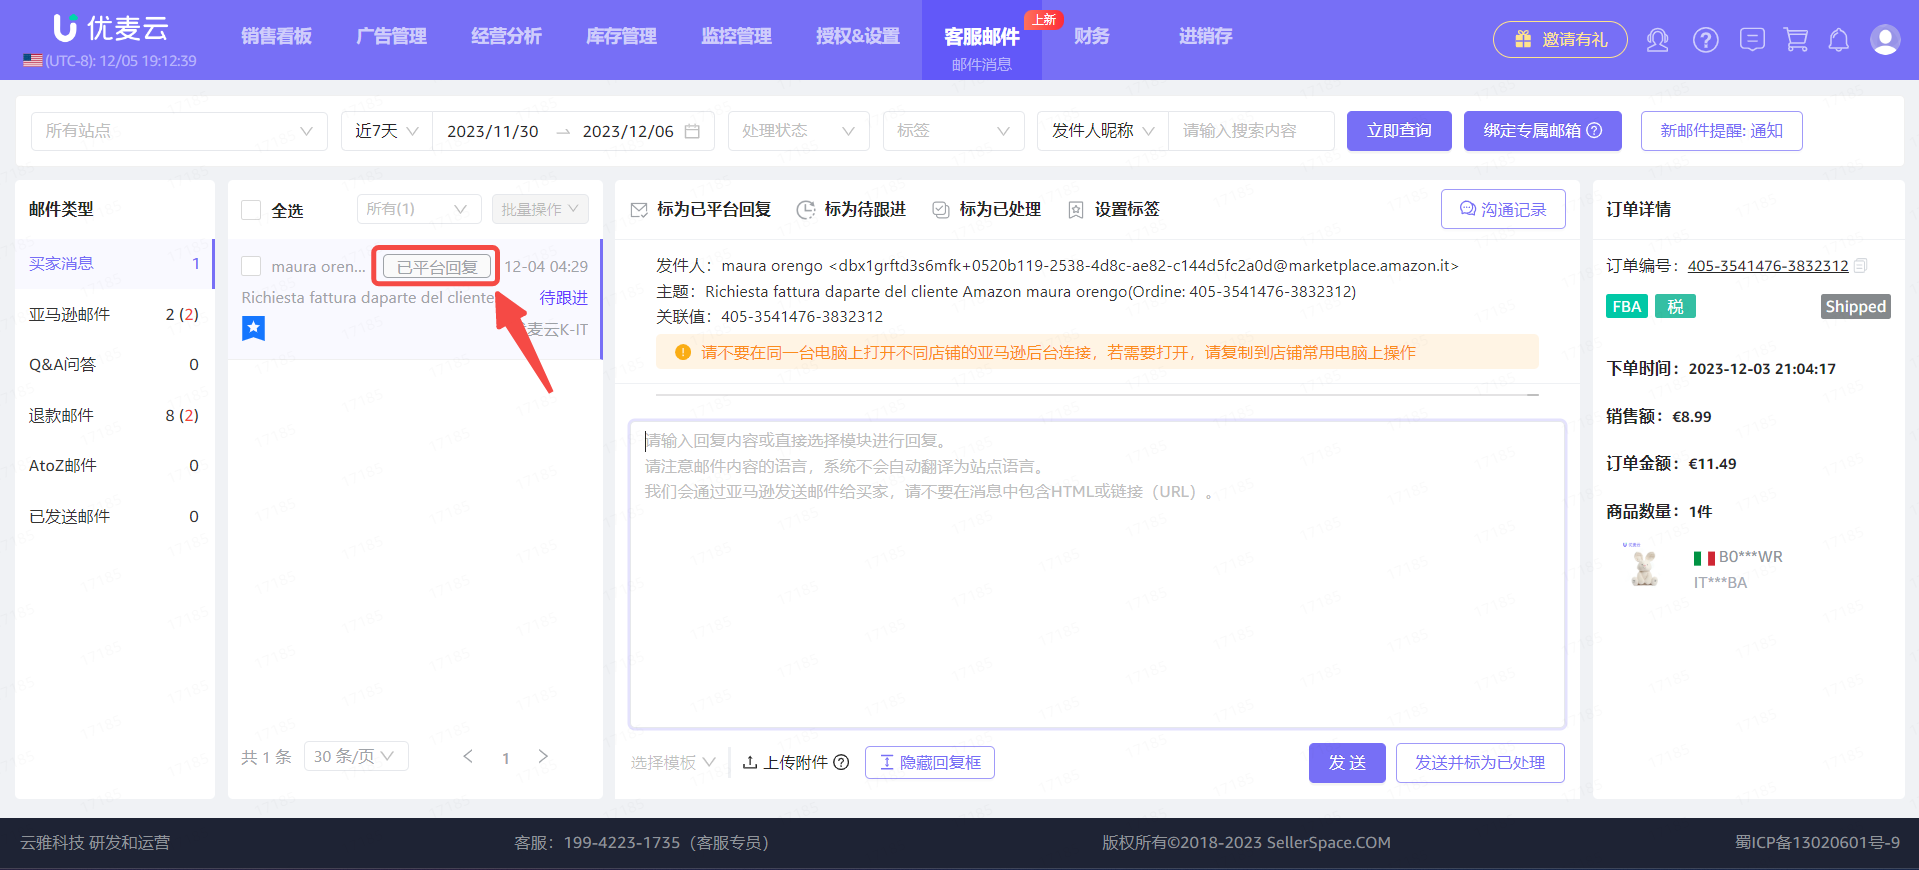
We can directly mark the currently viewed email as "Replied on Platform". And marking as "Replied on Platform" operation does not support undoing.
Enter the email details page and click [Mark as Replied on Platform] to mark with one click.
 +
+
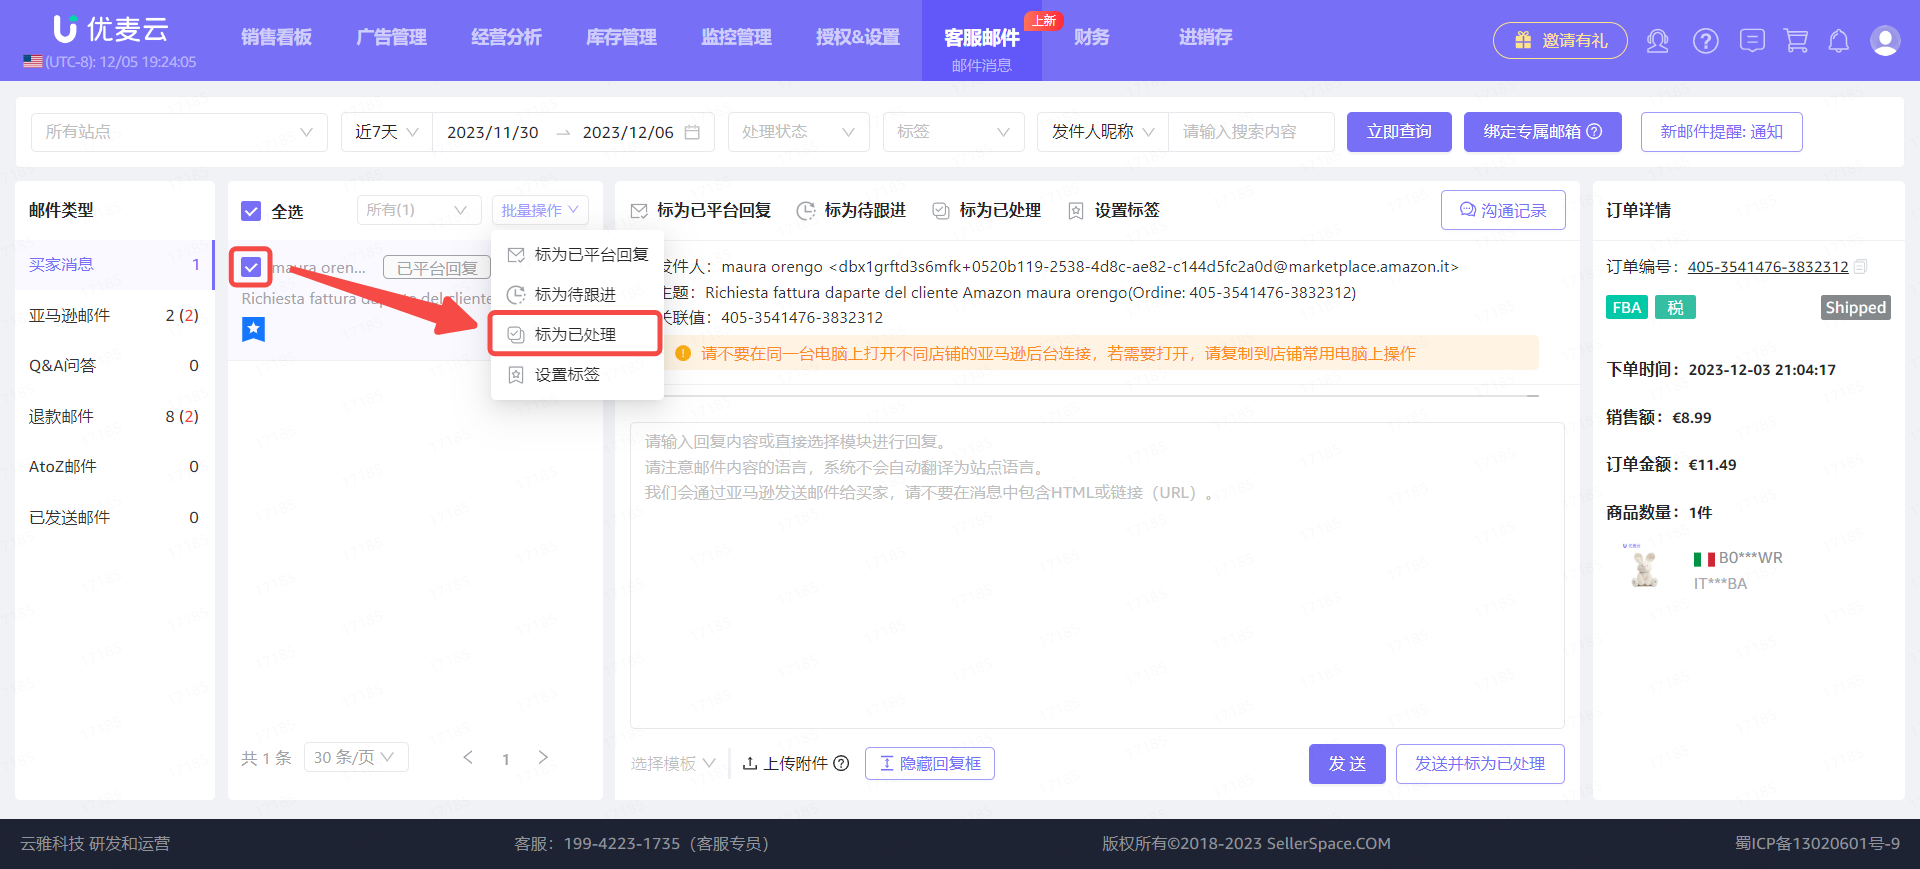
Or select the current email, click [Bulk Actions], and select [Mark as Replied on Platform] for bulk marking.
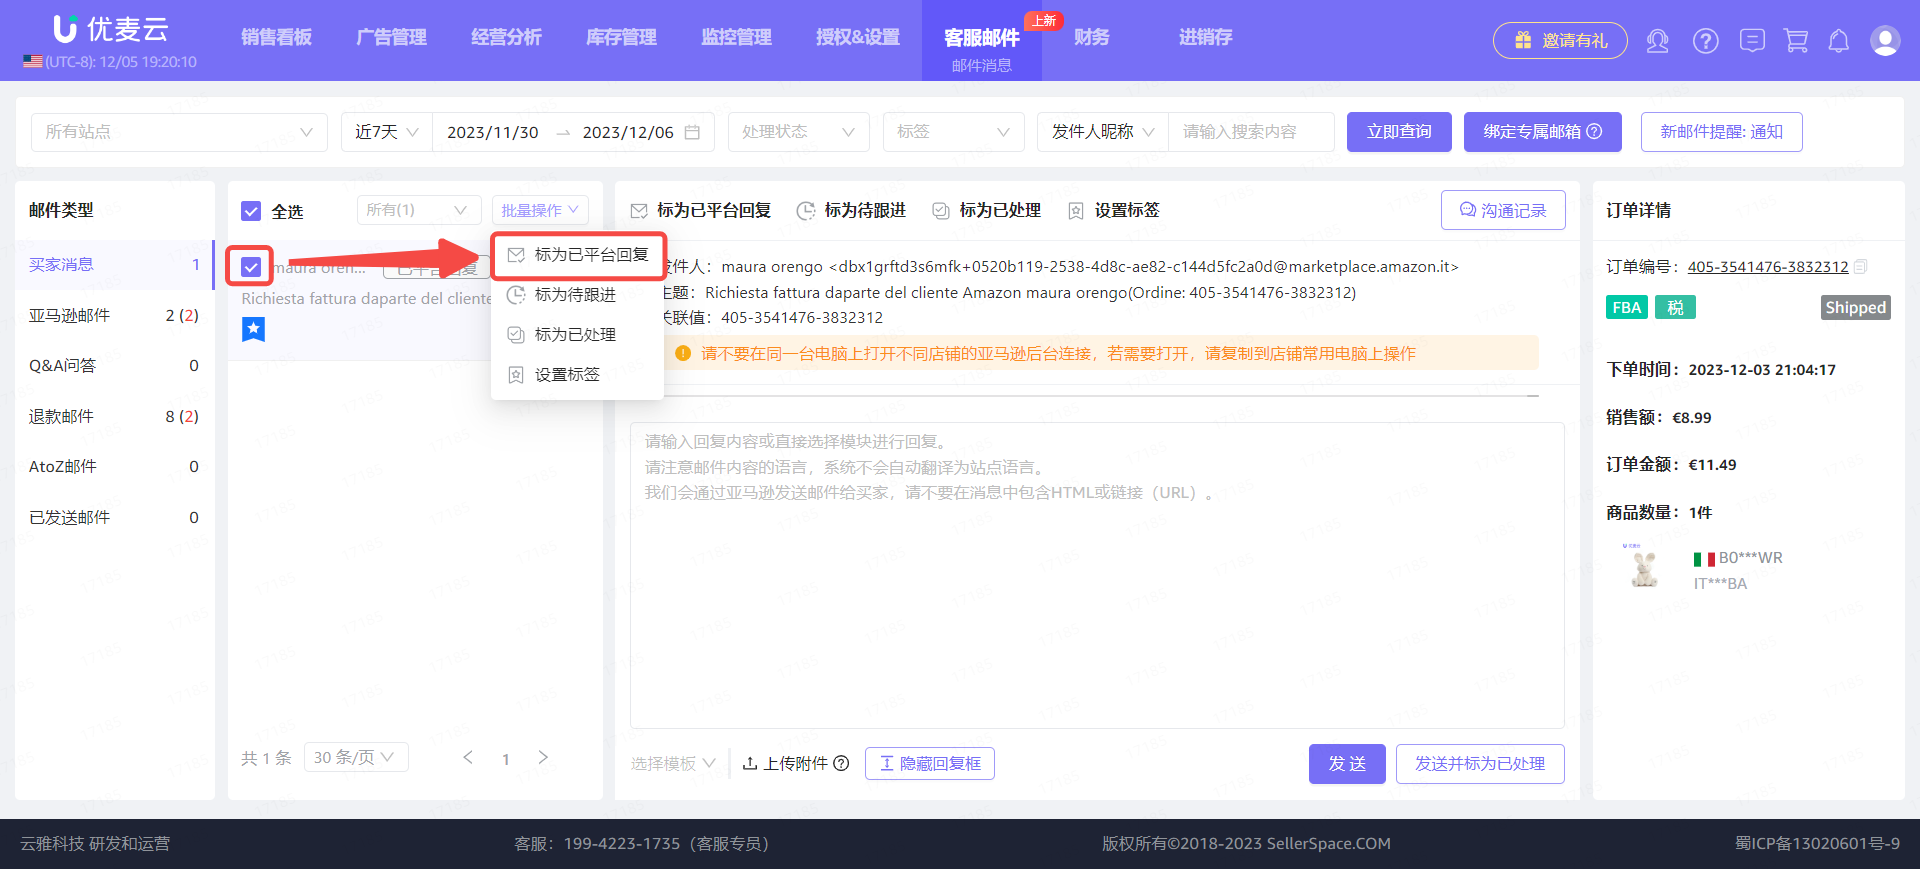 +
+
After marking, the email time display on the left will be updated to "Replied on Platform".
 +
+
② Mark as To Follow Up
If an email needs to be followed up, we can mark it as "To Follow Up". This way, when you need to process it next time, you can directly filter for [To Follow Up] emails for easy processing.
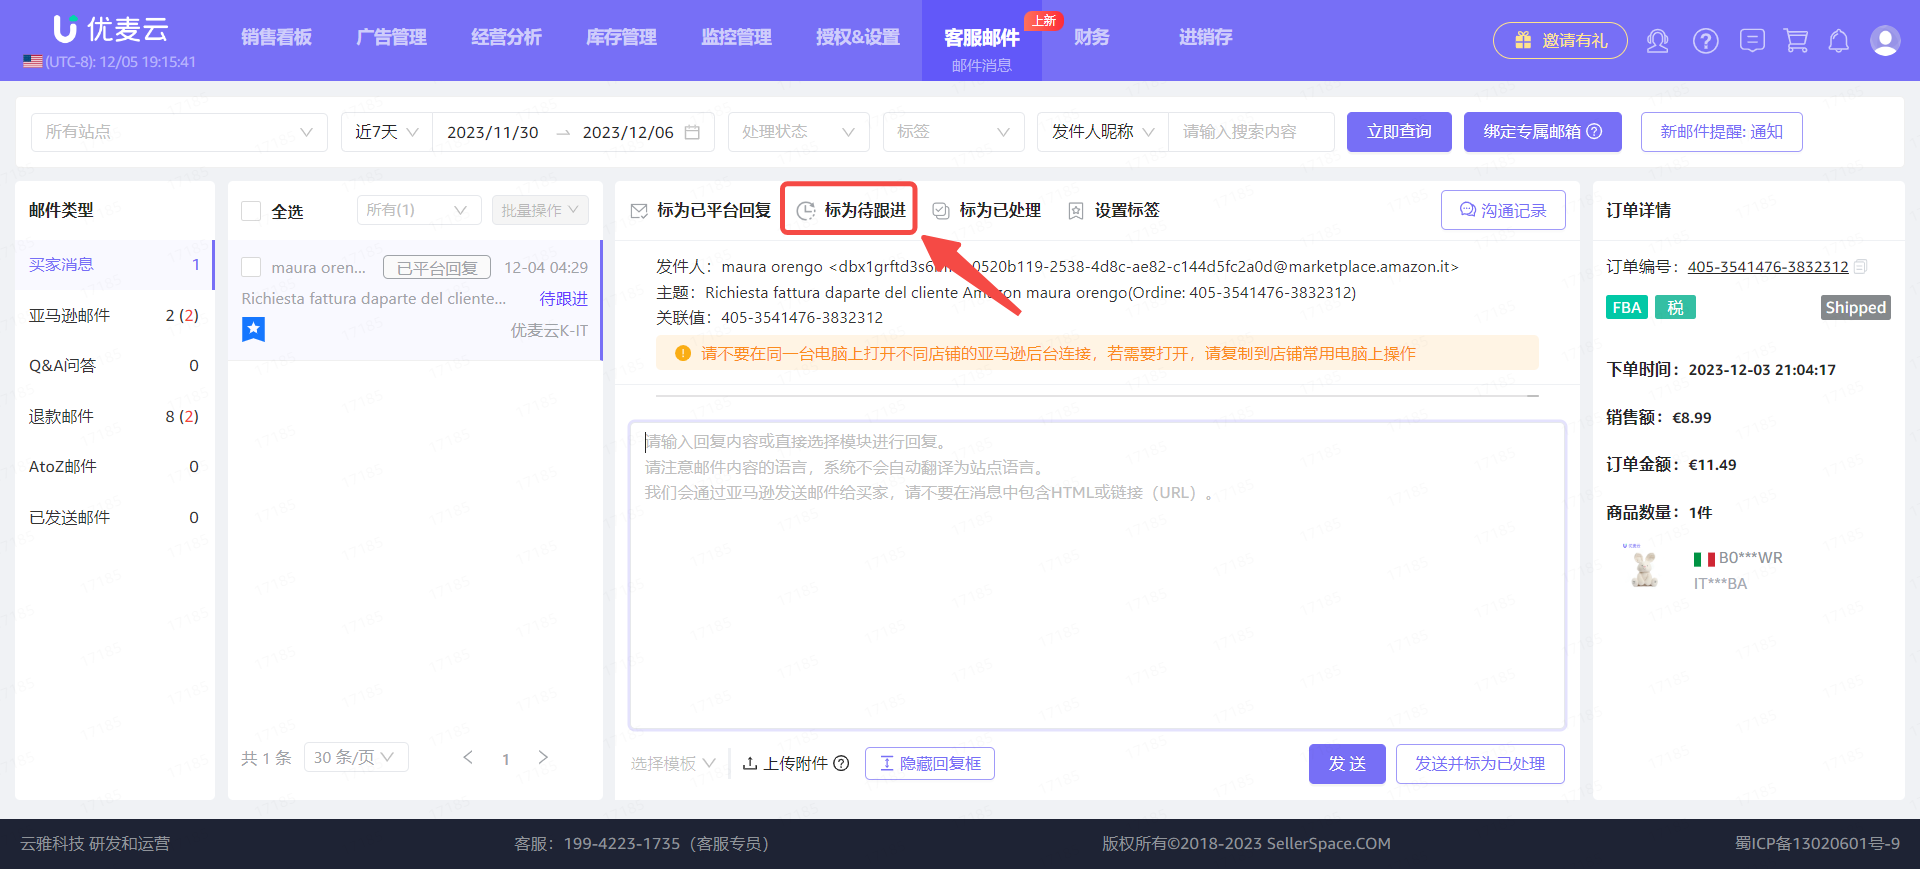
Enter the email details page and click [Mark as To Follow Up] to mark with one click.
 +
+
Or select the current email, click [Bulk Actions], and select [Mark as To Follow Up] for bulk marking.
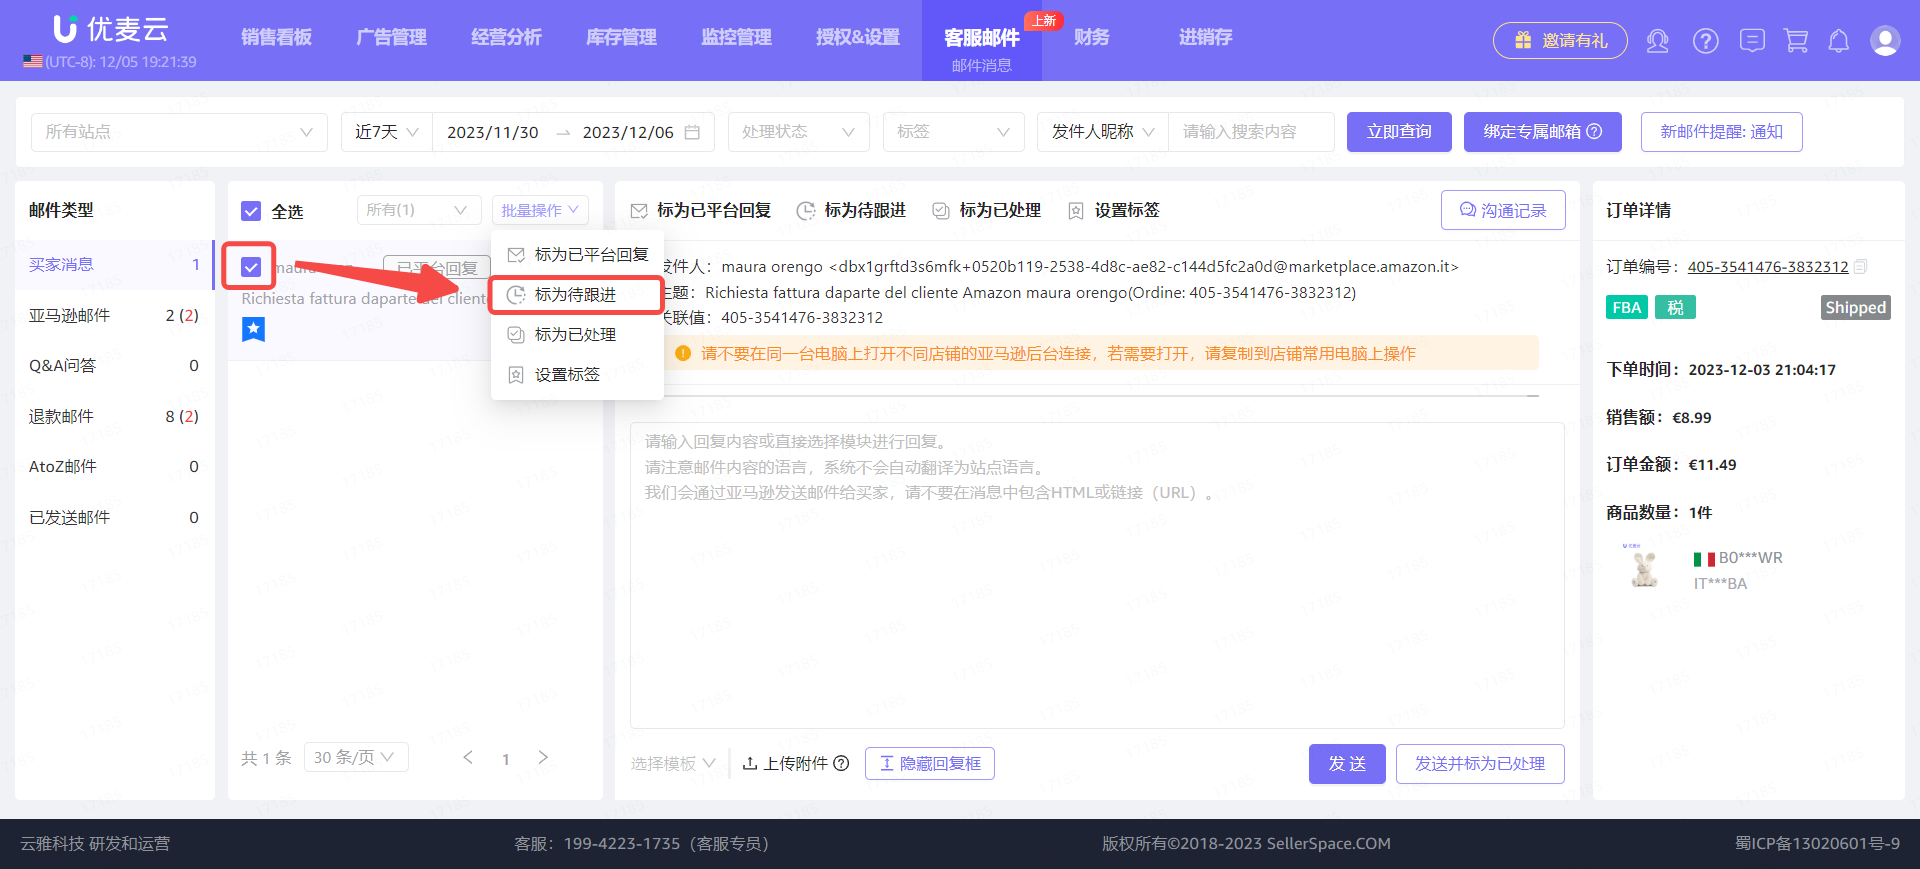 +
+
After marking, the email processing status display on the left will be updated to [To Follow Up].
 +
+
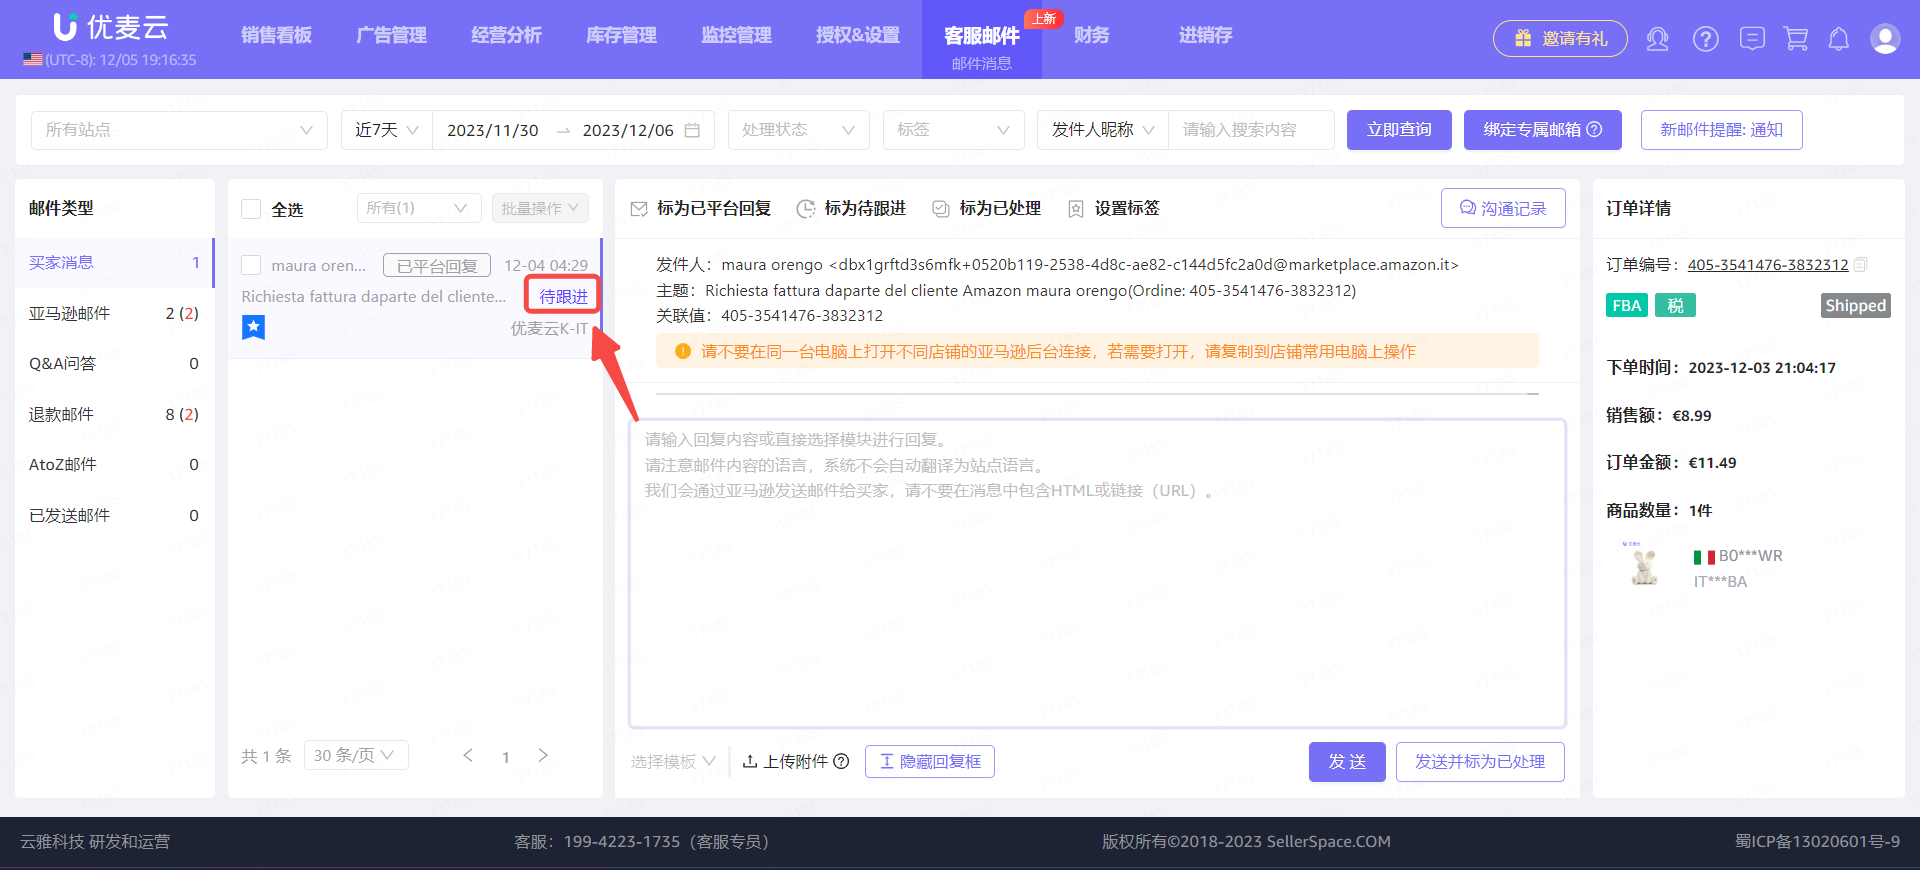
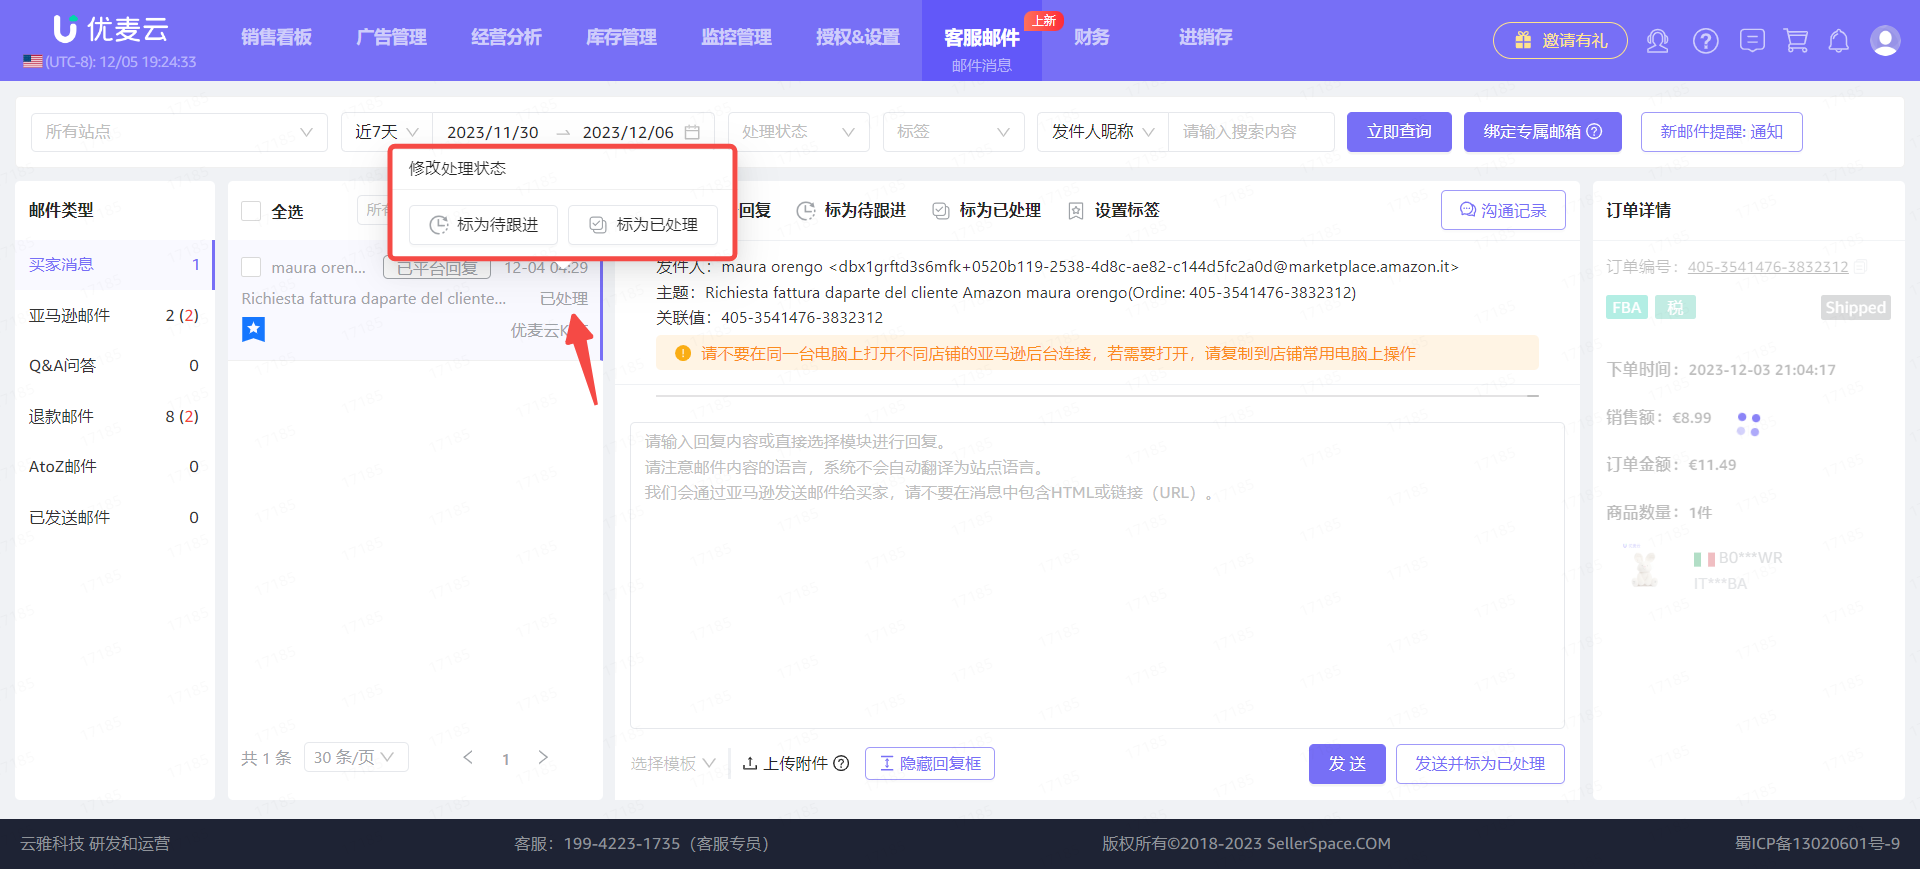
Hover your mouse over the [To Follow Up] status to choose to switch the processing status.
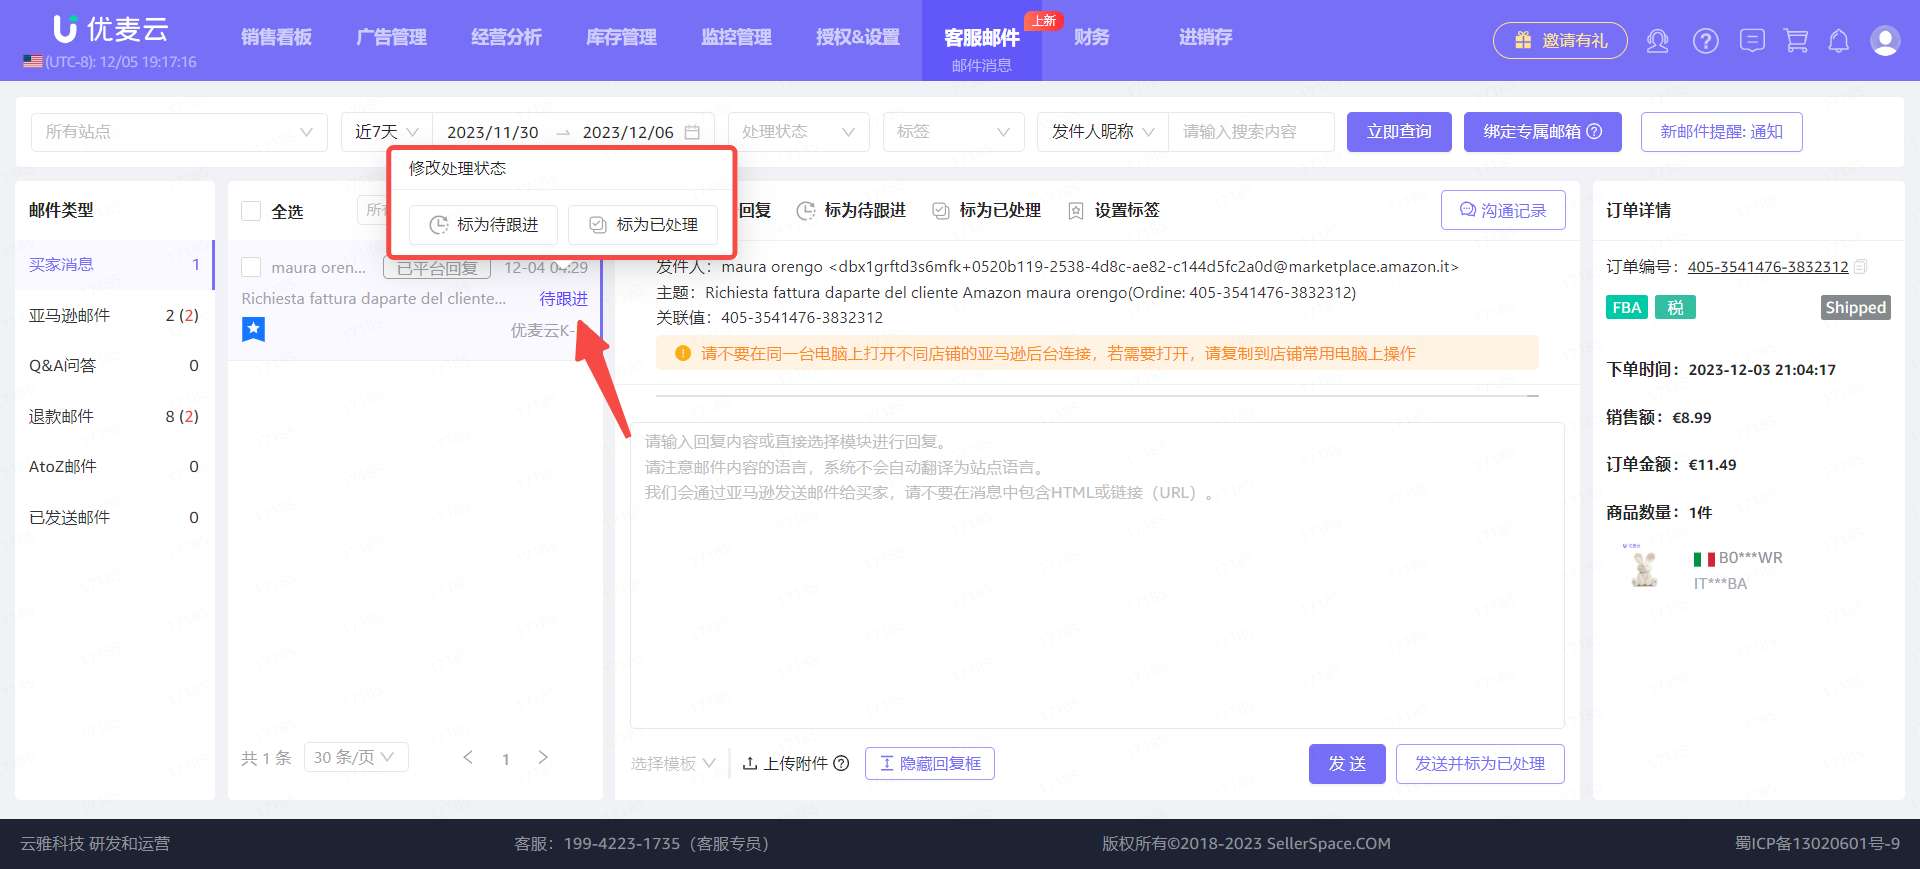 +
+
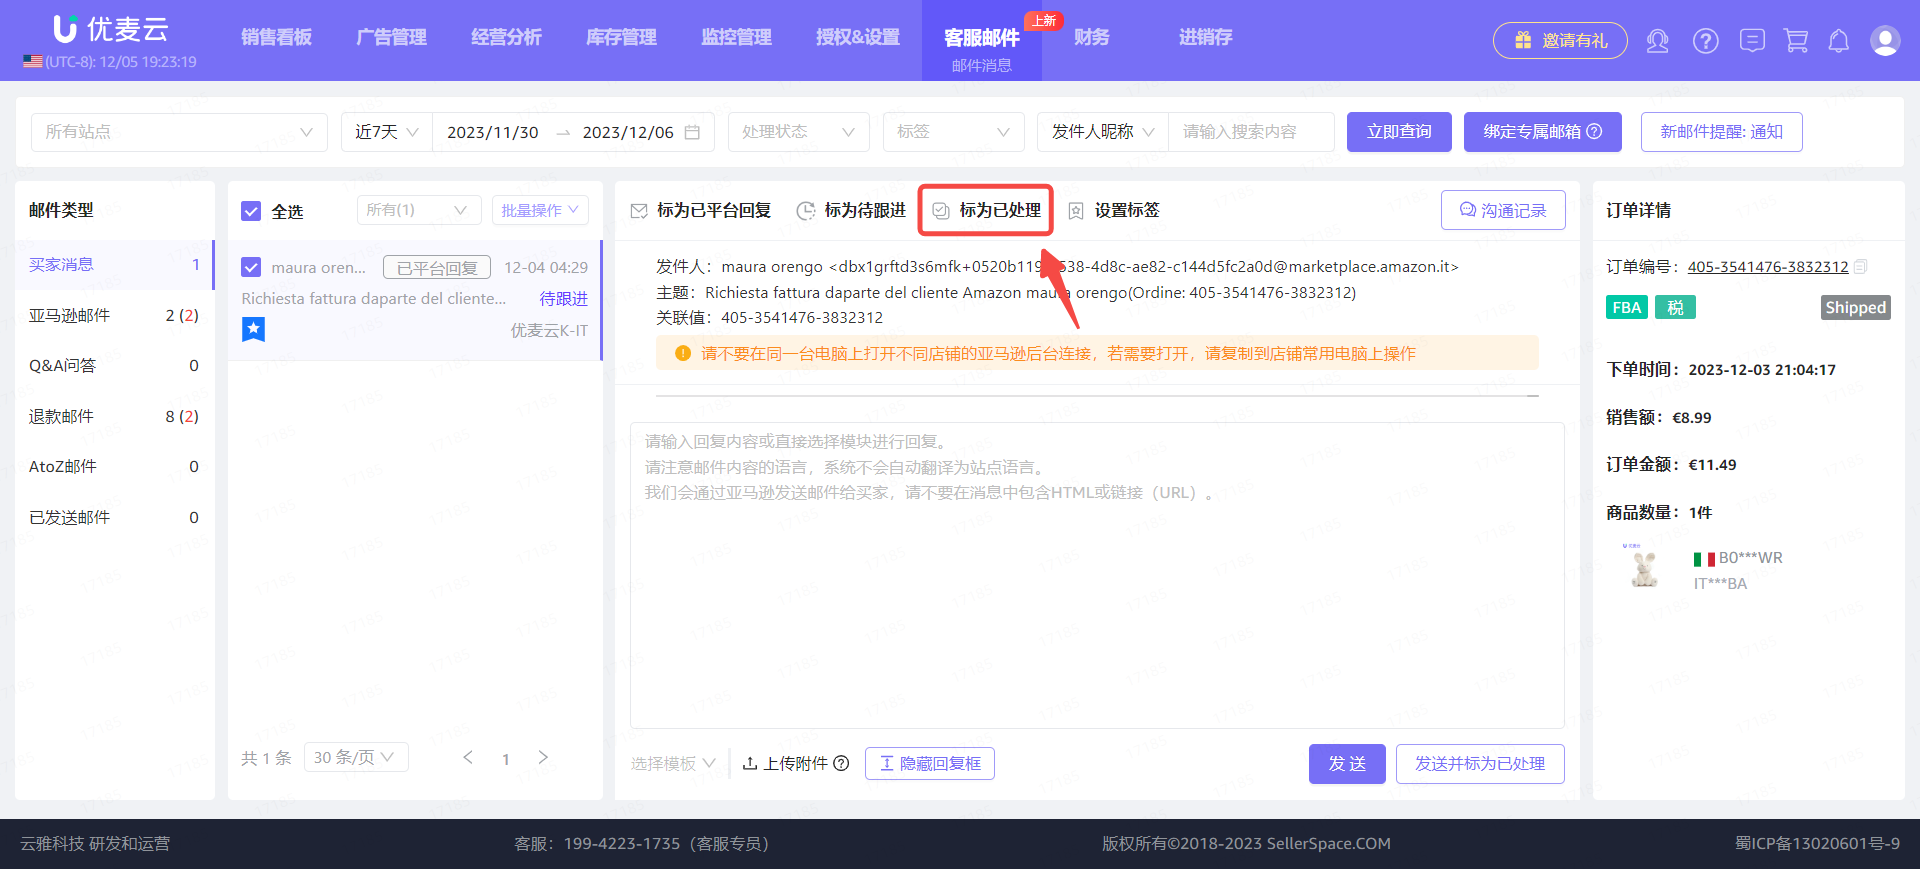
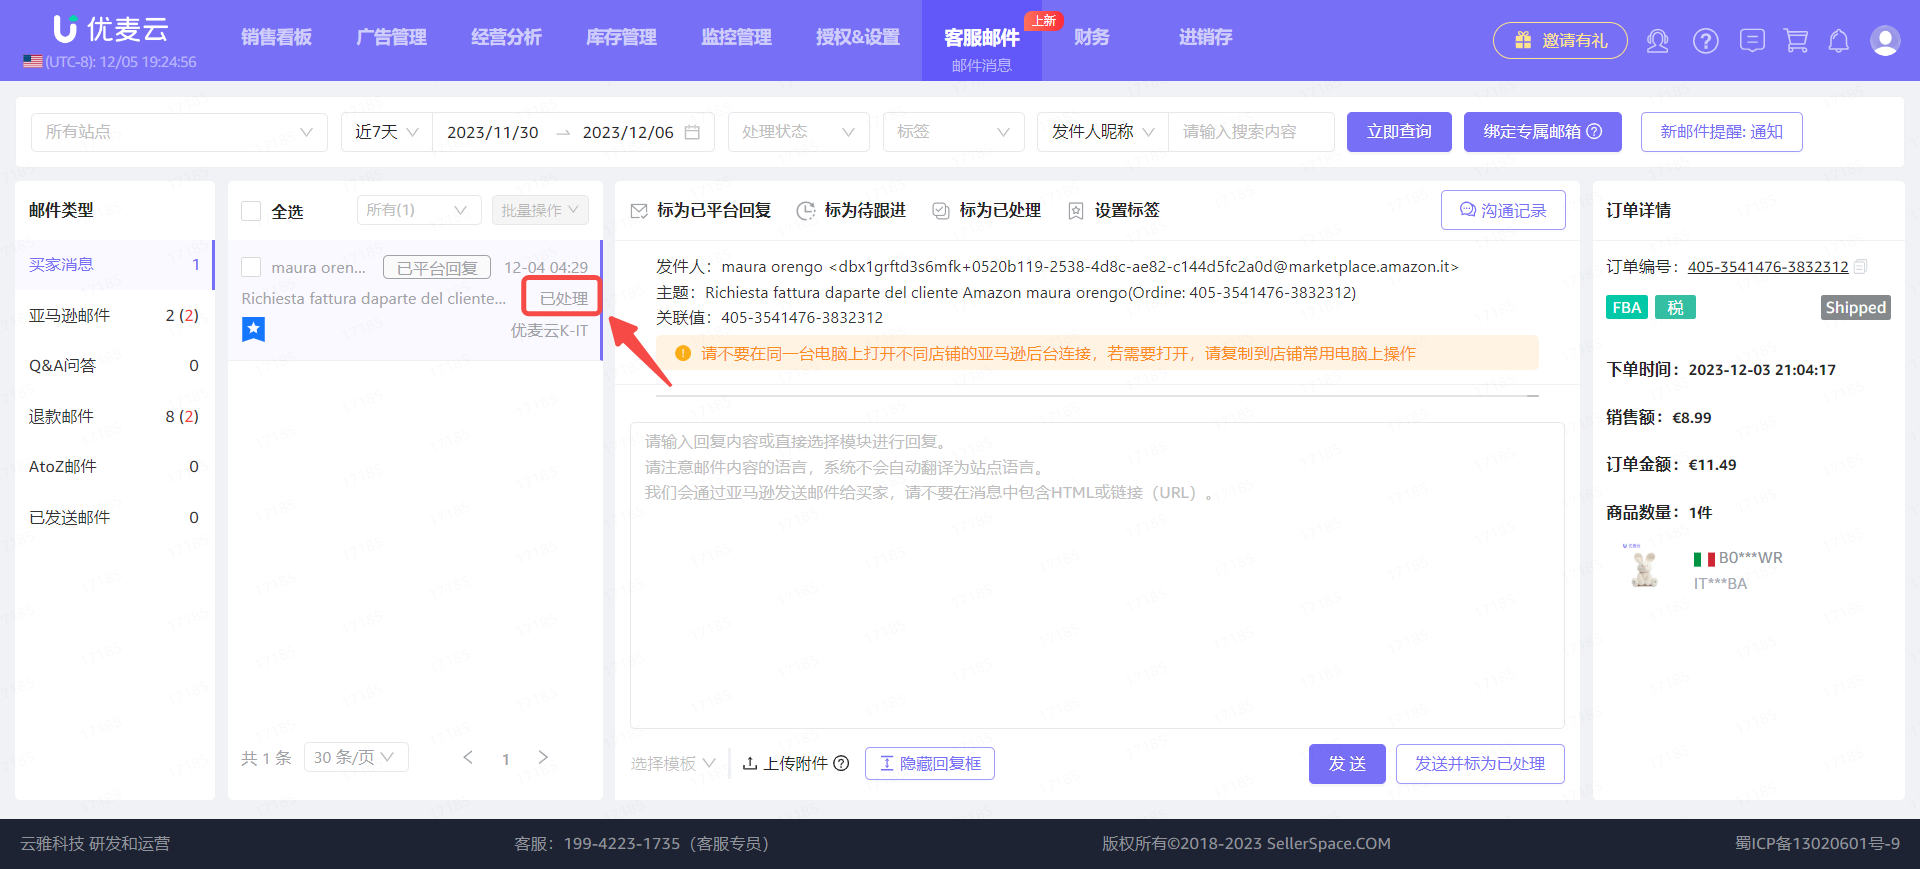
③ Mark as Processed
When we have finished processing an email, we can mark it as [Processed] to help us filter faster when filtering and processing emails again.
Enter the email details page and click [Mark as Processed] to mark with one click.
 +
+
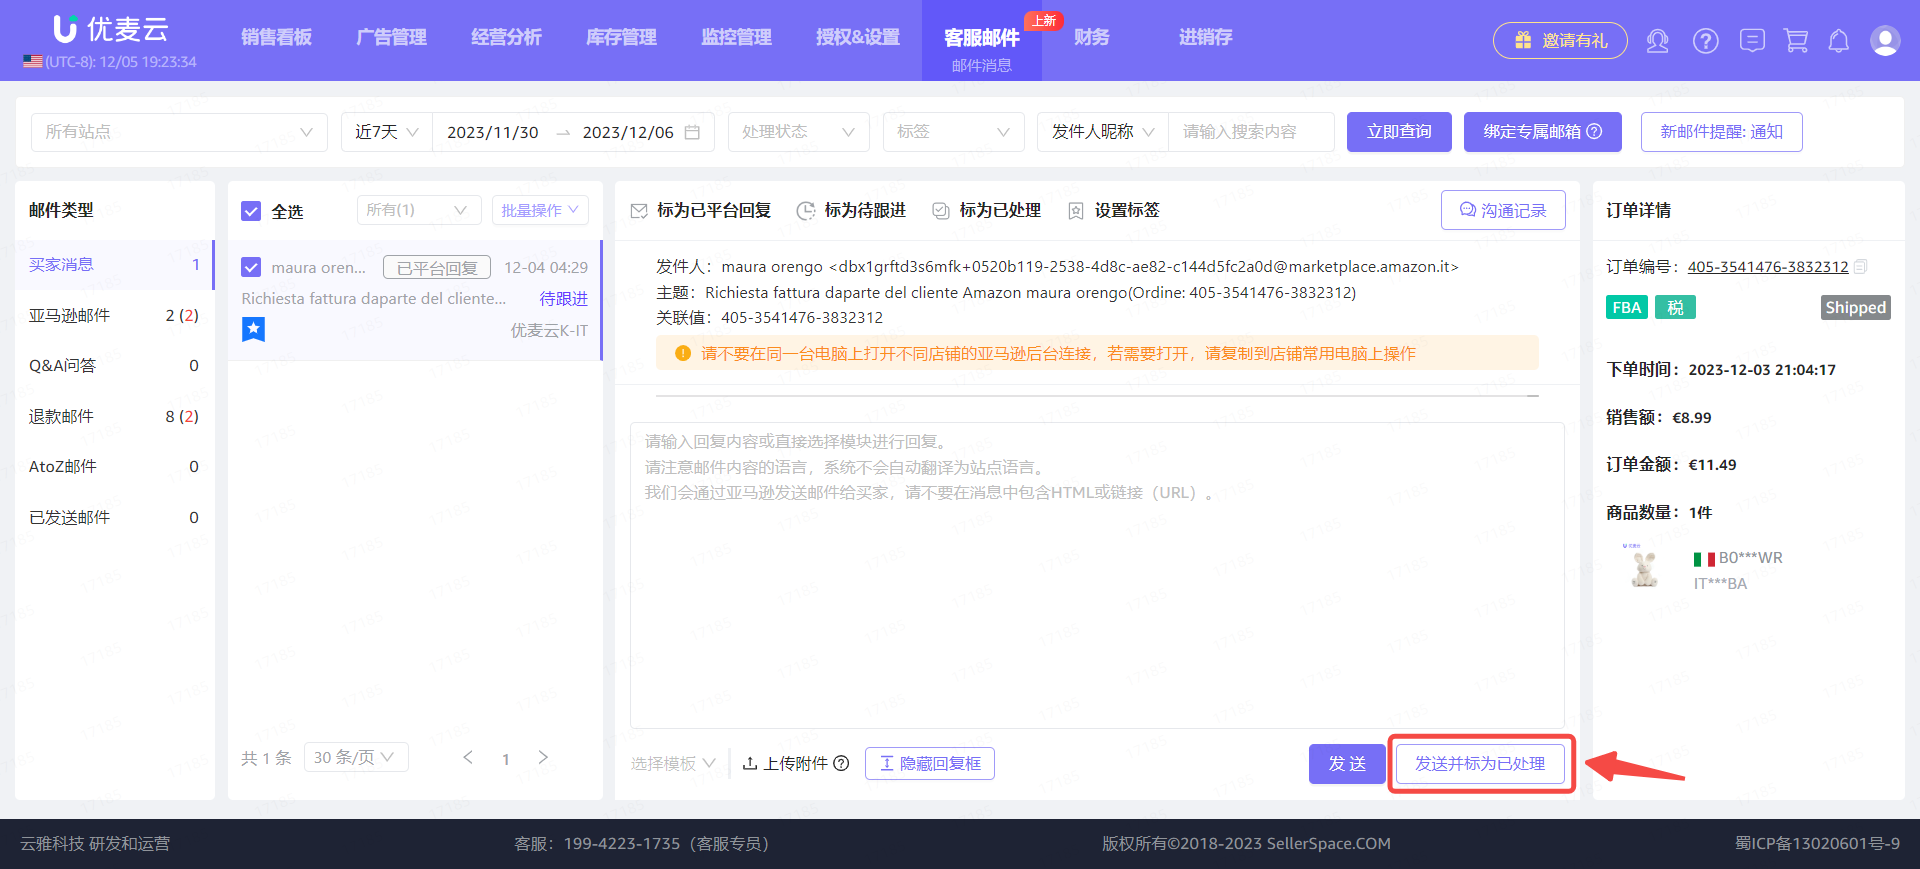
Or when replying to an email, click [Send and Mark as Processed] to mark it directly.
 +
+
Or select the current email, click [Bulk Actions], and select [Mark as Processed] for bulk marking.
 +
+
After marking, the email processing status display on the left will be updated to [Processed].
 +
+
Hover your mouse over the [Processed] status to choose to switch the processing status.
 +
+
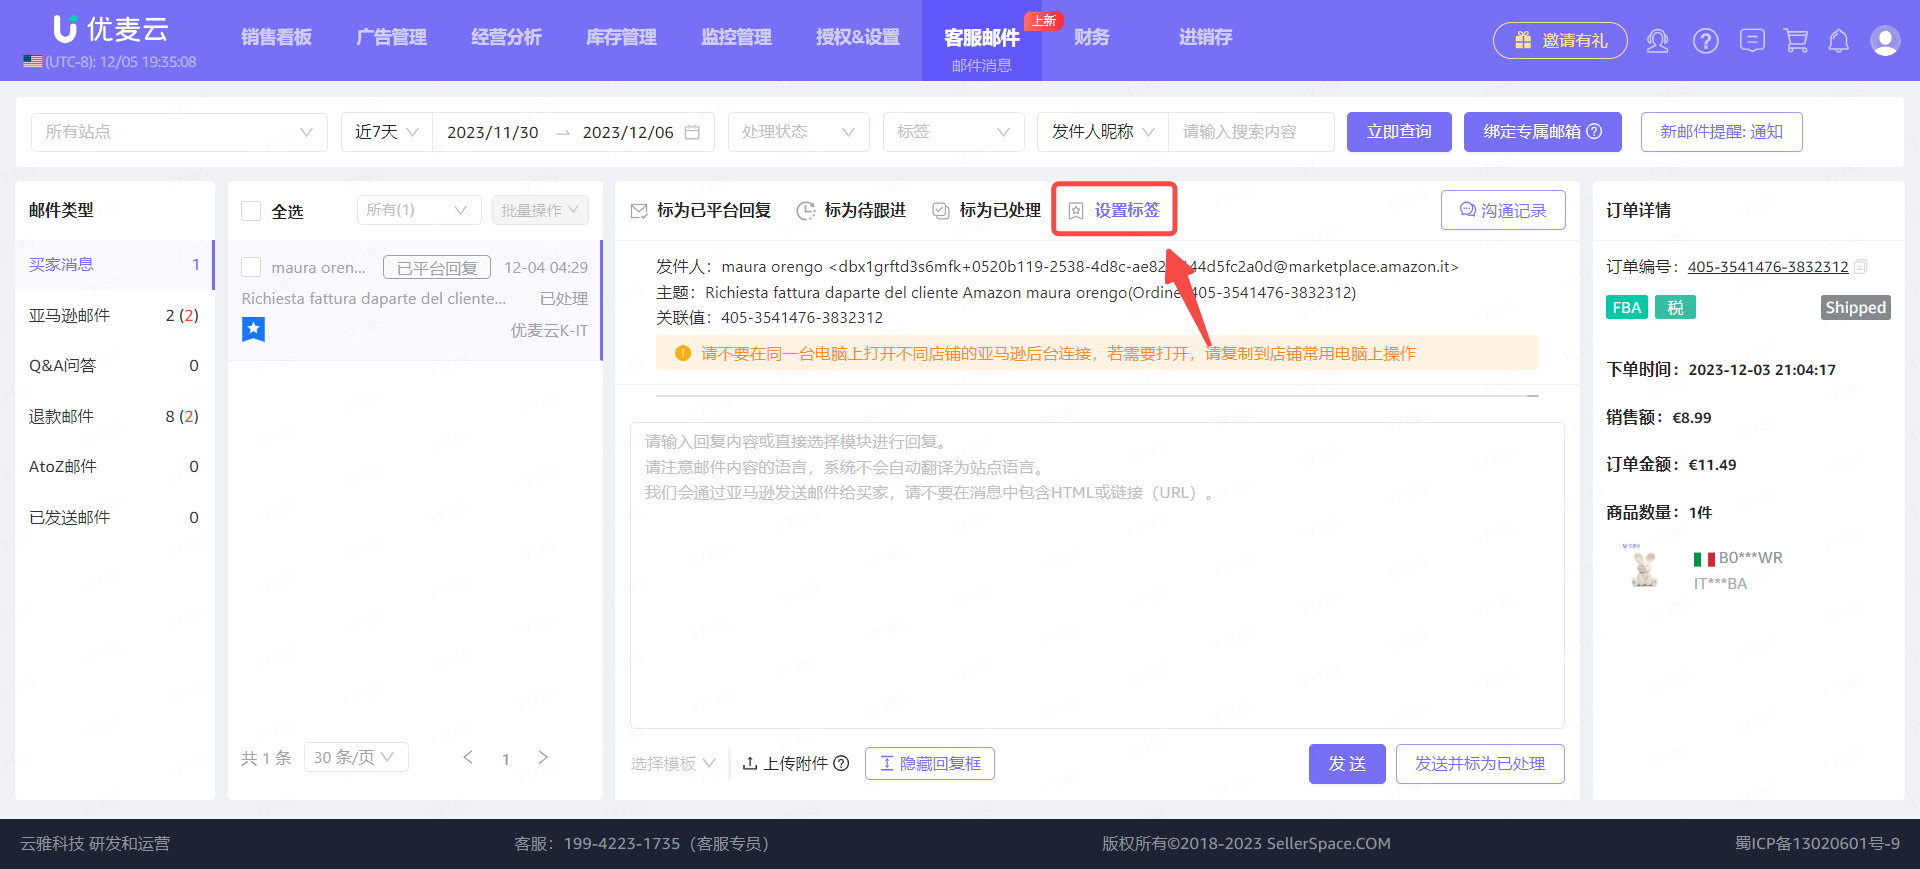
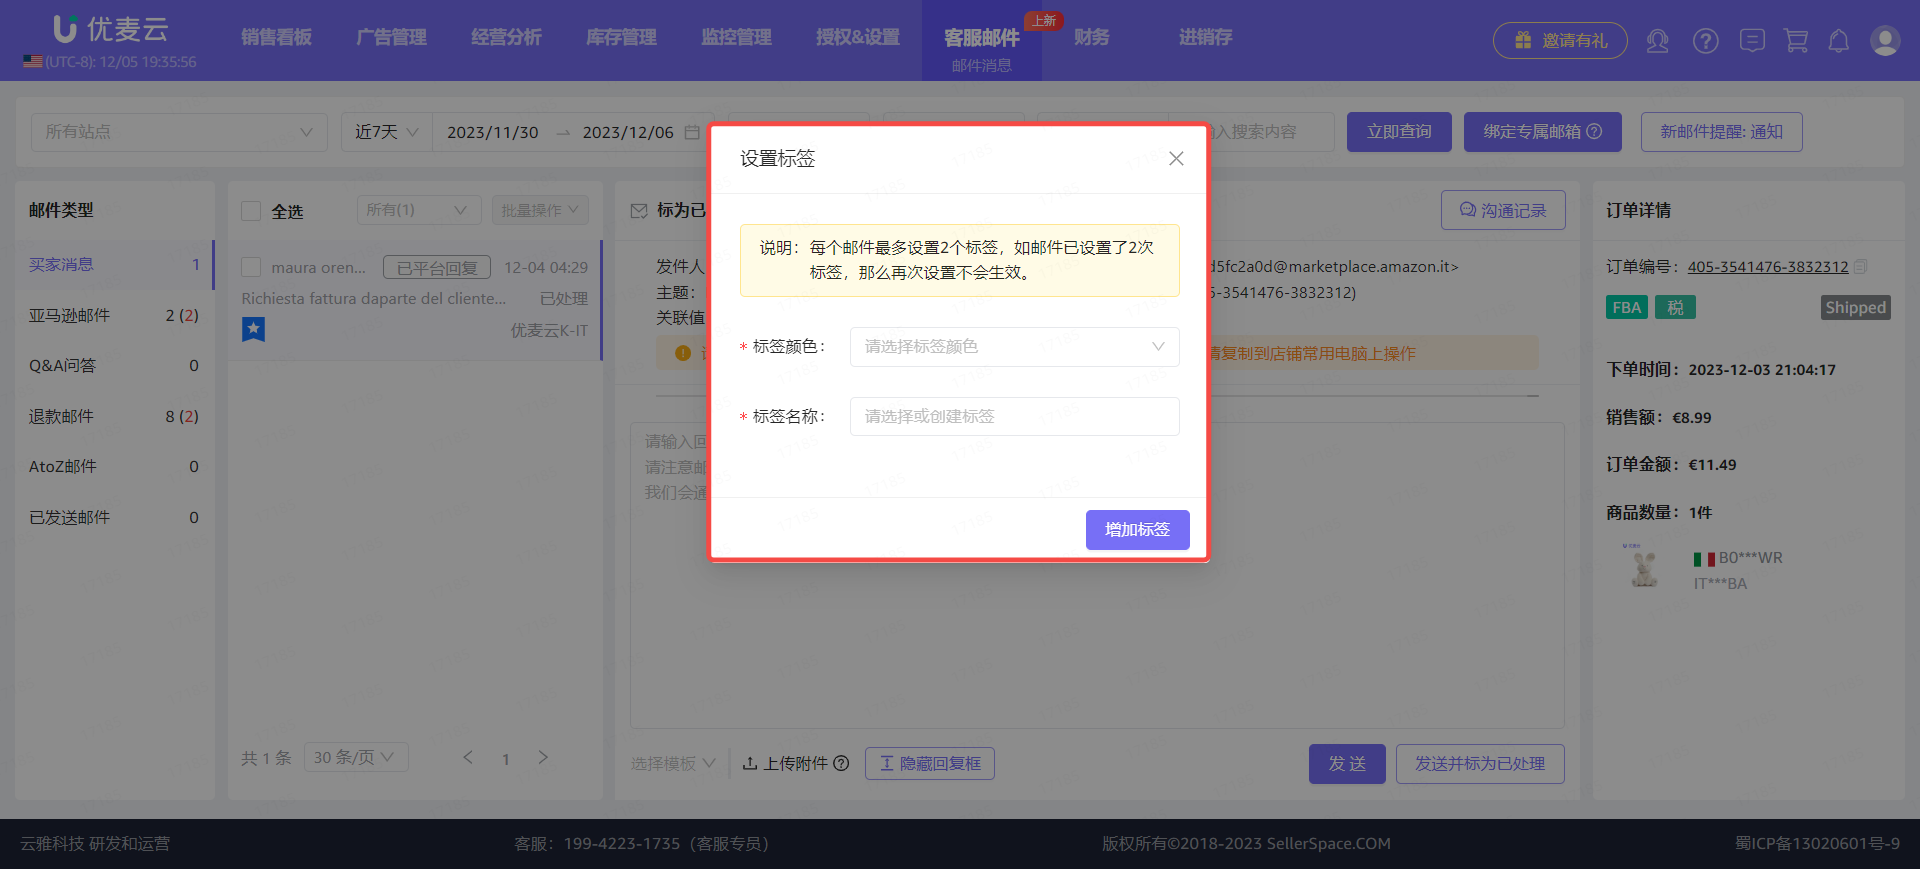
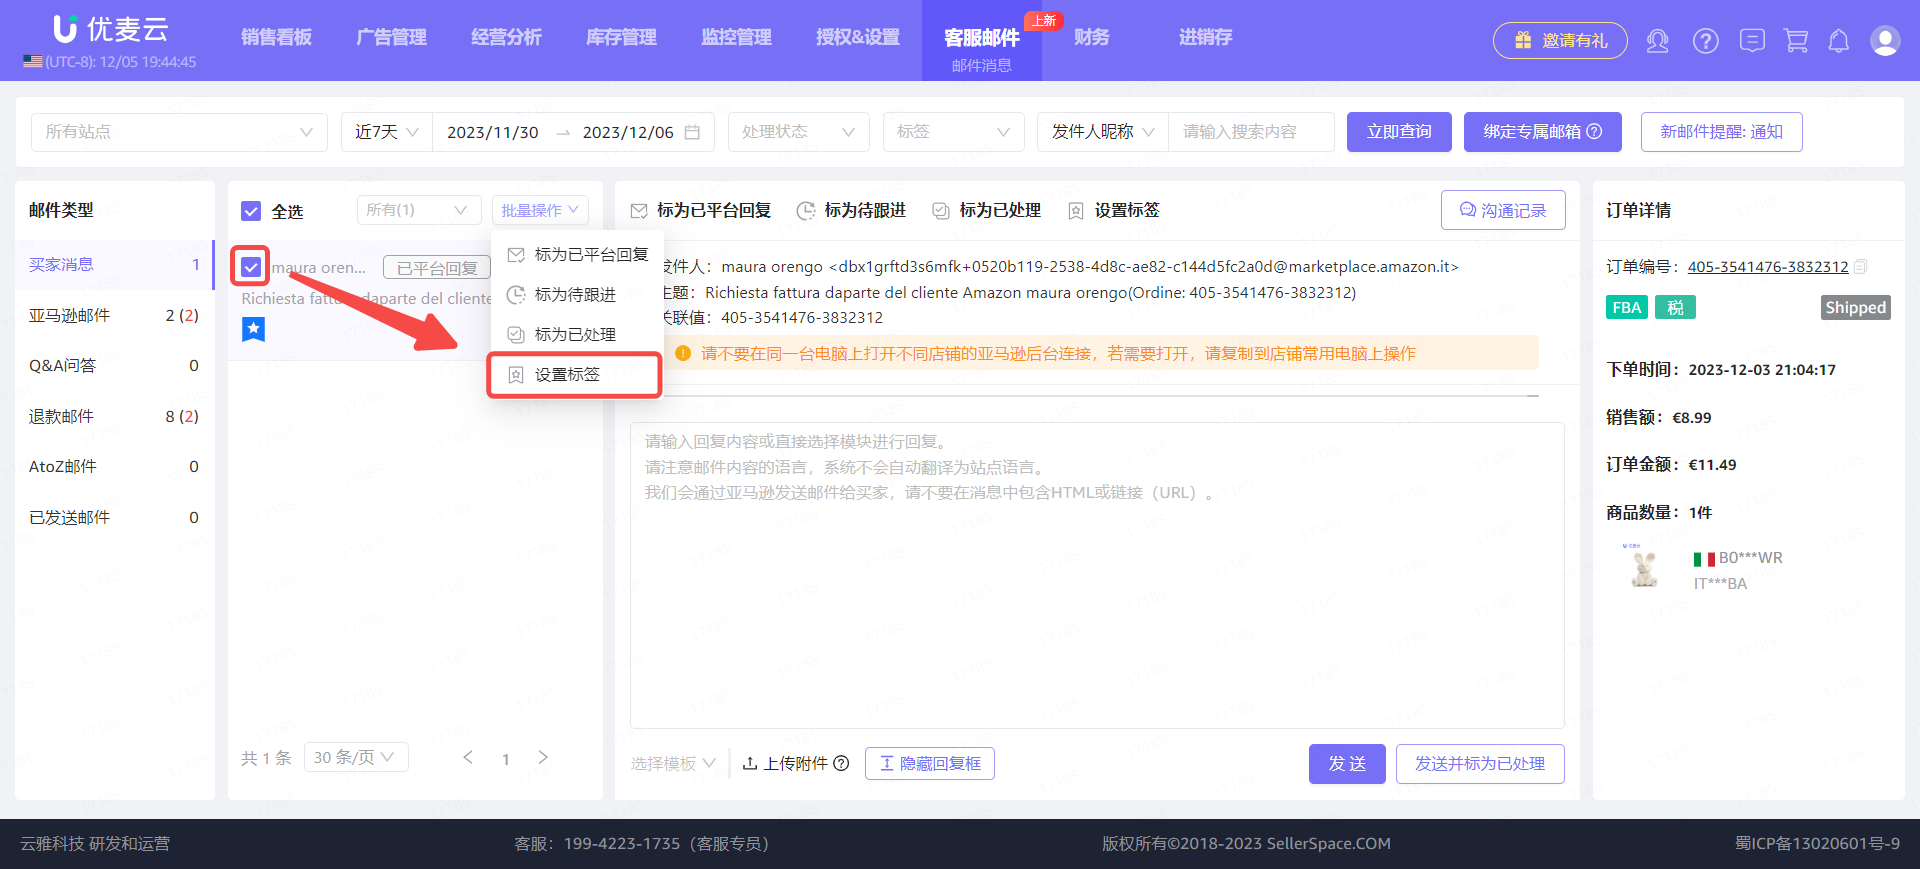
④ Set Tags
In addition to marking the processing status of emails, we can also set different tags for emails. A single email can have up to 2 tags.
There are 3 entry points for setting tags: Email Details Page + Email List Page + Bulk Settings. The setting methods are basically the same.
Email Details Page:
Enter the email details page and click [Set Tags] to enter the settings page.
 +
+
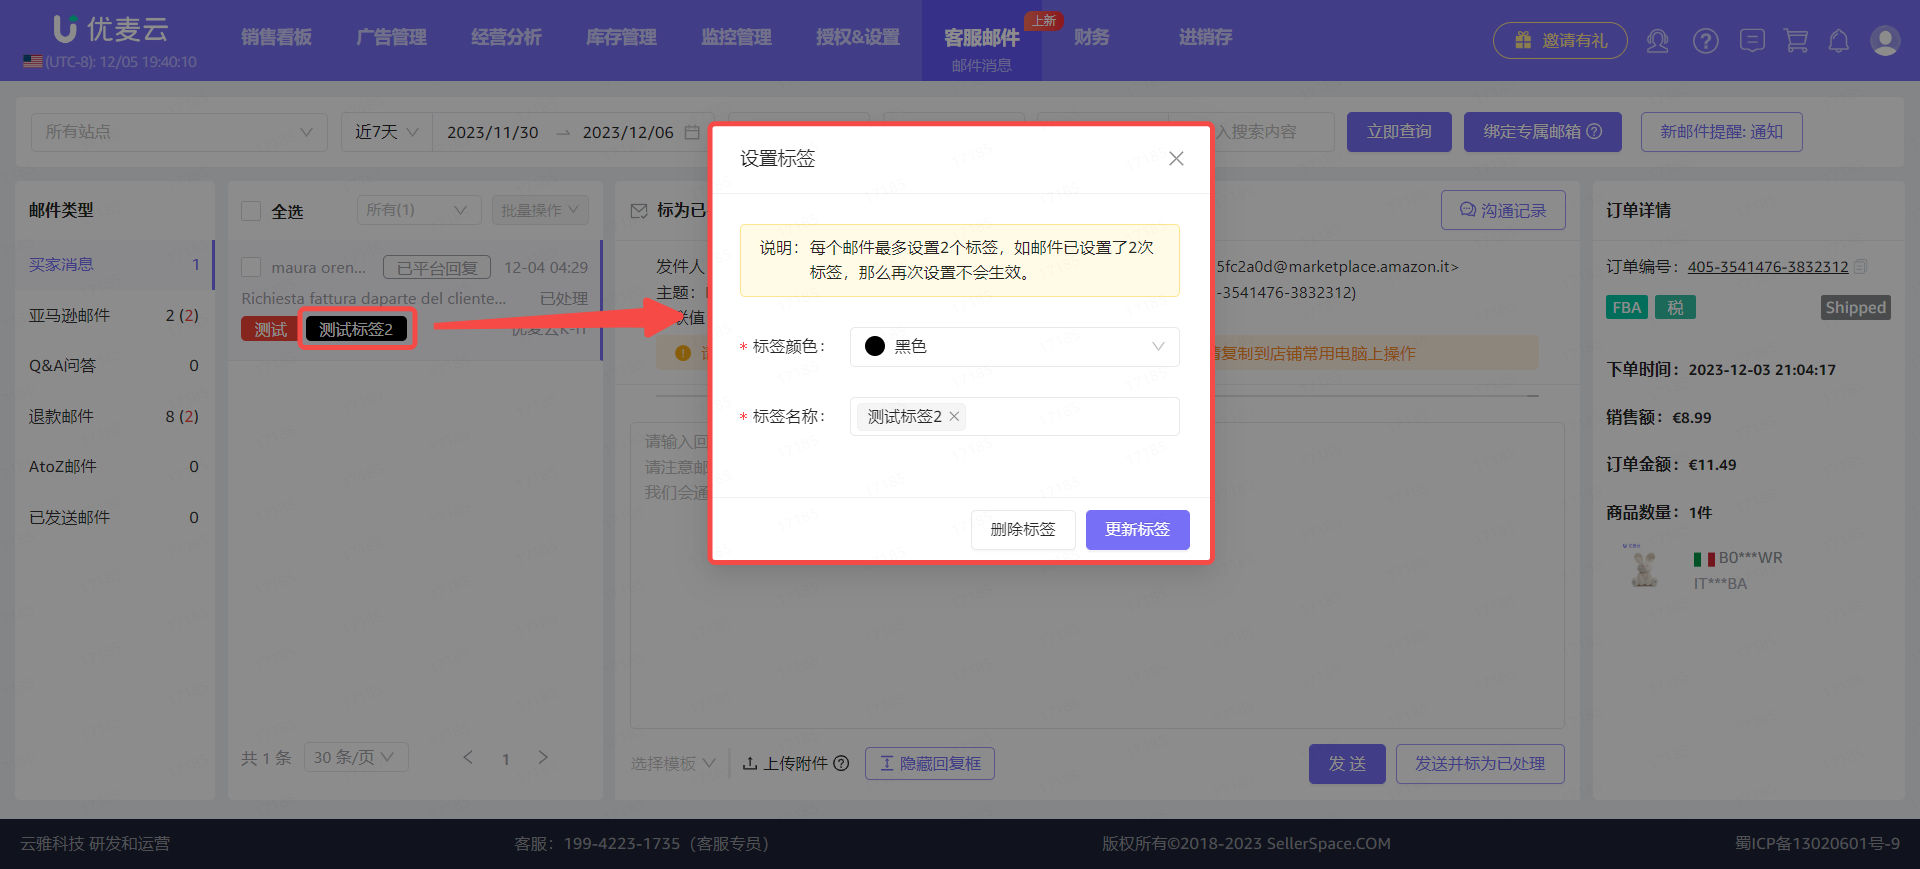
Select the tag color, set the tag name, and click [Add Tag] after confirming that it is correct to complete the setting.
 +
+
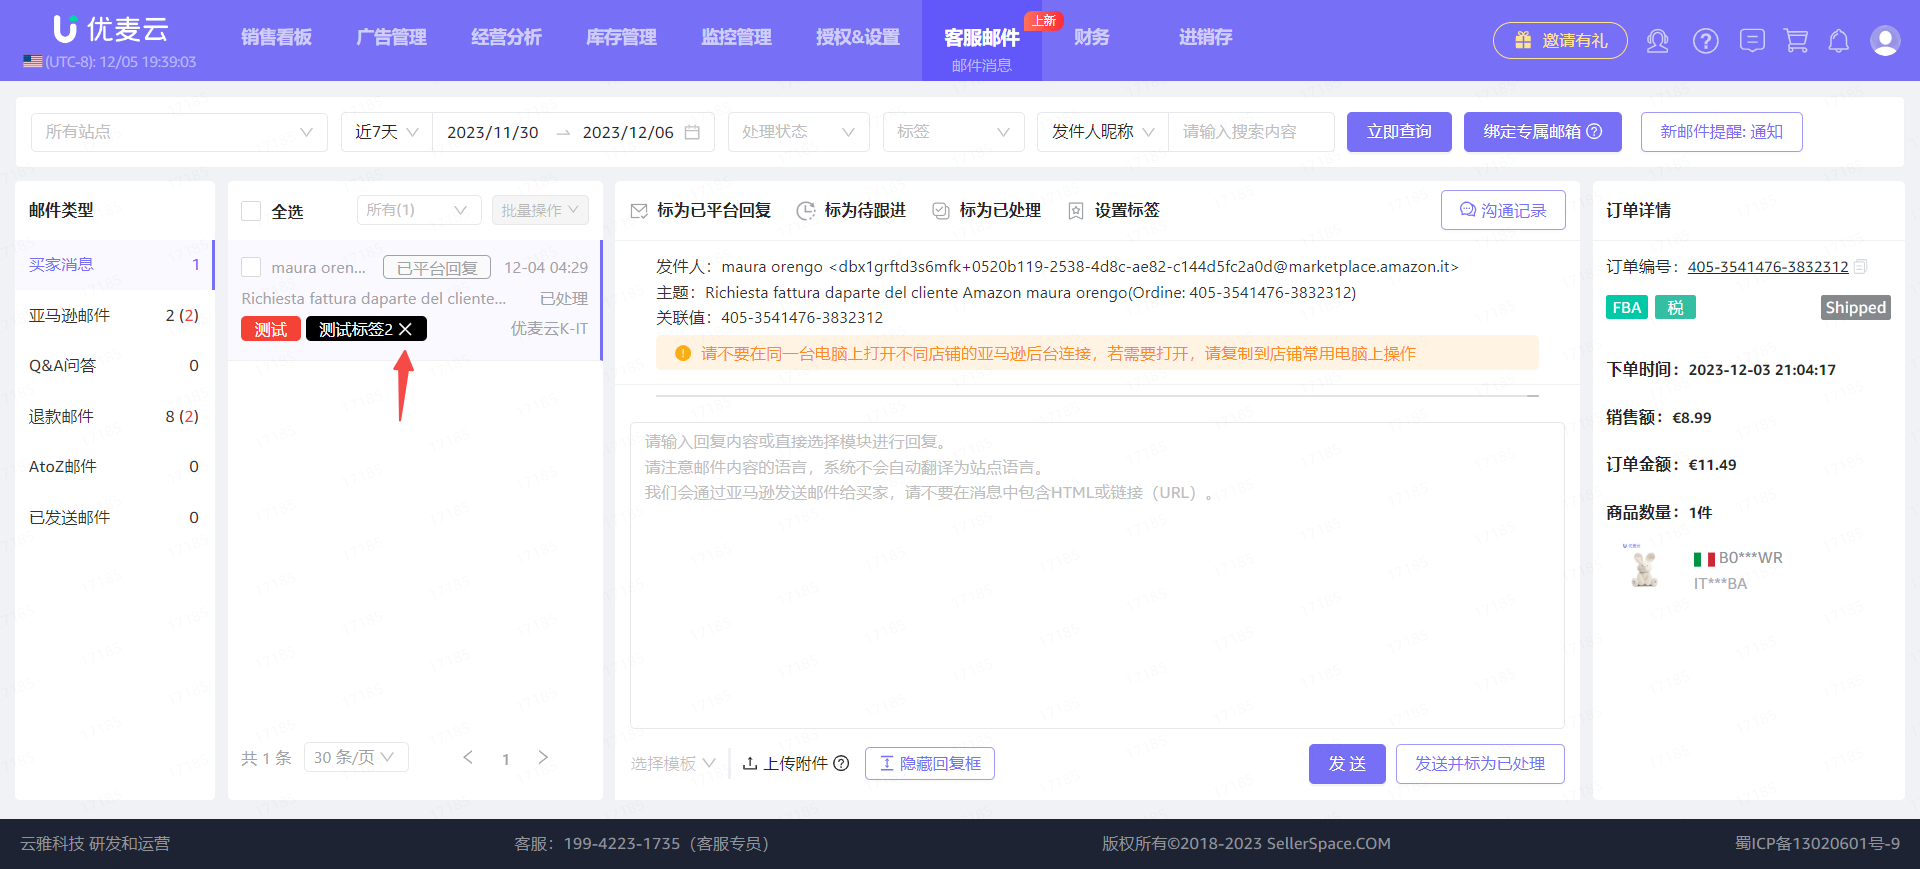
After setting, the tag will be displayed in the corresponding email on the email list page on the left.
 +
+
Hover your mouse over the tag and click [×] to delete the tag with one click.
 +
+
Click the tag name to enter the tag settings page to update the color or name of the tag.
 +
+
Email List Page:
The setting method is basically the same as the operation on the "Email Details Page".
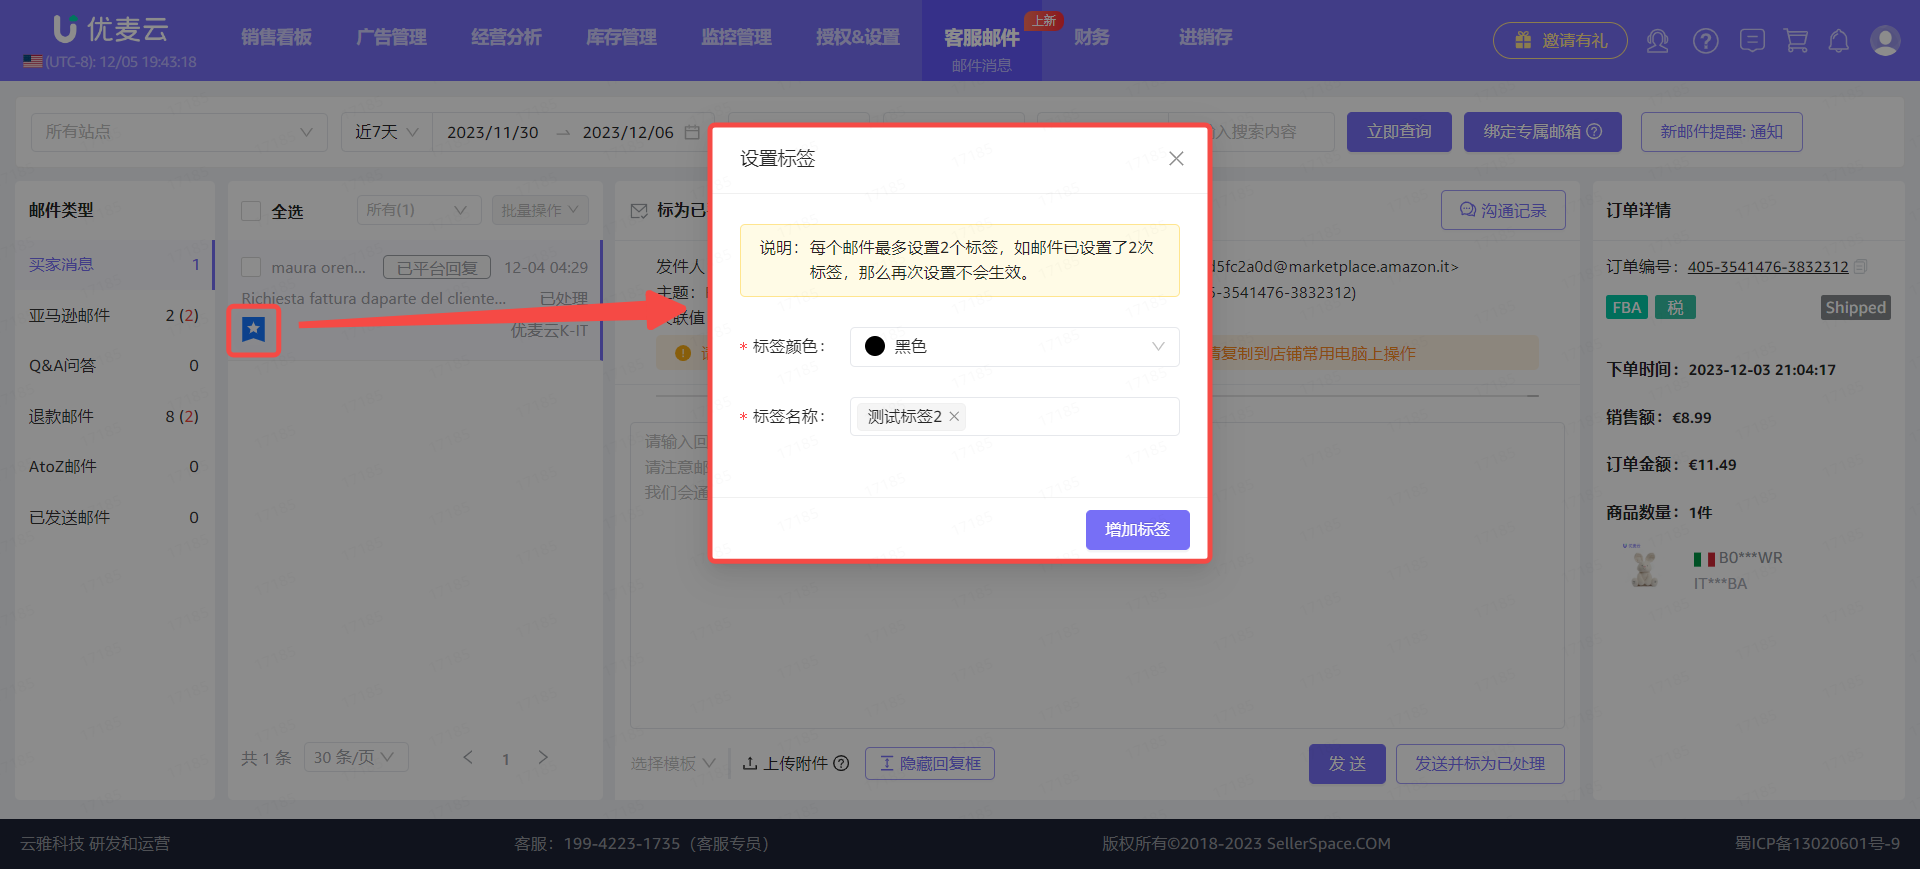
When the setting limit (2 tags) is reached, this operation entry will disappear. It will reappear after deleting a tag, making it convenient to add new tags.
 +
+
Bulk Actions:
Select the corresponding emails, click [Bulk Actions], and select [Set Tags] to set them directly.
The setting operation is basically the same as that on the [Email Details Page].
 +
+